Contrary Springs.
Physics teachers have an arsenal of demonstrations (toys) that illustrate physics principles. Some of my favorites are those that challenge student preconceptions. Through experience with the real world we develop a "naive physics" that satisfies us that we understand how things work. Then when we encounter new and unfamiliar situations we try to apply that understanding to predict the outcome. That's risky, and often it simply doesn't work. That's when the real learning occurs, as we examine why our confidence in our understanding was misplaced.These demonstrations have counter-intuitive or surprising behavior. The apparatus is shown openly, and students are asked to predict what will happen if you do something specific to it. After they have had ample opportunity to think about it and make predictions, the experiment is performed and the outcome is not at all what was expected. This has several educational benefits. It wakes up the students. It convinces them that naive and "common sense" analysis can be wrong. We are not born with a correct understanding of physics. We acquire it through curiosity about the real world, careful observation, detailed analysis, and some hands-on tinkering.
 |
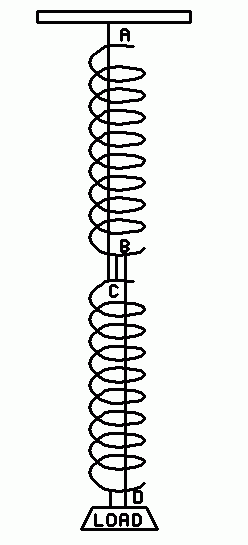
| Fig. 1. Connection of two springs. |
|---|
This little demonstration goes way back in the history of physics pedagogy, and has the virtue of simplicity. Two limp springs are usually used, with a load sufficient to stretch the springs to about twice their original length. The arrangement is shown in Fig. 1.
Make it.
You won't appreciate and understand this clever demonstration until you MAKE one and experience it in action. It won't cost you much in dollars or time. Springs sufficiently limp aren't common in hardware stores, but are readily available as Slinky™ toy springs, either the metal or plastic kind, in several sizes. If you have children, there are probably discarded damaged ones lying around somewhere. You only need two undamaged short sections of about 7 or 8 coils. Or shell out a dollar or two to buy a plastic one. Cut the spring to give you two springs of about 7 coils each, with material left over. (For this project I used the largest plastic spring, 3" in diameter.)Bend half of each of the end coils to provide convenient "handles". This may be done by hand, but don't make the bend in the plastic spring too sharp, or it might break. Bend it around the shaft of a pen or pencil.
First connect the two springs end-to-end with a short length of sewing thread between the lower coil (B) of the top spring and the upper coil of the bottom spring (C). Attach a load at the lower end of the bottom spring (D) heavy enough to stretch the springs about twice their original length. Then attach two other cords as shown, one from A to C and one from B to D, but leave them just a bit slack, so they obviously do not support any of the load. Thread these cords directly up through the springs. These springs are so weak that the load required is only a large S-hook and a large metal nut.
Presentation.
Show the audience that the two cords are slack, supporting no load, and that the short thread is taut, supporting the load as well as the spring below it.Now ask "What will happen if I burn, or cut, that short thread that is the only one supporting the load?" (Emphasize that.) "Will the load drop to a lower level, because we have removed a thread that was supplying the only upward force? Or will the load remain at the same level, because there's still the same two springs supporting it? Or might it be contrary and rise higher?"
Before reading more, reason out your own expectations, first making a quick and dirty guess. Then analyze the situation more carefully and, if necessary, revise your prediction. Now read on.
The thread (BC) may be cut with sharp scissors, or a nail-clipper without compromising the outcome. Have someone hold a hand under the load to "prevent it from dropping too far". (A little deception confounds expectations.)
Many people expect the load will drop to a lower level until the slack cords become taut and support its weight. Of course that doesn't happen, or we wouldn't go to the trouble of doing this, would we?
Test it.
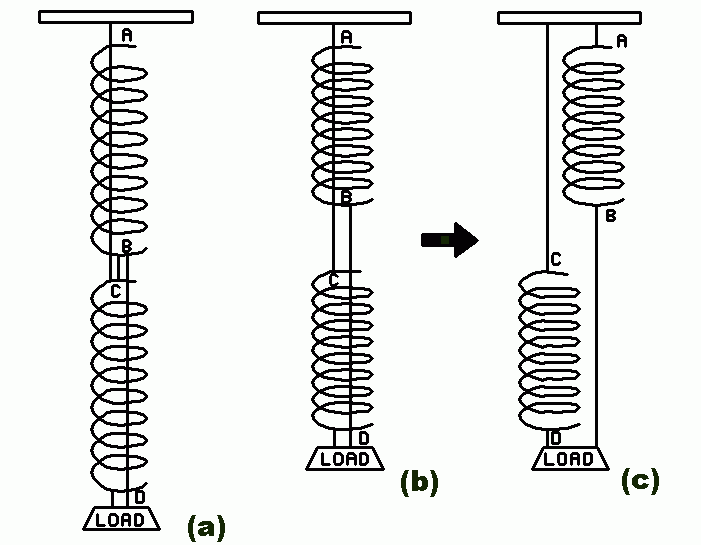
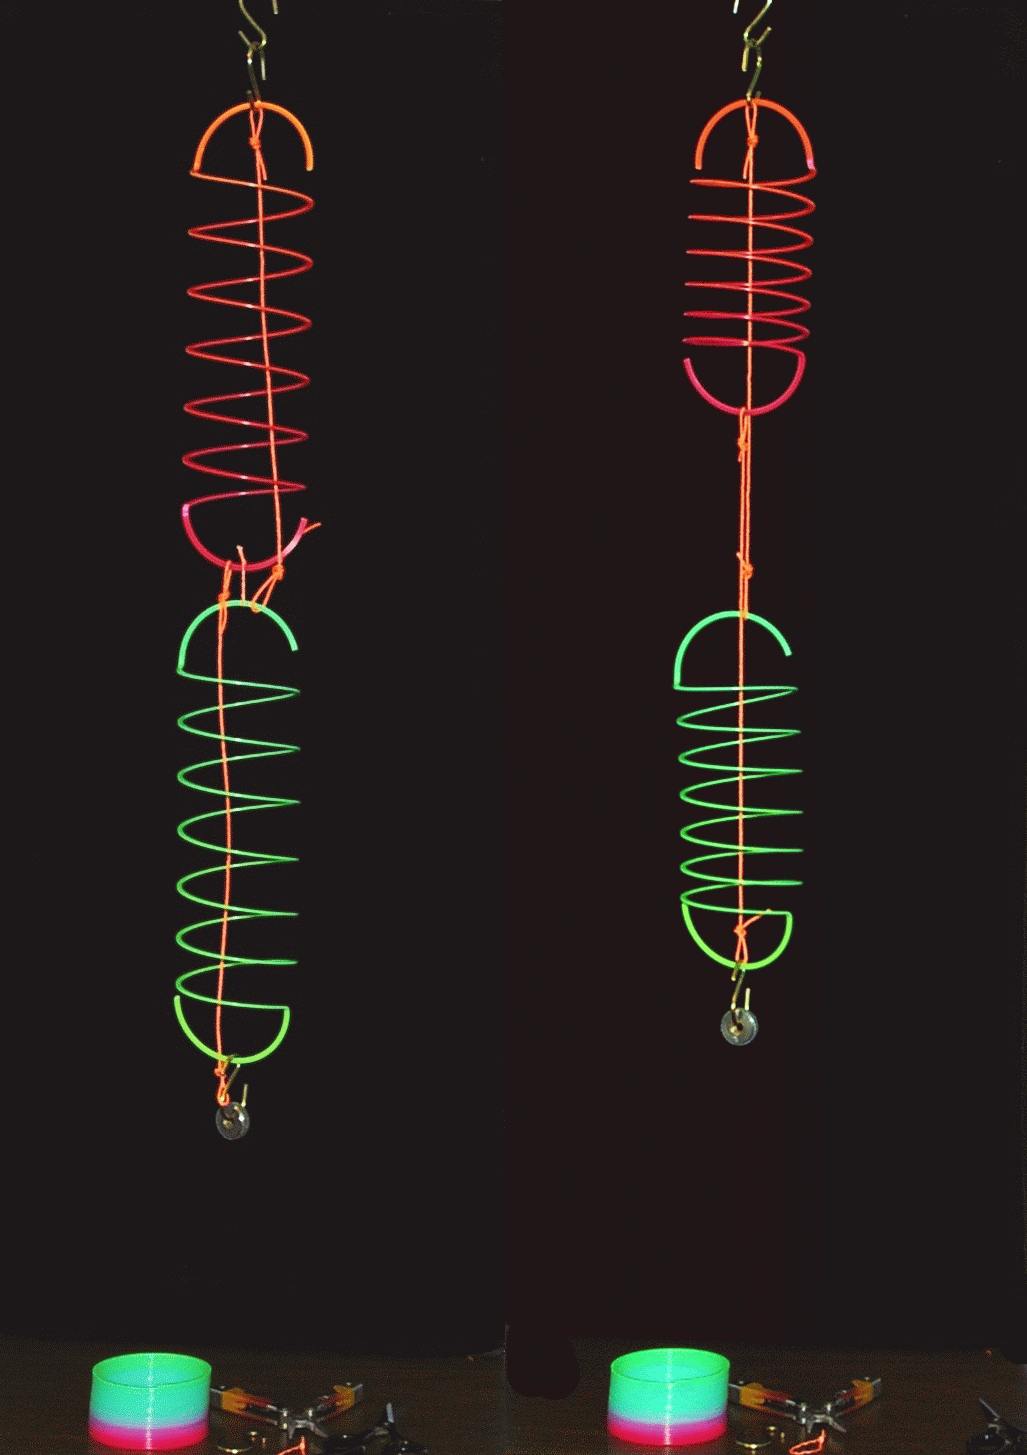
Chances are your prediction was partly right. When the short string is cut, the load may drop slightly, but quickly rise up to a higher position as the two slack cords become taut. How can this be? It results from the fact that the two springs both shorten considerably. This raises coil B and D, while coil C remains at nearly the same height. I have seen websites and even textbooks that show seriously incorrect drawings. See Fig. 3 for the actual results.
 |
| Fig. 2. Comparison of initial and final states. (a) before, (b) after cutting, (c) equivalent situation after cutting. |
|---|
If you are in a hurry, you can make an even simpler version that you can carry in your pocket to amaze your friends. Use thin, weak rubber bands instead of springs, paper clips, and any suitable heavy object to hang from them.
 |
| Fig. 3. Comparison of initial and final states with Slinky™ springs. |
|---|
The reason.
By now you have probably tinkered with this enough to figure out why the result is contrary to naive expectations. We may have expected that no matter how the springs were connected, they would support the weight at the same height no matter how they were connected. But, on more careful consideration you realize that after the thread is severed, the springs that were initially in end to end arrangement (series) end up in a (parallel) arrangement. So is this important?Each spring has a tension equal to the weight it supports. The spring weight, w is small compared to the hanging weight W. In the series case, the lower spring supports the weight W, and the upper spring supports (W + w), which isn't much larger than W.
In the parallel case, each spring supports only half of W. It is the nature of springs (Hooke's law) that the amount of stretch is proportional to the load it supports. F = -kx where F is the spring tension, x is the stretch and k is the spring constant. So now the springs stretch considerably less than they did when in series. Remember, stretch is the change in the spring length.
So long as springs aren't stretched beyond their elastic limit, Hooke's law applies rather well. It applies less well to rubber bands, but still, in this experiment, the result is qualitatively the same—the bands shorten and the weight rises.
Physics teachers might consider using old-fashioned spring balances for this demo instead of simple springs. I don't recommend that. Such balances are readily available, but you'd need ones intended for very light loads. If spring balances are used, students are more likely to make the correct prediction. Why? Psychology. The spring balances are familiar to students, and they focus attention on the tension that they measure. One is less likely to consider the tension, or even Hooke's law, if simple springs or rubber bands are used. Besides, one of the themes of these "Toys, Tricks and Teasers" projects is to use readily available common materials in projects you can easily MAKE for yourself.
Questions to test understanding.
Why is the top (orange) spring longer than the bottom (green) one initially? Why are the two springs nearly the same length after the thread is cut? Why does the coil at point C remain at the same height after the thread is cut?
Answers.
Both springs shorten after the thread is cut. If the springs are the same length and have the same spring constant, they will each support half the load after the thread is cut, and therefore will stretch the same amount. Coil C remains at nearly the same height because the upper cord prevents it from lowering.
[END]
1,337 Words. May 17, 2012.