L-7 SPECTROMETER
 |
| Spectrum of white light. |
|---|
1. PURPOSE:
(1) To learn the use of a prism spectrometer.
(2) To accurately determine the index of refraction of a glass prism for light of wavelength 5461 Ångstrom (the green line of the Mercury spectrum).
(3) To plot a dispersion curve for the glass prism, and use the curve for the identification of unknown wavelengths.
2. APPARATUS:
- Gaertner-Peck Spectrometer.
- Gauss ocular and illuminator.
- Equilateral glass prism, or right angle prism.
- Spectrum tube power supply.
- Spectrum tubes (Geissler tubes): Mercury, Helium, Argon, etc.
- Desk lamp, or other low intensity white light source.
- Holder for the prism table.
3. NOTES ON THE EQUIPMENT:
PRECAUTIONS: This spectrometer is a precision instrument and deserves careful handling.
(1) In general, do not force anything. If something does not move freely, you may have forgotten to loosen a clamping screw.
(2) Screws need only be tightened enough to hold the parts from moving. Never exert great force on a clamping screw, for this can permanently dent the main shaft, rendering the entire instrument unsuitable for precision work.
(3) If the spectrometer must be carried, carry it like a baby, with one hand underneath supporting the weight, and the other hand at the collimator base, steadying it.
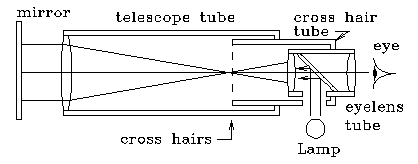
The Gauss Ocular: The spectrometer telescope (T in Fig 3.) contains a Gauss ocular (eye-lens) which may be used as a self-collimator in several parts of the experiment. This ocular has a partially silvered mirror at a 45° angle to the optical axis, as shown in Fig. 1. By rotating the ocular tube, a hole in its side may be lined up with a hole in the crosshair tube, allowing light to be admitted to the mirror through these holes.
A special illuminator may be attached directly to the ocular tube (O) directly (at O), and positioned for best illumination with two set screws. The light from this illuminator is reflected back from the crosshairs, the rest continues to the objective lens L1 and out of the telescope, as shown in Fig. 1.
A plane reflecting surface may be placed in this emergent beam, to reflect it back into the telescope, past the crosshairs again, and back to the mirror. Since the mirror is only partially silvered, much of this light passes through the mirror and to the eye.
When everything is aligned, you'll see two images of the crosshairs as you look into the ocular (O). One image is the usual one, formed by light which travels from the crosshairs through the ocular to the eye. The other is formed by light which traveled the other direction to the objective lens, to the reflecting surface, back through objective, eyelens, and then to the eye.
If the crosshairs are exactly at the focal plane of the objective lens, the reflected image of them also lies in this plane, and the two images are seen equally distinctly, with no parallax between them. This is the condition we wish to achieve, for then the telescope is collimated (focused for infinitely distant objects).
If the reflected crosshair image lies in a plane even a small distance displaced in front of or behind the crosshair plane, it will be so out of focus that you probably won't even see it. Sometimes it is helpful to initially focus the telescope for infinity by pointing it out the window or across the room. Then when the Gauss ocular method is used, you are almost certain to see both images.
When searching for the reflected image, look first for the circle of light formed by the illuminated objective lens. This is a bright circle of approximately the same size as the telescope's field of view. Match this circle to the telescope's field approximately, then search for the crosshairs by moving the crosshair tube.
Sometimes you see extra images of the crosshairs. These are formed by rays reflected from the back surface of the 45° mirror. These spurious images always move together when the plane reflecting surface is tilted. So simply choose the most distinct, or brightest one of these.
 |
| Fig. 1 Telescope with Gauss eyepiece autocolimator. |
|---|
Crosshairs: Some spectrometers have crosshairs tilted at 45° to the vertical. These are the easiest to use. Make all measurements at the bottom of the "V" formed by the upper edges of the crosshairs. See Fig. 2.
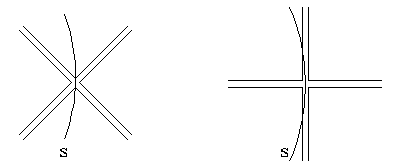 |
| Fig 2. Two arrangements of crosshairs. When one crosshair is vertical, as at the right, it is harder to determine the location of the spectral line, s. |
|---|
Some spectrometer eyelenses have vertical and horizontal crosshairs. This is a nuisance, because the vertical crosshair obscures part of the spectral line you are observing. Use the exact center of the cross hairs as the position reference for all measurements.
Spectrum tube power supply: The gas-filled spectrum tubes (Geissler tubes) require a high potential, up to 25,000 volts. Some of these require a variable resistor (a tubular rheostat of size 3 to 4 thousand ohms) to the two leads which extend from this power supply. The resistor is then in series with the spectrum tube, and controls the current. Connect the rheostat to these leads, using the two terminals at the same end of the rheostat. Certain other brands of power supply do not have this feature.
CAUTION: The spectrum tubes are fragile and relatively expensive. Be especially careful when removing them from the cardboard storage tubes, for there is a fragile glass protrusion from the side of each.
CAUTION: The spectrum tubes are not intended for continuous operation. Their manufacturer recommends that for longest life they be operated only for 30 seconds followed by a similar cooling period. The spectrum tubes can get hot, especially at their narrow neck. Avoid touching the glass with your fingers.
CAUTION: Do not touch the high voltage electrodes of the spectrum tube power supply. Though the voltage is high, the current is low, and won't kill you. But it won't feel good if you should accidentally touch exposed parts of the circuitry. Turn off or unplug the power supply when you must change or adjust the spectrum tubes.
NOTE: The rheostat (adjustable resistor) is used to control the brightness of the spectrum tube. Since the useful life of the tube is shortened by operation at full brightness, keep the brightness low during the experiment. If the lines are bright enough to see clearly that is all that is necessary. Making them brighter also broadens the lines and decreases the accuracy in determining their position.
You may need to place the spectrometer on a raised platform to be able to aim the collimator directly at the bright, narrow central neck of the spectrum tube.
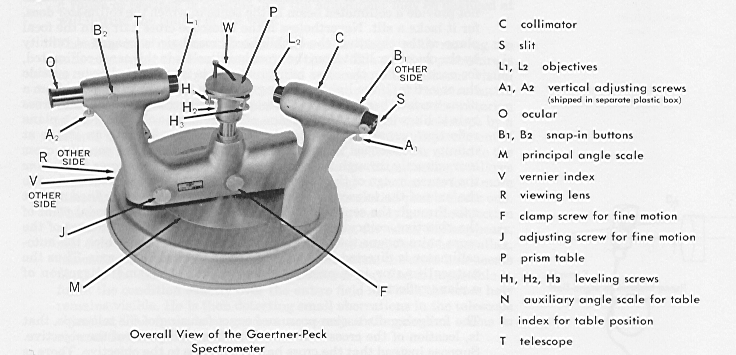 |
| Fig 3. The Gaertner-Peck spectrometer. |
|---|
4. PROCEDURE:
(1) CHECK THE COLLIMATION OF THE TELESCOPE.
A telescope is said to be collimated when its crosshairs lie in the focal plane of the objective lens. When the telescope is collimated, a bundle of parallel rays entering the objective will be converged to a point in the plane of the crosshairs.
a) Allow light to enter the telescope slit (S), perhaps from a desk lamp, so that you can look in the eyelens (O) and see the crosshairs distinctly.
b) In the next step do not push the eyelens forcibly into the crosshair tube (C), for this can alter the crosshair adjustment already made by the instructor.
c) Adjust the ocular (O) for comfortable viewing by pulling it gently in or out of its tube until you see the crosshairs distinctly. You won't need to change this setting thereafter. (However, if other observers use the instrument, they may need to reset this for their eyes. They may freely do so without in any way affecting the accuracy of the measurements, so long as the crosshair tube (C) is not moved in the process.)
d) Be sure that the Gauss ocular illuminator is attached to the crosshair tube (C). Plug its power converter module into an AC power outlet.
e) Now check the collimator by the Gauss ocular self-collimation procedure, as shown in Fig. 1. The face of a prism on the prism table serves as a "mirror" to reflect the light back into the collimator. Rotate the prism table until you see the reflected crosshair image. Move your eye sideways to check for parallax between these images. If you see parallax, consult your instructor who will assist you in removing it. (The adjustment is delicate, and requires a jeweler's screwdriver.)
(2) CHECK THE COLLIMATOR AND SLIT.
Now that the telescope is "focused" for parallel (collimated) light rays, you must now adjust the collimator so that it produces a bundle of parallel rays.
a) Loosen the prism table set screw (F) and carefully lift the prism table (P) from its shaft. Store the prism table temporarily in an upright position in the holder provided.
b) Put a light source behind the slit (S) of the collimator (a desk lamp will do). Open the slit rather wide, using screw A1 at the side of the slit assembly.
c) Loosen the telescope clamping screw (J) and line up the telescope and collimator. Look into the telescope (T) ocular (O) and try to find the image of the slit (a vertically oriented, narrow rectangle).
c) Check for parallax between the slit image and the crosshairs. If there is parallax, consult the instructor, who will re-adjust the crosshair position.
d) While looking at the slit image, turn the slit adjustment screw A1 so that the slit image becomes narrower. The slit jaws on this instrument are spring-loaded so that they cannot be "jammed" together. Continue to close the slit jaws until the image becomes very narrow, just a thin line. Notice that if the jaws are closed "too much" the image becomes a bit wider and slightly indistinct. This is caused by diffraction. There's an optimum slit width which produces the narrowest image.
 |
| Fig 4 Alignment of crosshair image. |
|---|
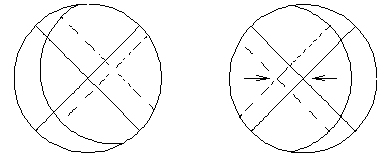
Fig. 4 illustrates the method for using the autocolimator for leveling the telescope. The reflected image of the crosshairs is shown with dotted lines. In the left diagram the intersections are at different height, indicating that the spectrometer is not properly leveled. [The lateral (left-right) displacement is not important.] The right diagram shows the intersections at the same height (at the arrows). If the crosshairs and their image are at the same height for all possible positions of prism table and collimator, the spectrometer is properly leveled.
(3) LEVELING THE PRISM TABLE AND TELESCOPE.
To measure deviations of spectral lines accurately, you must first make sure that both the telescope and the collimator axes lie in the same plane, perpendicular to the rotation axis of the prism. The prism faces must be perpendicular to this plane (that is, they must be parallel to the rotation axis of the prism). These conditions must be maintained for any rotational position of the prism table, and any angular setting of the telescope. The self-collimator allows us to achieve these conditions accurately.
If any of these conditions are not met, the misalignment will show up as a vertical displacement between the crosshairs and their reflected image. Fig. 4 shows proper and improper alignment.
 |
| Fig 5. Step A. |
|---|
The leveling of the telescope interacts with the leveling of the prism table. Unless you follow a systematic procedure, you could drive yourself to distraction, for an adjustment which improves one variable may mis-align the other.
IMPORTANT: Each time you rotate the prism table to a new position, first loosen its set screw. Then gently tighten the set screw before making any visual adjustments. This eliminates any effects due to "play" (wobble) of the prism table on its shaft.
In the procedure described below, the prism leveling screws H1, H2 and H3 are labeled A, B, and C. The procedure requires you to locate the prism on the table with respect to these screws exactly as shown in the diagrams to the right. It may help if you use some self-stick labels to mark the screws temporarily, but be sure to remove them when you are finished.
 |
| Fig 6 Step B. |
|---|
(A) Place the prism on the prism table as shown in Fig. 5, with one of its smooth faces parallel to the line joining two leveling screws. Look at the reflected image from this face. Bring the crosshairs into vertical alignment with the telescope screw, the prism screw (A), or both.
(B) Rotate the prism 180 on the table, then rotate the table 180. It should now look like Fig. 6. View the reflected image from the same face as before (that face is still parallel to the same two leveling screws). Bring the crosshairs halfway into alignment with the telescope screw, then the rest of the way with the same prism table screw as before (screw A).
(C) If you estimated "halfway" exactly in step B, the telescope is now perpendicular to the shaft axis. It is a good idea to return to step A to check this, and repeat steps A and B if necessary.
 |
| Fig 7. Step D. |
|---|
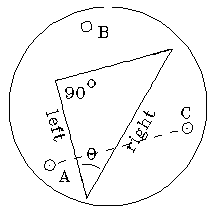
(D) Relocate the prism as shown in Fig. 7. The prism faces are perpendicular to the lines joining the leveling screws. Two faces have been labeled "left" and "right" to facilitate discussion. The left face is to your left as you carry out steps E and F. The left face is perpendicular to a line drawn from A to C. The right face is perpendicular to a line drawn from B to C. Note the location of the frosted face nearest the prism clamp.
(E) Look at the reflected image from the left face. Bring the crosshair images into vertical alignment with the prism table screw nearest to you and to your right (screw A).
(F) Look at the reflected image from the right face. Bring the crosshair images into alignment with the prism table screw to the rear and to your right (screw B).
Note 1: In principle these last two steps may be done in either of two ways (1) Leave the prism table fixed, and swing the telescope from left to right face. (2) Leave the telescope fixed and rotate the prism table to bring the faces into position. These will give the same results provided the spectrometer's central shaft if perfectly straight and the prism table has an accurately reproducible alignment on that shaft (no wobble or play). Obviously the prism table clamping screw should be tightened before any other adjustment is made, and loosened before any rotation of the prism table.
 |
| Fig 8. Right angle prism placement. |
|---|
Note 2: If you have a right angle prism, pick the acute angle you intend to use later as a refracting angle. Mentally label that angle's adjacent faces "left" and "right." Place the prism on the table with its left face perpendicular to the line joining screws A and C. This ensures that adjustment of screw B in step E will not mis-align the left face adjusted in step D.
(4) COLLIMATOR LEVELING AND SLIT ADJUSTMENT.
Finally, you must attend to the vertical tilt adjustment of the collimator. Remove the prism table (P) and set it in its holder. Do this very carefully, so that you won't disturb the prism table leveling you have achieved. Line up the telescope tube (T) and collimator tube (C). Now adjust the collimator leveling screw A1, moving the slit image up and down until the crosshairs are centered on the slit image.
Unplug the illuminator from the power outlet. You will not need it for the remainder of the experiment, but leave it in place on the spectrometer.
 |
| Fig. 9. Measuring the prism angle. |
|---|
(5) PRISM ANGLE.
When the prism is being used to view a spectrum, the light passes through only two of its faces. You must find the angle between these faces (the refracting angle). This angle is measured as follows:
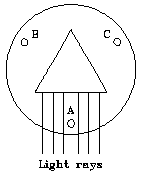
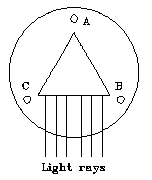
Illuminate the slit with white light and widen it a bit. Carefully replace the prism table on the spectrometer. Locate the prism in such a position that the vertex of the refracting angle is toward the collimator. The prism should be placed off-center on the table, as shown, so that the reflected beams will not miss the telescope.
The prism must remain in fixed position for both readings.
Measure the angular position of the telescope for the two reflected beams (positions 1 and 2). Find the difference angle, B, between them. Derive the equation for prism angle A from the angle B. Measure the other two prism angles, and check the accuracy by how closely they add to 180°. (1)
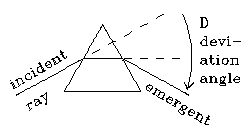
(5) MINIMUM DEVIATION.
The mercury green (2) line has a well-established wavelength of 5461 Å, so we will use it to measure the index of refraction of the prism glass at this wavelength by use of the formula:
 |
| Fig. 10 Deviation angle of a prism. |
|---|
n = sin[(A+D)/2]/sin(A/2)
where A is the prism angle, and D is the angle of minimum deviation.
Be sure the shaft collar on the prism table is tightened (gently) with the prism at the correct height. Loosen and remove the entire prism table. Sight straight through the telescope into the collimator at the slit, and read the position on scale M for this "zero" setting. This "zero" value will then be used to correct subsequent readings to obtain true deviation angles.
Carefully replace the prism table, but leave it free to rotate. Locate the prism off-center on the table with its frosted side near the edge of the prism table. Carefully position the narrow neck of the mercury spectrum tube close to the slit of the collimator. Rotate the prism and telescope until you see the spectrum. Find the 5461 green line, and follow it with the telescope while you slowly rotate the prism table. If rotating the prism increases the angle of deviation, you are rotating it in the wrong direction. Rotate the prism in such a direction that the angle of deviation decreases. A point will be reached at which the spectral lines viewed in the telescope will slow their motion to a stop and reverse their motion, even though the prism table motion doesn't reverse. This is the minimum deviation angle. After having found this angle approximately, find the position of the telescope for which the reversal point of the green line occurs exactly at the crosshair intersection. Tighten the prism table clamping screw and do not change the prism position from now on. Read the spectrometer scale; the telescope and prism are now located to give the minimum deviation angle for the mercury green line.
5. ANALYSIS:
Calculate the index of refraction for wavelength of the mercury green line, and compare with tabulated values. What kind of glass was used in your prism?
6. PROCEDURE:
(1) With the prism table still set at the position which gives minimum deviation for the mercury green line, move the telescope successively to the other mercury spectrum lines and measure their angles of deviation. (These will not be minimum deviation angles.) Plot this data on a graph of deviation angle vs. wavelength. This curve may be used as a calibration curve to determine unknown wavelengths. We are taking mercury as our wavelength standard.
(2) Now use the spectrometer to measure deviations (both right and left) of lines from some other spectral source. Use your experimental calibration curve to determine their wavelengths.
(3) [Instructor's option.] Your instructor may want to you to plot a different curve, a graph of index of refraction as a function of wavelength. To do this, you must reset the position for minimum deviation for each spectral line. [This graph could also be used as the calibration curve in part (2), but requires more work to obtain and plot the data.]
(4) An interesting exercise is to investigate the dependence of deviation angle on prism position. Unfortunately most spectrometers do not have an angle scale on the prism table. You can, however, measure the position of the prism by using the Gauss ocular, by finding the reflected image from a prism face. Use this trick to obtain a graph of deviation of angle of the mercury green line as a function of prism angle on either side of the minimum deviation position. You will expect to get a curve with a well-defined minimum, but this exercise will also allow you to find its particular shape, and to learn how sensitive the deviation angle is to slight changes in prism table position.
7. ANALYSIS:
This is a very accurate experiment. The deviation angle vs wavelength data should fall on a very smooth curve (it is not a straight line). If any data point fails to fall on this curve, you (a) may have mis-identified a line, or (b) blundered in measurement. There is no good excuse for either.
8. QUESTIONS:
 |
| Fig 1l. Curvature of the spectral lines. |
|---|
(1) If you were a perceptive observer, you noticed that the spectral lines were slightly curved. This is illustrated (exaggerated) in Fig. 11. This may have stimulated your scientific curiosity, causing you to wonder why they were curved. You can figure this out by considering the geometry of rays passing through the spectrometer, originating from various points on the slit, say from top, bottom, or middle of the slit.
(a) Explain why the lines are curved.
Hint: Consider what happens to light from the top and bottom of the slit, compared to light from the center of the slit. The angles of incidence at the prism face will be different in these two cases, as will the path lengths through the prism. Which case will give the larger deviation? Take it from there.
(b) Show how you could have predicted from optical theory which direction they should curve. In Fig 11, is the red end of the spectrum to the left, or to the right?
(c*) What shape is the curve that geometric theory would predict? Is it a circle, ellipse, parabola, or something else? You can't judge this merely by the visual appearance of the lines. You'll have to use mathematical arguments.
(2*) The determinate error equation for Eq. 1 is:
Δn/2 = (ΔD/2){cos[(A+D)/2]/sin(A/2)} + (ΔA/2)n{cot[(A+D)/2] - cot[A/2]}
Derive this result.
(3) What absolute error in the index of refraction is caused by an error of one minute of arc in the deviation angle? Assume glass of index 1.7 and light of 5461 Ångstroms.
(4) Under the same assumptions as question (2), what absolute error is caused by a one minute of arc error in the prism angle?
(5) You are assigned the task of ordering a replacement prism for a spectrometer, but you have no information about the recommended size of the prism. You do know that the collimator lens diameter is 2 cm. Therefore, you need a prism with a height just a bit larger than 2 cm. Since prisms are very expensive, and the cost is greater for larger sizes. It is wasteful to order one larger than needed.
The prism is to have a refractive index of 1.60 (for the mercury green line) and have equilateral shape. What should be the minimum length of each face? [This is the length of the edge of the triangle.] Actually, one must allow extra length so that all colors of the spectrum, including those with the largest deviation, will pass through both faces. Does the prism you used in this experiment have sufficient face length for the size of the collimator and telescope lenses? Should it be larger? Could it have been smaller?
(6) Consider a light ray which passes through a prism so that its path in the glass is perpendicular to the bisector of the prism angle. Show that, for this ray, the angle of incidence equals the angle of emergence (both measured to the appropriate normal to a prism face). Show also that the total deviation of this ray is then given by Eq. (1). This is not a derivation of Eq. (1) but merely a proof that the minimum deviation angle of a prism is that angle at which the incident and emergent angles are equal, and that the light ray passes through the prism perpendicular to the bisector of the prism angle.
Text and line drawings © 1995, 2004 by Donald E. Simanek.
9. SPECTRAL LINE WAVELENGTHS
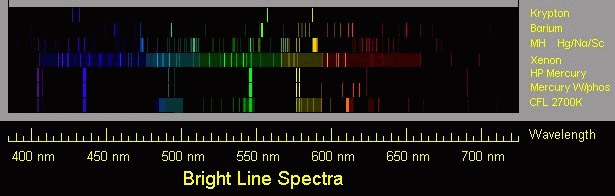 |
| Spectra of common discharge tubes and flourescent lamps. |
|---|
Wave lengths of prominent spectral lines, in Ångstroms:
MERCURY DISCHARGE
6232 orange6152 orange
5791 yellow
5770 yellow
5461 green (bright, yellowish) [2]
4916 blue-green (faint)
4358 blue
4078 violet
4047 violet
SODIUM FLAME OR DISCHARGE
5890 yellow (D2 line)
5896 yellow
NEON DISCHARGE
6929
6599
6507
6402
6383
6334
6217
6164
6143
6074
6030
5882
5852
5401
5341
HYDROGEN DISCHARGE
6563 red
4861 blue-green
4340 blue
4102 blue
3970 violet
3889 violet
HELIUM DISCHARGE
7281
7065 red
6678 red
5876 yellow
5048 blue-green (faint)
5016 blue-green
4922 blue-green (faint)
4713 blue
4686 blue
4471 blue
4438 blue (faint)
4388 blue (faint)
4144
4121
4026
3965
3889 violet
ARGON DISCHARGE
4628
4596
4511
4345
4334
4300
4272
4266
4259
4201
4198
4191
4182
4164
4159
June 25, 1995
Endnotes
1. If your prism has a frosted face, you will only be able to measure one of its angles, and you won't be able to check whether the three angles add to 180°.
2. You may judge it to be yellowish green. Of the green lines
it is the brightest, and nearest to the yellow lines.