L-10 TELECENTRIC LENS SYSTEMS
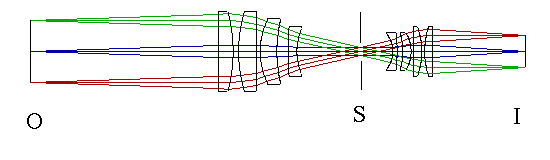 |
| Fig. 1. A commercial telecentric lens system telecentric on both object and image side. |
|---|
1. APPARATUS:
- Optical bench and the usual attachments.
- Acrhromatic lens of large (at least 4 cm) diameter and focal length of between 10 and 30 cm.
- Iris diaphragm, or a thin, opaque black metal or paper sheet for making small apertures.
2. THEORY:
Stops (apertures) can serve several functions in optical systems:
- As an aperture stop to limit the cross sectional area of the bundle of rays from object to image point, thereby controlling the brightness of the image.
- As a field stop to limit the angular field of view of the lens system.
- As a glare stop to block unwanted rays reflected or scattered from structural components of the lens system.
- To control the distribution of rays over the surface of lens elements, reducing geometric distortion or curvature of field of the image.
- To control the distribution of rays over the surface of lens elements for the purpose of controlling the perspective of the image. The telecentric system studied in this experiment is of that type.
Telecentric lens systems are useful in industry in situations where one must accurately measure the size of objects that are at unknown and possibly variable distances from the lens system. A telecentric system can create an image that maintains constant size at varying object distance. Such an image will display "isometric" perspective where parallel lines tilted to the object axis remain parallel. Parallel lines which, in conventional perspective, converge to a vanishing point, will remain parallel in the image made with a telecentric system. This is the same type of isometric perspective used in some engineering drawings where it is important to be able to make direct size measurements from a drawing of a three dimensional structure.
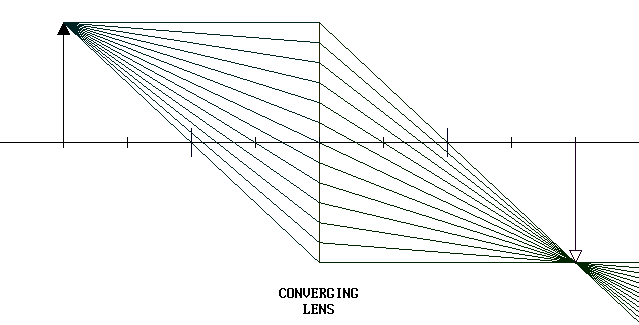 |
| Fig. 2. Rays through a lens without additional stops. |
|---|
Fig. 2 shows a converging lens forming an image. The edge of the lens itself acts as an aperture stop, and the field is limited by the size of the film on which the image falls. No additional stops have been included to limit the image-forming rays.
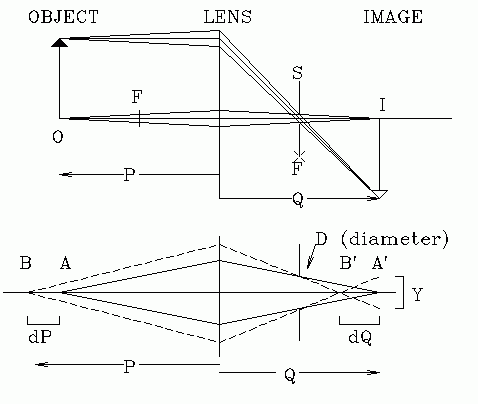 |
| Fig. 3. Rays through a lens with a stop at its focal point. |
|---|
Fig. 3 shows the same lens with a small stop placed at its focal point, so small that it limits the rays from each object point severely. Only a narrow bundle from each object point reaches the image plane. That bundle passes through only a small portion of the lens. Because the stop is at the focal point of the lens, the central ray of each bundle is parallel to the lens axis. Consider the bundle passing near the upper edge of the lens. If the object is moved nearer or further from the lens, this bundle still has its central ray parallel to the axis, and that ray reaches the film at the same point of the image plane as it does for other positions of the object. Thus the magnification of the image is constant with respect to object position. The system is said to be "telecentric on the object side" of the lens.
This is the principle of telecentric lens systems. Now, due to the finite size of the stop (which now acts as an aperture stop), there is an object position of sharpest focus, when all rays of the bundle converge on the same point. Other object positions will produce a circle of confusion in the image plane instead of a point. But the smaller the stop size, the smaller is the circle of confusion and the greater the effective range of motion of the object that will result in a good image. Still, whether the image is sharpest, or slightly unsharp, the image size remains the same as the object is moved.
The lower part of Fig 3 shows the rays from a point on axis, and the y axis (vertical) scale has been expanded for clarity. Remember, in the actual situation this is a very narrow pencil of rays. The solid lines show rays from an object at point A. As the object plane is moved from A to B by amount dP, the plane of the best image shifts from A' to B' by amount dQ. We show the case where the object moves away from the lens, and the image moves toward the lens. The stop diameter is D, and the diameter of the circle of confusion on the film plane is designated Y. We can easily find the relation between D and Y from geometry.
3. EXAMPLES:
1. You need to monitor in real time the number and size of smoke particles moving up in a smokestack. A telecentric lens could be mounted on the side of the smokestack, well removed from the smoke, and automated image sensors could count and measure the cross section of particles on the image. Each particle would have an image size proportional to its actual size, independent on how far it was from the lens system.
2. In an industrial setting, you need to continually monitor the width of some metal strips moving along a conveyor belt. You will use a sensor array and a lens system, with suitable software to analyze the image. The "camera" will be aimed down onto the conveyor belt. But the convyor belt is not of uniform thickness, so the strips are not always at a known, fixed distance from the camera and they may even be bouncing up and down. The distance from the strips to the camera may vary unpredictably within certain limits. This would, of course, cause the sizes of the images on the sensor array to vary in size.
Two solutions are possible.
- Have two sensors spaced a short distance apart, to give enough stereo parallax to determine the distance of the strip from the camera continually, using that information to correct the calculations from image size.
- Use a telecentric lens system that maintains a constant image size in spite of variations of object distance.
We will use the second method. Here are the technical requirements.
Lens focal length F = 25 cm.
Size of object to be measured = 32 mm.
Lens diameter = 42 mm (must be larger than object size).
Sensor array length: 40.96 mm.
Pixel spacing (resolution) of sensor array: Y =10 μm.
Desired magnification of image: m = 1
Variation in object distance: dP = ± 3 mm.
Let p be the object distance and q be the image distance. From the simple lens formula: 1/P + 1/Q = 1/F and the magnification formula m = Q/P we find that we must have P = Q = 2F.
From the lens formula, taking differentials of each term, -dP/P2 - dQ/Q2 = 0. But when Q = P, then dQ = -dP, these are the same size but opposite sign. We will drop the signs from here on.
If we choose P = 2F then we must locate the aperture D at 25 cm from the lens and the sensor will be 50 cm from the lens. This makes the camera tube 50 cm long, and the working distance, P = 25 cm.
dQ is very much smaller than F, 3 mm compared to 25 cm, or about 1% of F. Therefore we can make the approximation that F ± dq is approximately F. From similar triangles, we conclude that Y/dQ = D/f approximately. This gives a working formula for aperture hole size: D = YF/dQ. Now we can calculate the size of D for the given data.
Actually, when dQ is larger, a better formula is D = Y(F-dQ)/dQ = Y(F/dQ - 1), without the approximation used above.
We showed above that dQ = dP = 3 mm for the case of m = 1.
Then D = YF/dQ = (10x10-6 m)(0.25 m) / (3x10⁻³ m) = (5/6)x10-3 m.
In all this we dealt with tolerances, or limits of error—the maximum size of variations due to variations of object location.
So the aperture should be of diameter 5/6 mm for this design. Of course one can easily make smaller apertures, even down to "pinhole" size, and use brighter illumination on the subject. A smaller hole gives better resolution (smaller circle of confusion). But when you get down to pinhole sizes, resolution can begin to suffer due to diffraction, and you want to avoid that.
If we wanted a focal length lens of 12 cm the aperture would be 5/12 mm, or a bit less than a half-millimeter.
The design ensures that the light from each object point falls entirely within the area of one pixel (of 10 m linear size) even if the object point shifts toward or away from the camera by ± 3 mm, (over a range of 6 mm). [This simple and inexpensive design was actually used in an industrial quality control system.]
Constructing and testing a telecentric system.
Shorter focal length lenses are more expensive, for the large diameters required in these systems, because image distortions are harder to eliminate (curvature of field, astigmatism, etc.).
1. Use a white screen or ground glass in the image plane. Move the object toward and away from the lens, testing whether its image changes size on the ground glass. It shouldn't. Use a transparent ruler or a steel ruler as an object, and make careful image size measurements.
2. Use a piece of good quality graph paper on a stiff card as an object. Try tilting the object various ways and observe the geometry and sharpness of the image.
3. If you have a suitable film holder or camera body, take some pictures of various simple geometric objects. If you have a digital camera, take some pictures directly from the screen in the image plane.
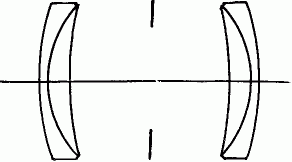
Systems telecentric on both sides.
The same telecentric lens can be used along with another identical lens to make a system that is telecentric on both object and image sides. The diagram should be self-explanatory, as it uses the same principles we studied above.
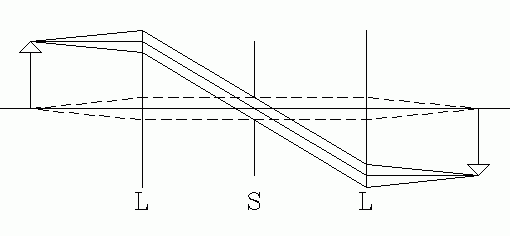 |
| Fig. 4. A system that is telecentric on both sides. |
|---|
The object, lens 1, stop, lens 2, and image are all spaced one focal length apart in this symmetric system with magnification 1.
The rays pass in parallel bundles through the stop. Compare this with the more elaborate system of Fig. 1, which shows the same feature. However, Fig. 1 is a system with different focal length lenses on either side of the stop, so the magnification is the ratio of these two focal lengths. Since Fig. 4 uses identical lenses in a symmetric arrangement, its magnification is 1.
Note that our two 1:1 systems, Fig. 3 and Fig. 4 are both of overall length 4F. The system that is telecentric on both sides has two advantages over the system telecentric on one side. (1) It is less subject to coma and astigmatism of the image. (2) It shows less effect of field curvature and other geometric distortions of the image. (3) It is not affected as much by film or sensor plane deviations from flatness, or by faulty placement of the image sensor.
|
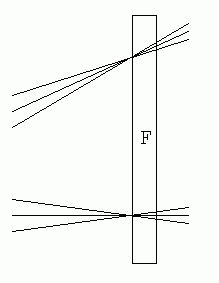
What's the advantage of a system telecentric on the image side? Most light-sensitive surfaces used in photography have some thickness. Light rays impinging at an angle normal to a film surface expose a narrow cone of material along that normal. Light rays impinging near the edge of the film fall on the film at a greater angle, and the exposed portion of each image "point" is laterally displaced somewhat with depth. Newer photographic technology uses digital sensor arrays which also have a structure in depth and perform best when light impinges normally on the sensors. This is especially true when the individual sensor elements have tiny color filters above the actual sensitive element.
Fig. 5 shows rays in a "normal" bundle, and rays in a "inclined" bundle focused on the surface of light-sensitive film emulsion (F). Though both bundles focus on the film surface, the normal bundle exposes light sensitive material in the depth of the emulsion near the same location. But the inclined bundle exposes light sensitive material laterally displaced from the "proper" image point. Even with LCD systems, performance is best with normal incicence onto the sensor elements.
Procedure
Assemble and test some systems of this sort. Experiment with orientation of the lenses. Is it better to have double convex, plano-convex, or meniscus lenses, and if either of the latter two is best, which way should the most convex surface face for minimum image distortions?
 |
| Fig. 6. Illusion picture made with a digital camera and a telecentric lens system. |
|---|
You may wish to take a photograph with such a system. Fig. 6 shows the isometric perspective such a system creates. In fact, the green base plate of the Lego model looks as if the most distant edge is longer than the near edge. But Careful measurement on a flat screen or printed copy shows that it isn't. We expect the distant edge to appear shorter, but when it doesn't, we perceive it to be too long. In an isometric picture, equal lengths remain equal on the photo even if they are at different distances from the camera. To see how this picture was taken, see Isometric illusions and Telecentric Lens Systems. One could even adjust such a system to produce inverted perspective, where parallel lines seem to diverge with distance from the camera.
Applications
When this experiment was written, back in 1972, telecentric lens systems were considered somewhat "exotic". Standard optics textbooks didn't mention them. But now (2006) they have found applications in astronomy, machine imaging and industrial quality control measurements. Imaging arrays are generally small compared to the area of photographic film images, and their performance is very much improved when all light rays impinge normally (perpendicular to) the array surface. This is due to the three dimensional nature of the sensor elements, and the fact that some incorporate tiny color filters above each sensor element. The entire sensor array is smaller than the diameter of the typical film camera lens. So it is quite practical to use a system telecentric on the image side to ensure that condition of normal incidence. Now such a system is even used in digital cameras (for example the Nikon Coolpix).
Additional reading.
- Telecentricity and Telecentric Lenses in Machine Vision. Edmund Optics.
- Telecentric Lens Systems by D. Simanek.
|
Questions
Question 1. Compare this kind of system with the "rapid rectilinear" lens systems used in the early days of photography. Later lens designs built upon that system, through gradual design changes. The rapid rectilinear lens was a symmetric arrangement of meniscus lenses with the aperture stop in the middle. Hint: Unlike telecentric systems, the rapid rectilinear lens's stop was not at the focal point of the lens or of either half of the system. Do some digging in the literature to find out why the rapid rectilinear lens was such an improvement over earlier lens designs. Hint: it has a much wider usable angle of field. Why?
J. H. Dallmeyer designed the Rapid Rectilinear lens in 1866 Brit. Pat. 2,502/66; U.S. Pat. 79,323.) It gave a wide field of ±24° at apertures as large as f/8 or f/6. In those days when film speeds were very slow, this was a vast improvement over earlier small-aperture rectilinear (distortion-free) lenses.
© 1972 and 2017 by Donald E. Simanek.