ELECTRICITY LABORATORY
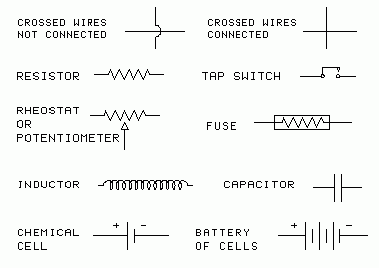
TABLE OF ELECTRICAL SYMBOLS
 |
 |
I. GENERAL INSTRUCTIONS:
1. Keep your work area uncluttered. All instruments not being used should be set aside on another table. Extra wires should be set aside. Coats and book bags should not be kept on your work tables.
2. Avoid shocks. You experience a shock when a current passes through some part of your body. Therefore don't let your body become a branch in a live circuit. Metal objects, water pipes, electrical conduit, etc are usually at ground potential. Parts of your circuit will be at other potentials. So touching part of the circuit while part of your body simultaneously touches a grounded metal object may give you a jolt. Be sure that power sources are disconnected before you touch any wires or components in the circuit. Even with circuits you think are not `live,' develop the electrical serviceman's habit of working one-handed, with the other hand safely in your lap or in a pocket.
3. Avoid accidental shorts between circuit terminals and components. Shorts can permanently damage expensive equipment. See that spade lugs on adjacent terminals do not touch each other. Spade lugs should also not touch the metal cases of instruments. Use insulated wires for all connections on temporary and exposed circuits.
4. Avoid current and power overloads. If there is some doubt how much current is in a branch of a circuit, set the adjustable resistors which affect that branch to values which will limit the current as much as possible. Put an ammeter of sufficiently high range in the branch. Then slowly change the resistor settings to increase the current, keeping close watch on the meter readings. In general, CALCULATE BEFORE CONNECTING!
5. Know the limitations of equipment. Every circuit component has limits of current, voltage, or power beyond which it will not work properly and may be damaged. These limitations are clearly stated in the manufacturer's catalogs which are on file in the lab. Find these values and record them in your lab notebook before wiring and powering the circuits. If some information is not available in the files, ask the instructor for it.
6. Know what you are doing. It is the experimenter's responsi- bility to have studied the experiment before coming to lab, and to be able to calculate in advance how the circuit will behave.
7. Fuse all circuits at your lab station, to avoid blowing the building fuses. [Exception: The fuse may not be necessary if the power comes to your work station from an independent source with appropriate circuit breakers or overload protection. Many power sources you will use have internal power and current overload protection, but even with these you may need fuses to protect individual circuit components.] 8. Report all damage to equipment so that it can be repaired or replaced before the next lab period.
9. When you leave, tidy up your work station and return all equipment, wires, etc. to their proper place. If a circuit must be left wired, place a prominent DO NOT DISTURB sign on it.
II. RESISTORS:
You will have occasion to use a number of types of resistors, some of fixed value, some variable.
Precision decade resistance boxes. Resistance boxes have decade dials for setting precise values, and are usually manufactured to precision tolerances of about 1% or better. These are used when you must vary a resistance value and still know its value precisely. They are not capable of handling much current, for their precision resistance coils readily overheat, and their insulation can melt. Therefore precision resistance boxes should never be used to control large currents. Consult the manufacturer's catalog to determine the limitations of all circuit components.
Typically each coil of a resistance box can dissipate no more than one watt continuously. If such a box were set to a value of one ohm, it could take no more than one ampere of current and therefore no more than one volt should be applied to its terminals. When the box is set to higher resistance values, the individual coils are in series, so one would still not be allowed to exceed one ampere, but higher voltages could be applied. At 100 ohms it still could take only 100 volts. The greatest danger in using these boxes is to absent-mindedly reset the dials from higher to lower values without considering these facts, and without doing preliminary calculations.
Another danger occurs when a resistance box is set to zero (which is generally safe for the resistance box), then dialed to, say 0.1 ohm. This can `fry' the low resistance coils in the box. The better procedure is to set the box at a high resistance value, ensuring low current, then lower its value slowly while watching meter readings carefully.
Slide wire rheostats, potentiometers, etc. Slidewire rheostats (Fig. 3) are used in physics laboratory when one needs variable resistance in a high current branch of the circuit. They are large, to efficiently dissipate heat to the surroundings, and consist of a resistance wire wrapped around an insulating ceramic cylinder. A sliding contact may be moved the full length of the coil. The circuit symbol for these is shown in Figs. 1 and 2.
The arrow or pointer symbol represents the sliding contact.
The zigzag resistor symbol is almost unique to the U.S. In europe and other parts of the world, the resistor symbol is a simple rectangle, solid, or open, often with its value label printed within;
The value label 2K8 stands for 2.8 Kilohm, the K multiplier symbol being placed in the position of the decimal point. This is clearly readable, and the decimal point can't get lost.
Rheostats have two important applications:
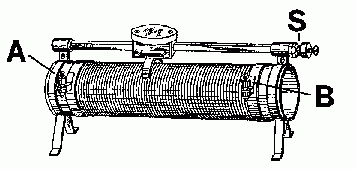 |
| Fig. 3. Laboratory slide-wire rheostat, about 1 foot long. A and B are terminals at each end. S is a terminal to the sliding tap. |
|---|
(1) A variable resistor (Fig 2). It is customary in this application to connect the sliding tap to one end of the resistor, shorting out the unused portion of the resistance wire. In Fig. 2 the resistance between A and B increases as the sliding contact C is moved to the right. Fig. 3 shows the actual device, with the sliding contact being labeled S.
For very high current applications, or for situations where a low value rheostat is needed with smooth control, a carbon compression rheostat is used. This is a stack of carbon blocks separated by metal strips which act as heat dissipating fins. When the stack is compressed, its resistance decreases. One must take care with these devices to ensure that the blocks and fins are uniformly in place in their v-groove. If one is askew, it may crack when pressure is applied. Also, do not turn the rheostat upside down when pressure is relaxed on the stack, or all of the blocks and fins can fall out and you'll be playing pick-up.
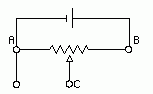 |
| Fig. 4. Rheostat connected as a potential divider. |
|---|
(2) A potential divider (Figs. 1 and 4). Terminals A and B are connected to a potential source, and the sliding contact C `taps off' a potential which can be varied from zero up to the potential of the source.
The output potential is taken from terminals A and C (or C and B). For this application the size of the rheostat is usually chosen to be large compared to the resistive load which will be connected across the output terminals A and C. Also, this arrangement is generally used only in cases where the current at the output terminals is small. This is not an appropriate way to control a large current.
 |
| Fig. 5. Potentiometers. A (top row): Low-current. B: High current. C: Small pots for circuit boards, with screwdriver adjustment. |
|---|
One might suppose that, if the currents were small enough, a precision calibrated variable resistor could be used in this way, to obtain a calibrated variable potential. Unfortunately this is not practical when there is current at the output terminals A and C. This is because the current through the left part of the rheostat (A to C) is different from the current in the right part (C to B) and therefore the output voltage is not a simple function of the resistance tap setting. However, this technique can be useful in situations where the current is zero at the output terminals, as in voltage comparison circuits.
Smaller versions of the rheostat are widely used in electronic circuits, for example as volume and tone controls on radios and television sets. These are often called `pots' (Fig. 5) which is short for `potentiometer.' They have a resistive wire coil or strip bent in an arc, contacted by a sliding tap fastened to a rotating central shaft.
(3) AC Resistance Boxes. Devices used in AC circuits must be free of inductive pickup. Therefore wire-wound resistors, such as those in resistance boxes, should be wound non-inductively, and enclosed in shielding metal boxes. DC resistance boxes, which may have their coils wound inductively and housed in wooden boxes"are definitely unsuitable for AC work.
AC resistance boxes frequently have three output terminals, one labeled `high' (or colored red), one labeled `low' (or colored black) and one labeled `ground' (or colored black or green). The `ground' terminal is connected only to the shielding metal case of the instrument. A captive `grounding' strap may be present to allow easy connection of the `low' terminal to the `ground' terminal. The `low' terminal is the one which has the greatest amount of stray capacitance, measured with respect to the shielding `ground' terminal. If one of the terminals is to be connected to ground, it should be the `low' terminal, thereby eliminating that capacitance. In any case, the component should be wired in the circuit so that the `low' terminal is the one with the shortest path to ground.
III. GROUNDING
Students are often mystified by the term `ground' and ask ``How should this circuit be grounded?'' The term `ground' has several distinct meanings.
 |
| Fig. 6. Ground symbols. |
|---|
(1) Common ground. This refers to a wire, conducting strip, or conducting chassis which serves as a common reference potential for various parts of the circuit. In circuit diagrams this symbol may appear at many points, and all of these points are understood to be connected together, that is, there is a conducting path between all of them. When wiring such a circuit from the diagram, you must include that conducting path.
(2) Chassis ground. The metal box or enclosure in which a circuit is housed is called the `chassis.' If that box also serves as the common electrical grounding conductor, it is called a `chassis ground.'
(3) Earth ground. A low-resistance wire or pipe connected to a metal stake driven into the earth is called an earth ground. Its purpose is to ensure that the potential of the grounded part of your circuit is stabilized at the potential of the earth. Be aware that an earth connection which hasn't low enough resistance can `pick up' unwanted electromagnetic influences. This is because induced currents in the wire cause a potential across the wire's resistance. Therefore a short length of heavy, low resistance wire is best for earth grounds to ensure that the induced voltages are small. Sometimes a cold- water pipe is a good earth ground. A hot water pipe is not a good ground, for the water heater usually breaks the electrical continuity to earth. A good earth ground may also serve as a safety ground, but electrical wiring codes specifically require a safety grounding system independent of the plumbing system.
(4) Safety ground. If you touch an object at different potential from your body, you may get a shock. Therefore the metal chassis of a circuit should not be allowed to attain potentials much different from those of the surrounding environment. This is why exposed metal surfaces of appliances are connected to an earth ground through the green `safety ground' wires of the building's wiring system. The earth represents a source/sink for electrons. You may think of the earth as a huge capacitor of infinite capacity, whose potential doesn't change even when large amounts of charge are given to it or removed from it. In this grounding method the chassis ground is also an earth ground, but often not a sufficiently good earth ground for purposes of shielding. [Obviously you don't want a situation where a careless plumber could inadvertently defeat the electrical safety ground.]
(5) Grounded shields. In alternating current circuits, especially at audio and radio frequencies, it may be necessary to electrically shield all or part of the circuit from electromagnetic radiations from the environment. Any AC circuit radiates electromagnetic waves. Parts of the circuit act as radiating antennae. Other circuits or parts of circuits can act as receiving antennae. In this way signals can be `coupled', i.e. transmitted, from one part of a circuit to another part. The coupling may be inductive, capacitive, or both.
This radiation can enter the circuit through inductive or capacitive coupling with connecting wires, coils, and capacitors, producing `unwanted' signals mixed with the `wanted' ones.
Large metal parts are susceptible to capacitive coupling. This may usually be eliminated by enclosing the offending circuit in a completely shielded and grounded metal box (Faraday cage). The metal chassis box of the circuit can serve as a shield for the circuit, especially if the chassis is also connected to earth ground.
Coils of wire, such as transformer windings and inductor windings, can inductively couple to other coils of wire. Unfortunately, metal sheets do not completely shield magnetic fields. One precaution against inductive coupling between two coils is to orient the coils so that their axes are at right angles.
The commonest environmental `unwanted' radiation `pollution' is that from 60 Hz power lines, which also radiate harmonics at 120 Hz and higher. The fundamental and first harmonic are the most troublesome. Nearby radio and television stations can cause this type of electromagnetic pollution also.
(6) Shielded cables. If several circuit chasses must be connected together it is best to use shielded cables, in which the signal-carrying wires are within an enclosing metal braid `shield,' the shield being connected to the grounded chasses.
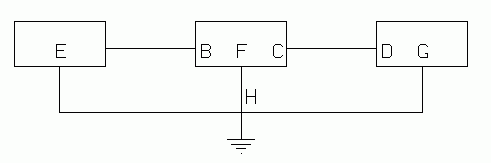 |
| Fig. 7. Ground loops. |
|---|
(7) Ground loops. When a number of components, or a number of instrument chasses are connected together, one must be careful to avoid ground loops. Fig. 7 shows a bad example. This circuit has too many grounding paths. They form two physical `loops.' These act as inductive loops in which induced currents may arise from radiation fields in the environment. If AB and CD are the shields of connecting cables, they provide the necessary ground connections between the three chasses. Therefore two of the other wires EH, FH, and GH should be removed to eliminate the ground loops. [The circuit of Fig. 6 may have been the result of an overzealous amateur's attempt at grounding.] This point is important to understand when connecting components of a high fidelity sound system. It is even more important when connecting laboratory equipment for detection of very weak signals.
As a general rule, the wire running to earth ground should be heavy, low resistance wire (or copper braid) and should take the shortest route to ground. A nearby cold water pipe makes a convenient grounding point, as does the heavy metal conduit of a good building wiring system. The earth ground is connected to that point in the circuit where the `wanted' signals are the weakest, as at the `magnetic phonograph' input jack of an audio system, the antenna input of a radio receiver, or the input of a very sensitive meter.
In the laboratory you must experiment to find which grounding scheme best reduces the `unwanted' signals and noise. Sometimes it is best to ground near the low signal points of the circuit. Sometimes it is better to ground the oscilloscope (or other detector) at its own input jack.
(8) Grounding considerations within the circuit. In spite of chassis grounding and shielding, some outside radiation does enter a circuit. Also, parts of the circuit may produce radiation which can capacitively or inductively couple to other parts of the circuit where it isn't wanted. Transformers, coils and capacitors are the worst offenders, but at radio frequencies even the interconnecting wires may cause trouble.
Power supplies with transformers and rectifiers should be shielded from the other parts of a circuit. The power transformer often has a metal shield around it. There may even be a metal enclosure around the entire power supply. Some capacitors, especially electrolytic ones, are in a metal can which serves as a shield if the can is connected to chassis ground. Tubular capacitors are made by wrapping two conductive foils with dielectric sheets between. One foil ends up `outside' of the other. The lead connected to the outside foil is marked by a stripe at that end of the capacitor. This is the lead which should be connected to ground, or through the shortest path to ground, so the outer foil does its job of shielding the rest of the capacitor.
IV. POWER SOURCES:
|
Chemical dry cells of various types are suitable for many of these experiments. Be aware that all such cells have internal resistance, which is small in a fresh cell, but can become significantly large over the cell's lifetime. This causes a potential drop across the terminals of the cell. So a cell that had a terminal voltage of 1.5 volt, may have only 1.4 volt or less after some period of use.
Also available in the lab are commercial power supplies that have built-in voltage regulation as well as overload protection. They shut down when too much current or power is drawn from them, preventing damage to the power supply. After a shut-down, they may require a period of "cooling off" before they will operate normally.
Any power supply that plugs into the electrical system of the building will usually have part of its circuitry connected to the building's ground wire, leading to an earth ground. Usually an instrument with a metal case will have that case connected to the building ground wire. Sometimes one of its output terminals will be connected internally to that same ground, and if so, that fact will usually be indicated by a "ground" symbol by that terminal, usually a black or green coded terminal. You must be aware of this, to avoid connecting several such instruments in a way that would result in undesired and potentially dangerous "short circuits".
There are situations where it may be necessary to "defeat" the safety grounding in such a system, especially when using several such instruments together. Two ways are possible.
- Isolate the instrument from the building's grounding system with an isolation transformer.
- "Lift" the ground by using a power cord adapter that interrupts the path of the instrument's ground wire.
In the second case, know what you are doing and realize that you have defeated an electrical safety feature of the instrument, and take appropriate precaustions against injury to yourself or the circuit.
NEVER, under any circumstances, cut off the safety prong of the instrument's power connector. Other people using the instrument will not be happy, and may be put at risk. If the power outlets at your workstation are of the older type that do not accomodate the newer grounding plugs, replace them with modern outlets, and be certain that they are in fact properly connected to the grounding system of the building (green wire, or metal jacket conduit).
V. MEASUREMENTS WITH METERS:
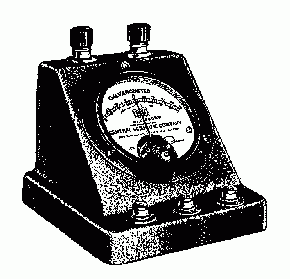 |
| Fig. 8. Galvanometer, with 3 inch face diameter. These usually have accuracy of 2% of the full scale reading. |
|---|
How to use voltmeters and ammeters:
A good voltmeter has very high resistance, often megohms. When it is connected properly across a circuit element the voltmeter doesn't divert much of the circuit's current through the itself. Therefore the currents and potentials existing in the circuit are not changed much by the measuring process.
An ideal ammeter has a very low resistance. When it is connected properly, in series with a circuit element, it doesn't add significant resistance to the circuit. Therefore the currents and potentials existing in the circuit are not changed much. Unfortunately most ammeters aren't close to ideal, and do alter the circuit.
When an ammeter is improperly connected, in parallel with a circuit element, its low resistance allows considerable current to be diverted through the meter, possibly damaging the meter or the circuit. Even if the current is within the range of the meter, the current reading of the meter resulting from this improper connection is of no use to the experimenter
When a voltmeter is improperly connected, in series with a circuit element, its high resistance (compared to that of the circuit) limits the current in that branch of the circuit to a very low value. This alters the currents and potentials of the circuit from their original values. The meter usually won't be damaged, and will indicate a voltage very near to zero. In rare circumstances the altered currents and potentials in the circuit may damage a circuit component.
Fig. 9 shows correct connection of a voltmeter. The voltmeter measures the potential across resistor A.
Fig. 10 shows correct connection of an ammeter. The ammeter measures the current in resistor A. To do this, the circuit was broken (cut or unsoldered) next to resistor A and the ammeter connected at the break, in series with the resistor. Therefore all of the current in A must also pass through the ammeter. The measurement could also have been made by breaking the circuit to the left of resistor A, since, by Kirchoff's law, the current into a resistor is the same as the current out of it, and, of course, the same as the current through it. The current in B is not equal to the current in A, however, because A and B are not in series.
Note the polarities of the meter probe leads with respect to the battery polarity of the circuit. The connections shown above are correct.
Potential measurements in a circuit.
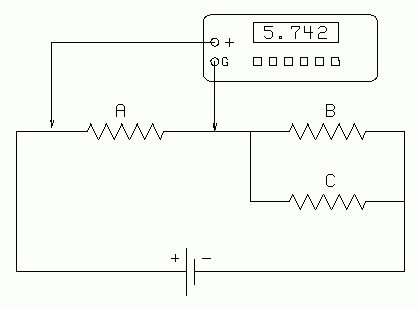 |
| Fig. 9. Voltmeter measurement of potential across resistor A. |
|---|
As we see from the discussion above, measurement of potentials in a circuit is simple. One just touches the voltmeter probes to the appropriate points in the circuit. One need not break any connections, or even fasten the voltmeter leads permanently. One must take care that the voltmeter probes make firm electrical connections. Small clips or hooks on the probe ends are helpful to anchor a probe temporarily in place so that it doesn't fall off.
Current measurements in a circuit.
Whenever possible try to find a way which doesn't require breaking into the circuit. If you need to measure the current in a branch, and there's a resistor in that branch with a clearly marked value, measure the potential across it and use I = V/R to calculate the current. When trouble-shooting a defective circuit, examine the resistor carefully to be sure it shows no signs of damage: burned or charred insulation, broken leads, even a smoky residue on the circuit board under the resistor, any of which could indicate that the resistor is defective.
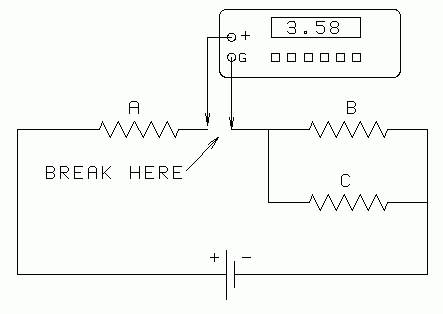 |
| Fig. 10. Ammeter measurement of current through resistor A. |
|---|
In most practical circuits there's a resistor in most branches, so that one can easily find the current in any branch using only a voltmeter measurement. Trouble-shooting a circuit is almost entirely reduced to voltmeter measurements. Schematic circuits usually show potential values at many junctions to aid the serviceman; only rarely do you see a current value given.
When you must break into a circuit branch, unsolder (or cut) a wire and lift it just enough to attach the ammeter leads.
In AC circuits the current can be measured with an inductive probe and an AC ammeter. This probe clips around a current-carrying wire and responds to the changing electromagnetic field around it.
Measurement of resistance in a circuit.
If a resistor is suspected to be defective, measure the potential across it. If that potential is much too high, or too low, for the normal conditions expected in the circuit, the resistor may be defective (shorted or open). Most resistor failures are catastrophic: causing the resistor to be open (infinite resistance), or shorted (zero resistance)"seldom just a small change of resistance.
Resistor failure, especially a shorted resistor, may be the result (or cause) of failure of another component nearby. Replacement of the resistor may result in immediate failure of the new one.
In the rare case where you must measure the value of a resistor in a circuit, your best course of action is to remove all power from the circuit, then disconnect one end of the resistor and use a good ohmmeter to measure it.
Of course, since you must `break into' the circuit anyway, you could measure the current in its branch, and the potential across it. But that's exactly what the ohmmeter does. Besides, if the circuit is malfunctioning, so as to have `blown' the resistor, it will present an abnormally high current to the ammeter. So if you do use an ammeter in a malfunctioning circuit, be sure to start with the ammeter set on a high-current range.
When you need to measure the resistance of a suspect component in a circuit, and can find a good resistor in series with it, measure the potential across the good resistor, then measure the potential across the `suspect' component. Calculate the resistance of the `suspect' component using the fact that, being in series, they have the same current.
One reason to avoid ammeter measurements is the fact that readily available ammeters are seldom even close to ideal (negligible resistance compared to circuit resistance). Voltmeters are much closer to ideal (very high resistance compared to circuit resistance). Therefore an ammeter measurement changes currents and potentials in the circuit much more than a voltmeter measurement does.
VI. SWITCHES:
 |
 |
| Fig. 11. Wiring of a reversing switch. |
Fig. 12. Reversing switch, simplified diagram. |
|---|
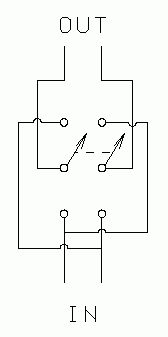
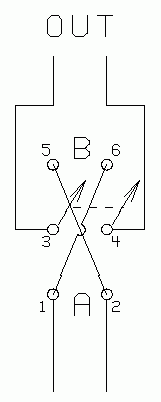
One often has need for a quick reversal of two wires in a circuit. A reversing switch does the trick. Fig. 11 shows how a double pole double throw knife switch may be wired to function as a polarity reversing switch. Obviously the input and output designations may be interchanged.
Fig. 12 shows the same electrical wiring, but in a manner which may be easier to understand. The two movable `knives' (arrows in the diagram) are rigidly connected by an insulating bar (dotted line) and may be swung together from position A to B. Two wires `cross- connect' terminals 1 to 6 and 2 to 5. In switch position A, terminal 1 connects to terminal 3 and 2 connects to 4. In position B, terminal 1 connects to 4 and 2 connects to 3. No external connections are made to terminals 5 and 6.
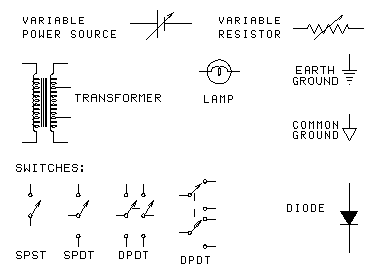
House-wiring circuits use such a switch when more than two toggle switches must control the same light bulb. Such switches are sold with the necessary cross-over connections entirely internal, and have only four accessible screw terminals, 1, 2, 3, and 4 above. This is called a 'three-way' switch.
VII. WIRE RESISTANCES:
#20 Copper 3.33 x 10⁻⁴ ohms/ft = 9.57 x 10⁻⁴ ohms/meter
#18 Copper 2.09 x 10⁻⁴ ohms/ft = 6.86 x 10⁻⁴ ohms/meter
Text and diagrams © 1995, 2004 by Donald E. Simanek.