E-4 SLIDEWIRE WHEATSTONE BRIDGE
1. PURPOSE
(1) To construct a slidewire wheatstone bridge.
(2) To study the factors that affect the precision of the bridge, as an example of the kind of investigation that must be done with any new or unfamiliar experimental apparatus..
2. APPARATUS
 |
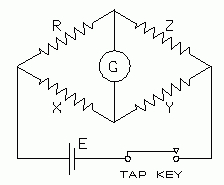
| Fig. 1. The Wheatstone Bridge Circuit. |
|---|
Slidewire assembly, one meter long.
Multirange galvanometer.
Manufacturer's catalogs describing the
resistance boxes.
Manufacturer's catalog describing the
galvanometer.
Precision resistance box, 0.1 to 99.9 ohm.
Another resistance box, need not have the
0.1 dial.
Unknown resistors in range 1 to 100 ohm.
Tap key (two, if galvanometer has no
reduced sensitivity button).
Connecting wires.
50 ohm resistor (100 ohm may be
substituted).
1.5 v power source (need not be
regulated).
3. THEORY. See any textbook.
 |
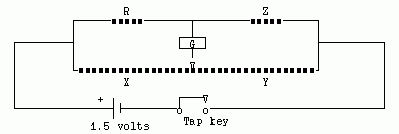
| Figure 2. The Wheatstone bridge circuit, another representation. |
|---|
4. APPARATUS
Fig. 1 and 2 show the general form of the Wheatstone bridge circuit. The working current is supplied by a 1.5 volt dry cell or equivalent power source. The source need not be regulated. Precision resistance boxes, X, Y, and Z may be adjusted until the galvanometer, G, reads zero. The bridge is then said to be "balanced." By application of the circuit laws, it can be shown that when the bridge is balanced, the unknown resistance R is given by
| [1] |
R = Z(X/Y)
Slidewire form of the bridge. The separate precision resistors X and Y can be replaced with a uniform resistance wire. In the "student" form of the bridge, this is a one meter long slide wire of low resistance. One lead of the galvanometer connects to a sliding tap key that can make electrical contact with this wire at any point along its length.
| [2] |
 |
| Fig. 3. Slide wire form of the Wheatstone bridge. |
|---|
The actual layout of the apparatus will look somewhat different, though the electrical connections are the same.
 |
| Fig. 4. The wiring layout of the slidewire bridge. |
|---|
Follow this wiring diagram closely. The numbered terminals with the symbol "o" represent binding posts you will find on your apparatus. Terminals 2, 3, and 4 are electrically connected (through a metal "bus" or through the metal case of the instrument). Likewise terminal 1 is connected to 6 and 5 to 7. If the instrument has a metal base, terminals 2, 3 and 4 are insulated from the metal by fiber washers. If you repair or replace one of these terminals, you must have these insulating shoulder washers properly placed and aligned. The "extra" terminals are for convenience. When this apparatus is correctly wired, there will be only one wire attached to any one terminal and all terminals will be used. Use the shortest wires possible.
R is the "unknown" resistor being measured. Z is a precision resistance box.
Initially, when the bridge is not yet balanced, the current may be large enough to overload the galvanometer, risking damage to it. There are several ways to avoid this.
(1) A 2K resistor may be put in series with the galvanometer for initial balance, then bypassed (with a shorting tap key) to use the full sensitivity of the galvanometer for final balance.
(2) A multirange galvanometer may be used. It has push buttons on top. When they are "up" the galvanometer is least sensitive. When the left button is pushed down the meter operates at full sensitivity. [Your meter may operate differently, check it carefully before using it. Consult the manufacturer's instruction manual if necessary.]
If you are using inductively wound resistance spools as unknowns, and/or resistance boxes with inductively wound resistance coils, it is important to close the battery circuit tap key before closing the galvanometer circuit key that switches the galvan- ometer to maximum sensitivity. This reduces the "kick" or "jump" of the needle that may occur due to induced emfs in inductive elements in the bridge.
Always open the tap key on the slidewire when changing its position. Do not press it down so hard as to dent the wire, and do not slide it while pressing it down, for that can scrape the wire. The uniformity of the slide wire resistance depends on it being uniform in physical cross section. Physical damage from denting or scraping can destroy this uniformity.
If you do not have a multirange galvanometer, you risk damage to it if the tap key is closed when the bridge is nowhere near balance. To prevent this, use a special multi-tap key that has connections to protective series resistances. Pressing the key lightly introduces a high resistance, a bit more pressure introduces a lower resistance and finally, no resistance. Consult your instructor for such a switch and for instructions for connecting and using it.5. SOURCES OF ERROR IN WHEATSTONE BRIDGE MEASUREMENTS
One may be tempted to derive a determinate error equation for equation (1), concluding that the fractional error in R is the sum of the fractional errors in X, Y, and Z. This naive approach would completely ignore important error sources that do not explicitly show in the equation used to calculate the "result."
This is a common pitfall for the unwary experimenter. The equations used to calculate results can hide important error sources in the procedure. One must look beyond (beneath?) these equations, to analyze the actual procedure used. This requires the experimenter to understand how the equations were derived, what assumptions went into them, what approximations were used, and what quantities "dropped out" of the mathematical derivation.
The resistance boxes X, Y, and Z are quite precise, and are usually not the predominant source of error! One may list variables that conceivably could affect the measurements with the bridge, but only a careful analysis of each will determine which actually are important, and how much each affects the results:
First, there are possible determinate errors. These include:
(a) Contact potentials are small voltages that may occur at junctions of two dissimilar metals, for example between hook-up wires and binding posts.
(b) Thermoelectric emfs occur between dissimilar metals when there is a temperature difference between the two metals. Their effect on a measurement may be an error of either positive or negative sign, depending on the sign of the temperature difference.
(c) Resistance of connecting wires.
(d) Internal resistance of the power source.
(e) Resistive heating of one or more arms of the bridge, changing their resistance.
There are also possible indeterminate errors:
(f) Insufficient sensitivity of the galvanometer.
(g) Non-uniformity of the slidewire.
A list of "possible" error sources is of little use until we determine which of these actually affect the measurements, how much their effect is, and how that effect might varies with choice of operating procedure. Some of the above listed error sources do not affect the results, but at this point we won't tell you which they are! In fact, we can not know in advance the relative importance of some of these unless we know exactly which pieces of equipment you will use.
It is always the experimenter's responsibility to study these matters quantitatively, in order to know how good the results are. Fortunately, a rather straightforward experi- mental investigation gives the information needed here to determine the uncertainty of the results.
In this experiment you will study the precision and accuracy of the bridge. [Later in this course you may do an experiment using the bridge as a measurement tool.] You will look for error sources that have an effect larger than that of the precision resistance boxes. So you can use a resistance box as a convenient tool to find them, putting it in place of the "unknown" resistor, then deliberately unbalancing the bridge to determine how much uncertainty in the unknown is detectable.
The bridge errors do depend on the size of the resistor being measured. In fact, the Wheatstone bridge is unsuitable for measuring very small resistances, of a few ohms or less. A Kelvin bridge is better for measuring small resistances. The slide wire form of the bridge, designed for instructional laboratory, is also not suitable for measuring resistors of thousands of ohms or more.
6. MEASUREMENT PROCEDUREFirst, to become familiar with the operation of the bridge, you will make a simple measurement. This also establishes that the bridge is correctly wired and every component is working.
Mathematical analysis of the Wheatstone bridge shows that one important source of error is minimized when X and Y are made nearly equal, which will force Z to be nearly equal to R. [You are asked to prove this in question (4).] This means that when you use the slidewire bridge you should start with the sliding tap near the center of the wire, then bring the bridge into as good a balance as you can by varying Z. Finally adjust the sliding tap on the slidewire for best final balance.
(1) Connect the components of the slidewire bridge, to match the topological layout of Fig. 4. Use the shortest wires possible. An "unknown" resistor will be provided. Connect it directly to terminals 1 and 2 at position "R". Have the circuit checked by the instructor.
(2) Set the galvanometer button for lowest sensitivity and set the sliding tap at the midpoint of the slide wire. Adjust resistance box Z for best galvanometer balance (closest to zero reading.)
(3) If the galvanometer cannot be brought to exactly zero in step 2, adjust the slide wire tap a bit off center to achieve an approximate balance then achieve fine balance with resistance box Z.
(4) Switch the galvanometer to higher sensitivity and repeat steps (2) and (3) to achieve a better balance. Continue until you have the best balance with the highest sensitivity of the galvanometer. If the best balance seems to lie between two of the smallest increments of resistance box Z, the final fine balance may need to be achieved with the slidewire tap.
(5) Now that you have this procedure well in mind, repeat it at least 10 times in order to determine whether these repeated independent measurements show a distribution (or scatter) due to experimental uncertainties. Be sure that you repeat the entire procedure each time, to guarantee that each new measurement is independent of the previous one. Divide the work with your partners, as additional insurance against one person's procedural bias. Make every effort to avoid the possibility that knowledge of previous measurements can influence your judgment of later measurements.
7. EXPERIMENTAL WAYS TO DETERMINE BRIDGE PRECISION
You have just measured the resistance of one resistor. But how good is the measure- ment? The distribution of values in part (5) tells you something about the cumulative effect of indeterminate errors. But it tells you nothing about possible determinate (systematic) errors. It also tells you nothing about the uncertainty of the measurement of a resistor of significantly different size. It also tells you nothing about whether some other procedure might have given better, or worse, results. In short, you have not yet done sufficient investigation to qualify as an "error analysis" of the Wheatstone bridge.
To do a proper error analysis, you must study the inherent errors of the bridge under the full range of operating conditions. [The resistor may have coded stripes indicating its value. However, these are probably only guaranteed to 5% or 10% limits of error. Your measurement should be much better than that.]
Look up the manufacturer's guaranteed accuracy of the meter and the resistance boxes you are using. Record these in your lab notebook. [Manufacturer's catalogs are available in lab.]
(1) Now use a precision resistance box in place of the "unknown" R (this box need not have 0.1 ohm increments.) Set it to the value you previously determined for the unknown resistor. Balance the bridge. Now, with the smallest resistance dial of the resistance box, change Z slightly to find how small a variation causes a noticeable galvanometer deflection. Vary Z both up and down, to determine the range of uncertainty of the bridge in this measurement of R. [It may happen that the precision of the bridge is smaller than the smallest increment on the resistance box. Ask your instructor for a resistance box that has 0.1 ohm increments.]
(2) Vary the position of the sliding tap slightly to see how large a variation causes noticeable unbalance.
(3) Balance the bridge. Reverse the polarity applied to the bridge by interchanging the two wires to the power source. If no thermal emfs are present, the bridge should balance at the same value as before. Does it?
(4) We have said that the precision of the bridge is greatest when the slidewire segments are equal, X = Y. You will now investigate that proposition experimentally. Use a 100 ohm resistor as R, and set the sliding tap at 50 cm. Balance the bridge using the resistance box Z. Now vary the setting of resistance box Z to determine the uncertainty in its value, as you did in part (1).
(5) Now you will quantitatively investigate whether the precision depends on the ratio X/Y of the slidewire segments. You will keep one resistance box (say R) constant, to minimize the number of variables. Leave the 100 ohm resistor in place, as R. Now balance the bridge with resistance box Z and determine the uncertainty in Z (by varying Z) when the sliding tap is set for values of 50, 40, 30, 20, and 10 cm.
(6) If there is time, do this also for tap key settings 60, 70, 80, and 90 cm. This test, compared with the results of step (5) may reveal non-uniformities in the slidewire, or non-equal resistance at the binding posts at the ends of the slidewire.
8. ANALYSIS
These questions are to be answered by appealing to your experimental data and results.
(1) Do you find any evidence of contact potentials or thermal (thermoelectric) emfs?
(2) Plot the data for parts (5) and (6), plotting uncertainty in X against the length of the shortest slidewire segment. Does your data show evidence of a dependence of uncertainty on the location of the balance point? Is this dependence large enough to be of importance in the use of this bridge?
(3) From your study of this bridge, quantitatively compare the relative importance of these sources of error: (a) the meter precision, (b) the resistance box precision, and (c) the slidewire scale setting precision. How large an error does each one cause in the measurement of a 100 ohm resistor?
(4) Does your data show evidence of any other sources of determinate or indeterminate error?
9. QUESTIONS
These questions are to be answered by doing a mathematical analysis of the bridge circuit, making use of circuit laws such as Kirchoff's laws and Th‚venin's theorem. Do not appeal to your experimental data or results in answering these questions. (1) We hinted that the resistance of connecting wires could cause error, and suggested you use the shortest wires possible. In fact only some of the wires are critical. Which wires need to be short, and which don't matter? Explain why. Which can cause determinate errors, and which only affect the indeterminate errors? Why?
(2) What effect does the battery voltage have on the precision of the bridge? Would one with twice the voltage give twice the precision? (3) What effect does the galvanometer sensitivity have on the precision of the bridge? Would one twice as sensitive give twice the precision?
(4) What if the voltage of the power source you were using varied erratically, say by as much as 20%? What effect would this have on your experimental data and results, and how much?
(5*) Considering only the errors due to uncertainties in resistance of the bridge arms, show that the slidewire bridge is most precise when the slider is set at the center of the slidewire.
(6*) By changing the value of the resistance box R, the slidewire bridge may be made to balance at any desired point along the length of the slidewire AB. If it were balanced at a point 2 cm from one end, how would the accuracy of the measurement compare with a measurement of the same unknown resistor made with the balance point at the center of the wire?
Text and drawings © 1995, 2004 by Donald E. Simanek.