Thin Lens Ray Tracing
An instructional physics program by Donald E. Simanek.Introductory physics textbooks introduce the subject of lenses and mirrors by use of a geometric process called "ray tracing". This method is an exact geometric interpretation of the simple-lens formula 1/p + 1/q = 1/f, where p and q are the object and image distance (from the lens) and f is the focal length of the lens. Therefore geometric ray-tracing has all of the limitations of that formula.
Specifically, the simple-lens formula applies only to paraxial rays, those rays which make only small angles with the lens axis. In fact, the angles must be so small that the sines of the angles are nearly equal to the angles' radian measure, and the cosines of the angles are nearly equal to 1. Lens aberrations are, by definition, any deviation from the simple-lens formula, and therefore the formula does not reveal their existence. So this method cannot say anything about curvature of field, chromatic or spherical aberration, astigmatism, coma, thick lenses, etc. So what is the simple-lens formula good for? It gives object-image-focal length relations correctly, as well as object and image character (real or virtual) and image magnification.The ray-tracing process and these optical phenomena are difficult for students at first, particularly when dealing with virtual objects and virtual images. This computer program was written to help students visualize such ray diagrams and form a stronger understanding of images of all character.
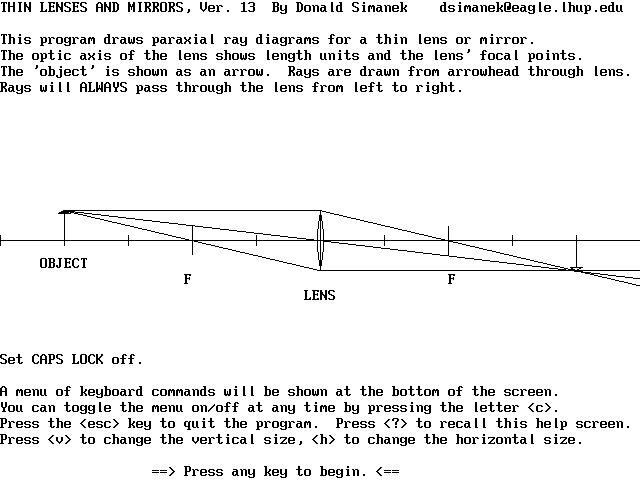
This computer program may be used by the instructor, with a graphics projector, or by the student as an interactive tutorial for concept development. The screen captures in this document have been prepared with monochrome graphics. If you wish to see what this program's typical computer screen display looks like (black background) click here to view lens0.gif. Color is only provided in the compiled version for VGA screen.
This program does not simulate multiple lenses, thick lenses, or aspheric lenses. It does not simulate aberrations of any kind, for the simple-lens formula applies only to paraxial rays and is limited to values of p, q, and f which are large compared to the lens thickness. The method assumes an infinitesimally thin lens. This is not a lens-design program. Many commercial software programs do that. It's purpose is primarily instructional, for concept-strengthening, not for computation. But the results of the simple lens formula computations are correctly displayed.
The monochrome version 13.38 LENS1338.BAS is posted here 3/5/01. Some bugs have been fixed that were in previous versions. This is an older version. It can be run in interpreted BASIC or may be compiled, and will support VGA screens only if your interpreter or compiler can. It has the same functionality as the VGA color version below. It is intended to be compatible with the following computers:
	IBM PC, XT, AT with CGA or EGA graphics
	Tandy 3000 with CGA graphics
	Xerox 6064 or ATT 6300 high res screen, 640 x 400
	Tandy 2000 high res mono, 640 x 400
	Sanyo 555, original MS-DOS, 640 x 200
	Sanyo 555, with video card, DS-DOS, CGA graphics.
	Persyst BoB graphics card, 640 x 350 mono.
This program has evolved over the years, and since I no longer own some of these computers, I cannot test the most recent versions on them. Enough "fossil" code remains in the program that interested users may be able to modify it for their own special computers. Expect the program to run a bit slower on older computers.
Color version 14.56 LENS1456.EXE supports only VGA and EGA graphics, and has color enhancements. The code was rewritten with better subroutine structure, but the user won't notice that. See the last section of this document for notes on its special features.
The color version 14.56 of this program does not work with Windows Vista. My computer with Vista generates an error message "this computer does not support full screen mode." The message seems to apply to the command prompt window in which a DOS program runs. If anyone knows a way around this, please let me know. Another reason to curse Microsoft's contempt for its own past.
However, there is a free DOS emulator, Dosbox, that does run under Microsoft Vista. My lens program works fine under Dosbox in Windows XP, and I have good reason to suppose it would also work under vista. If anyone can confirm this, please let me know. Though Dosbox was developed primarily for the computer gaming community, to run old DOS games, it can also be used to run DOS programs of other kinds. I have used it to run DesignCad 2 and other programs that hang up because they can't find a com port. Windows 3.1 can be run in Dosbox, and thereby run many Windows 3.1 programs that won't run under later versions of windows.
These new versions of my ray tracing program have cleaner graphics in the "rayburst" mode, and a cleaner menu layout. They implement for the first time the option of toggling the lens equation on/off, with the lens equation equation correctly displayed for either sign convention. This helps to remind students of what the program is emulating. The default is the "freshman" convention.
If you experience problems, crashes, or odd behavior, check this site to see if a newer version has been posted. If the newer version still has problems, send me e-mail with as much detail as you can. It is unlikely that I will make any major enhancements to this program, as I am retired from teaching.
The source code for this program is not a model of good programming. It grew over many years of tinkering and debugging. Its only virtue is that it works correctly, and perhaps the results could inspire others to write better code to accomplish the same results and more. It is actually two programs linked together. One simply shows three rays through the edges and center of the lens. The other (the raytrace mode) shows only the "special" rays useful for manual location of images: a ray through the left focal point, a ray through the right focal point, and a ray through the lens center.
The program first attempts to determine the display adapter type from two peeks at hardware codes. If this fails, the user is manually prompted to select from a menu. The user is also given a chance to override the selection from the menu.
Graphics selection.
This program evolved through many computer types. It began on the little Tandy 100, a computer that had a built-in lean version of Microsoft Basic. That evolved into a version for the IBM-PC, then one for the Tandy 2000 and the Xerox 6400, and finally for the CGA and VGA screens. Some of these older computers would get cranky or crash if you tried to draw lines that crossed the boundaries of the screen. So this code was written so that all lines terminate at the screen edges. This is all history now, but the early code still remains.A prompt gives several choices for entry to the program after the computer has selected a screen mode. Press "y" to accept the choice and begin the program, "n" to seclect a different screen, "g" to go directly to the program, bypassing the help screen, or "i" to enter an instructor's "demo" mode. Pressing "enter" accepts the default VGA mode.
The instructor's demo opens showing only a source of light with many rays coming from it in all directions. This illustrates an isotropic source of light. I call this the "rayburst" effect, and it may be toggled on/off at any time by pressing "*".
Pressing any key after this opening screen introduces a converging lens into the picture, and shows how the rays which reach the lens are refracted to form an image. I like to leave the rayburst in place for a while, to remind students that the source gives off many rays which are not affected by the lens. The rayburst effect "goes along" with any changes you make in the size or position of the object. If the object is moved to the right of the lens (virtual object), the rayburst switches off, but returns when the image arrow is placed where it represents a real image.
The opening screen.
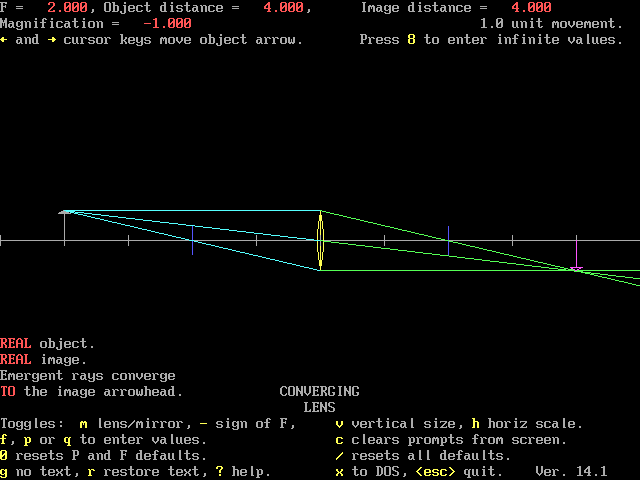
Lens, object, image, and magnification data is displayed at the top of the screen. The type and character of the lens is shown beneath the initial position of the lens. At lower left the character of the object and image is displayed in words. Data displays are completely refreshed at every change of value of a variable.
The opening screen shows the lens shape, and a modest vertical magnification. The lens shape is drawn for a lens of 1.5 index of refraction. No attempt is made to show the rays refracting at the lens surfaces. Consider this only an icon representing the lens.
The present version does not round off the last displayed digit.
Vertical expand.
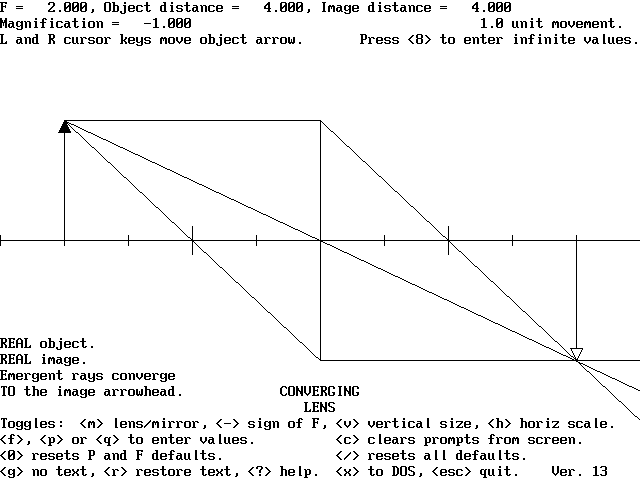
These diagrams seen in textbooks are frequently exaggerated vertically to faciliate manual drawing. Pressing the key "v" toggles a larger vertical magnification. In this mode the lens shape is not drawn; the lens is represented only as a thin line.
The key "h" toggles a smaller horizontal magnification, showing a greater portion of the lens axis. This is useful to see an object or image which is off-screen.
Moving things around.
The display may be scrolled left or right with the "," and "." keys. They are easy to remember, for these keys also have the symbols "<" and ">". (This is an old DOS convention.)The object arrow may be repositioned left/right with the cursor keys. The default movement is 1 axis unit, but movement of .1, .5, 1, and 5 may be selected by pressing 1, 2, 3, or 4 on the keyboard. The selected value is shown one time only at the top right of the screen. If you've scrolled a long way, you can return the lens to default position at the center of the screen by pressing "z" (for "zero").
Object size.
The up/down arrows on the keyboard change the size of the object. This illustrates that for a given object position, the image size is proportional to the object size, a consequence of the linearity of the lens equation. The default length is equal to the lens diamter, which is most useful for most purposes, for it ensures that two "special rays" (those that pass through a focal point) are always displayed.At any time the object size may be set to zero (source on the axis) by pressing "a". The default size is then restored by pressing "b". It may be possible that repeated changes of size by cursor could accumulate round-off error, though I can't seem to make that happen when I deliberately try. But if it happens to you, pressing "a" or "b" should set things right, or press "zero" or "/" to reset all defaults.
Direct entry of values.
Pressing the following keys gives you a prompt to enter values of these variables:
        p or o for the object distance
        q or i for the image distance
        f for the focal length.
These are the conventional symbols used in introductory physics courses.Exponential form may be used for input values (3E5 for example, for 3 x 10⁵). The units used are those shown as "hash-marks" on the lens axis. The position of the focal points are also shown on the axis with longer hash-marks (blue in the VGA version).
Sign convention and the lens equation.
Pressing "s" toggles the sign convention being used for data entry and data display. The opening screen defaults to the "freshman" sign convention. Pressing "s" changes this to the "Cartesian" convention in which everything to the left of the lens is negative and everything to the right of the lens is positive. In this convention the lens equation is 1/p + 1/f = 1/q. The Cartesian convention is often used in upper-level optics courses.
The Cartesian convention takes everything to the left of the lens as negative, everything to the right as positive. This has the fortunate result that the lens equation, as written above, is more intuitive. 1/p and 1/q represent the convergence of the rays entering and leaving the lens. Negative convergence means the rays are divergent. 1/p represents the power of the lens to change the rays' convergence. Why this sensible convention is not more widely used in introductory physics courses is a mystery to me.Pressing "w" toggles the display of the lens equation at the top right of the screen. The equation is correctly shown for the particular sign convention you have chosen. This helps to remind everyone that this program simulates that equation, the ideal(ized) lens equation, and is not a complete simulation of lenses themselves.
Command menu and graphics menu on/off.
The command menu is at the bottom. This menu may be toggled on/off with "c". The data and menu displays may be toggled off/on by pressing "g" (for graphics-only display, useful when doing screen captures for reproduction or when projecting this program on a screen as a classroom aid. For class use, it's useful to be able to suppress the display of object and image characteristics, then ask students to charactrize them as real or virtual.

It's even possible to suppress all text, for a
display which shows only the drawing. Just press the key
"d". The text is restored by pressing
Rather than allow (or require) entry of f, p and q each
time you make a change, I have adopted a more natural
"single entry" logic.
Here's how it works:
Anything larger than 1E6 (or just E6) is considered infinite. Much care
has been taken in writing this program so that variables
will never have values too large for the basic interpreter or
compiler to deal with without crashing the program. The
program also correctly deals with the case where p=0 and
therefore q=0.
Infinite focal lengths, object distance, or image distances and focal
length may be entered by first pressing the number "8". Think
of it as the infinity symbol seen sidewise. Infinite values of
p, q or f may also be entered as 1E6, which is treated as
essentially infinity for all practical purposes. An infinite value of
f may also be forced by entering a value of q equal to p.
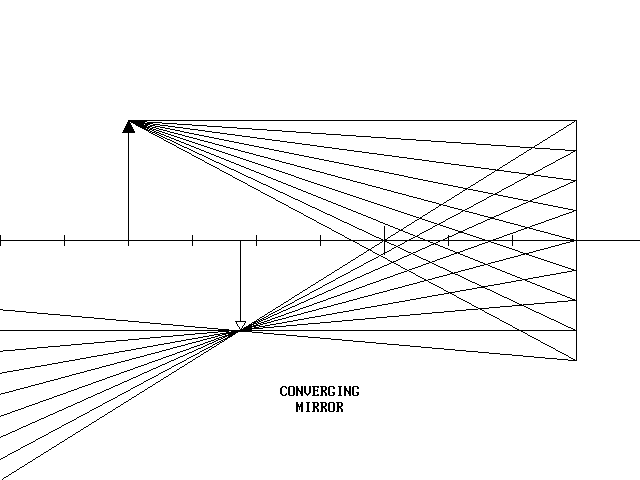
The "-" key toggles the sign of the lens, positive for
converging, negative for diverging. The "m" key toggles
lens/mirror. The curvature of the mirror is not shown, it
is represented by a straight line.
The left/right scroll feature is especially useful when
simulating mirrors.
The rayburst option may be toggled on/off
at any time with "*". It shows the fact that rays
radiate from the object in many directions, but we only
need and use those which pass through the lens to do the
calculations of objects and images. In fact we need only
two of the three "special" rays and the positions of the
focal points to geometrically locate objects and
images. The rayburst effect is only displayed for real objects.
At any time an "interrupted" mode may be invoked by
pressing "`" (left leaning single quote). Rays are then drawn one segment at a time, waiting for a key press to continue. When the final image is drawn,
any normal command may be issued. To enter a command at any
other time in this mode, press "e". To exit the interrupted
mode, press "`" again. The interruped ray mode may be useful
for demonstration in an interactive
class setting, but is not as user-friendly as I'd like.
Pressing "'" (right single quote) displays dotted lines
which are extensions of the emergent rays. This
is useful for showing how incident convergent rays are aimed towared
the object arrow on the right.
Pressing ";" displays dotted lines which are
extensions of the incident rays. This is useful for showing how
emergent rays seem to radiate from the virtual image to the left.
These rays to the right and left of the lens can be shown simultaneously,
but you don't usually need to. Construction rays are not shown
if the lens is scrolled off-screen. I can't think why you'd want them if
the lens were not shown. The construction rays may also be shown in
the mirror simulation.
This is primarily an option for instructor's demonstrations. It should
be used sparingly, to avoid too much confusing detail on screen.
This mode seems
to me to be of limited use except to show that very distant objects
will produce images nearly in the focal plane. It's an
"almost infinity" simulation. This version works
(I hope) just like all previous versions in all other
respects. Let me know if that is not true. I have not
blocked extreme keyboard entries in this "very distant
object" mode. Some work, some don't, and some may generate
an "overflow" message and the "Redo from start" message.
The rayburst feature is disabled in "distant" mode.
If you are working in distant mode, where the object length
is huge, and enter a smaller value of p where that size
object would
generate a screen write error, the program puts the object
there but reduces it to the default size. This does not,
however, exit from distant mode. The only way to exit the
distant mode is to press "/".
The up/down arrow keys change the object size by fixed
increments, which is obviously of little use for distant
objects. The [ and ] keys change the object size by a
fixed fraction of p, the object distance, and are primarily
useful for very distant objects, though they are active at
all times, except when p is infinity.
There's an error handler in the code to print a yellow "Inappropriate
input" message in the middle of the screen and prompt for a
keypress, but I haven't seen it appear in a very long while.
Help! This version implements a help screen which shows all of
the commands. It may be brought up at any time by entering
"?", or, in the compiled .EXE version, by pressing F5.
Raytrace mode. Many instructors emphasize manual
construction of ray diagrams using the three 'special' rays:
At long last I have implemented this conceptual mode as an
optional way to display the diagram.
By simply pressing <r> the "raytrace" mode is toggled
on or off. In this mode the command keys *, [, ], =, and \
are disabled. The screen shows just the three special rays,
and you can't change the number of displayed rays.
When in this mode, the lens plane is shown as a vertical dashed
line. As you change the object height, you are magnifying
the paraxial ray situation in the vertical direction, and
rays "refract" at the lens plane. The lens icon
is still shown to remind you what kind of lens you are
using. When a construction ray goes off the top or bottom
of the screen it is not shown. Restore it by making the
object smaller.
Of course the interrupted mode still works in raytrace
mode, which is very valuable as an instructor demo. The ray
through the center is drawn first, then the incident
parallel ray, and finally the incident ray which (if
extended) passes through the appropriate focal point. If
the object distance is smaller than the focal length, the
incident ray direction is extended as a construction
(dotted) line to the focal point.
The raytrace mode is useful for showing what a true
paraxial situation looks line. Just reduce the object size
to the smallest finite value allowed.
In this version I've given users the option of whether the
defaults are reset when toggling to/from raytrace mode. Two
commands do the raytrace toggle. The
command "r" resets the defaults, the command "u" does not.
I prefer "u" most of the time. For technical reasons, I've
disabled the "u" toggle when you are in "distant object"
mode.
The only way to exit the raytrace mode is to press "r" or
"u". The dashed-line lens plane will disappear as confirmation.
5, 6, 7 For display of five, six, or seven rays.
Since 8/30/01
Revised document, April 23, 2001.
Return to lens tutorial.
You can have lots of rays if you want them.
Pressing 5, 6, 7 or ! triggers display of 3, 5, 7 or 13
rays. The latter is very pretty, but obscures the
simplicity of the ray diagram.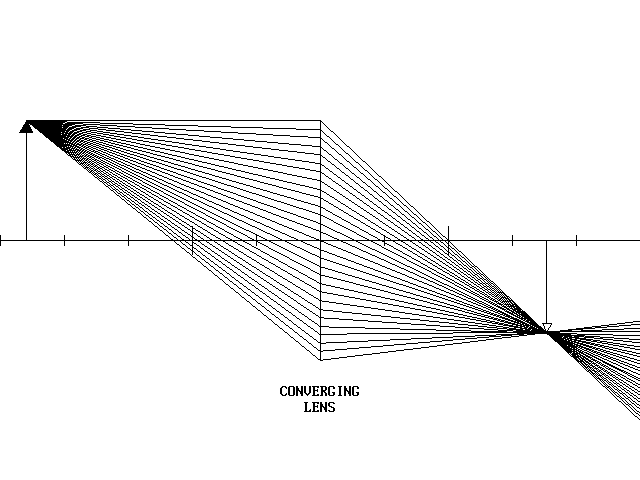
Order of precedence of calculations.
	if you change p, f stays the same, q will change,
	if you change q, p stays the same, f will change,
	if you change f, p stays the same, q will change.
Handling of zero and infinity values.
Positive and negative lenses and mirrors.
Entry of a negative q forces the sign of the lens to change,
if necessary for the given object. If the lens is a positive one,
p is larger than f, and a negative q
is entered, the sign of the lens focal length changes to negative.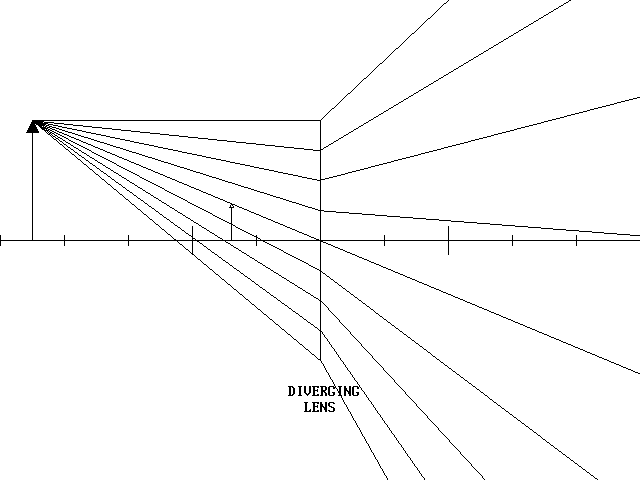
Virtual objects.
When the object is virtual the incoming rays are shown
only near the lens. They must, of course, originate at a source
somewhere, perhaps from another converging lens or a lens
system somewhere to the left of the lens. This is a concept
troublesome to students, and was the motivation for writing
this program. 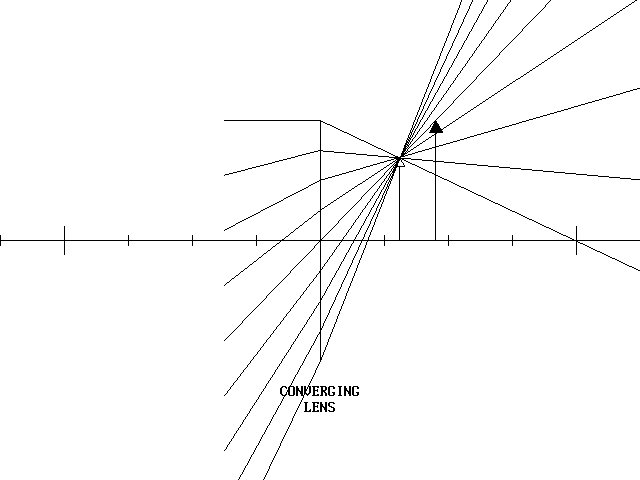
Miscellaneous notes.
The object arrow has a solid head. The image arrow has an
open head. In the color version the object arrow is white,
the image arrow magenta.
The object and image arrows are displayed only when they
lie completly within the boundaries of the screen. Use the
vertical and horizontal display size toggles to display them in
some cases.A constructive feature.
Often you'd like to convince students that incident rays
really do converge to a virtual object, or that emergent
rays really diverge from a virtual image. This program
includes toggles to show "construction"
rays as dotted lines. These are "feature on/off" toggles.This way to the egress.
To quit the program, press the escape key. If you respond
"no" to the "Do you want to exit?" prompt, you are returned
to the point where you left off.Testing, testing ...
Distant object mode. This version addresses
the complaint of a troublemaker who wanted a way to
simulate a very distant object well off-axis.
Enter a very distant
object by pressing "=". This puts the object at a distance
of 5000 units from the lens. Then use the [ or ] keys to
increase/decrease the object size by large amounts.
This moves the
object off-axis as far as you wish. To return the object to
the axis, press "a" or "b" to restore the default image
height.
In this "distant" mode, you can also enter a distant image by
pressing "\". Pressing 8 to enter infinite values of p, q
and f, doesn't give infinity values, but gives the largest
values allowed in this
mode, 5000, 5000 and 2500 respectively. When you are done playing with
this feature, press "/" to exit the "distant" mode and
restore the default screen.
Any thin lens problem can be solved by using just two of
these special rays. I personally think this is a very
useful way for students to construct their own ray diagrams
with a straightege and pencil.Future enhancements.
When I was still teaching I had visions of extending this program and improving it.
In particular, I wanted to:
Other programs I wanted to develop:
But now I leave these improvements to others. Summary of keystroke commands.
? Help screen.
m Toggles mirror or lens display.
s Toggles sign convention. Freshman (default) or Cartesian.
p, q, f For entry of object disance, image distance or focal length.
- Toggles converging or diverging lens display.
0 (zero) Resets p and f default values.
v Toggles vertical magnification.
h Toggles horizontal scale.
w Enter lens equation solver.
> Shifts graphic display to the right. Decimal key. (Old DOS convention.)
< Shifts graphic display to the left. Comma key. (Old DOS convention.)
→ Moves object arrow to the right one unit.
← Moves object arrow to the left one unit.
↑ Increases object arrow size.
↓ Decreases object arrow size.
c Toggles the command menu display on/off.
g No text on screen (graphic only). Toggle.
r Restores text to screen.
/ Resets the default screen.
a Put object on the axis (zero object length).
b Restore object arrow size.
1, 2, 3, 4 Select horizontal increments of 0.1, 0.5, 1 and 5 unit movement.
! Displays 13 rays. (Toggle.)
8 For entry of infinite p, q, or f values.
; Toggle display of incident rays (dotted).
' Toggle display of emergent rays (dotted).
r Taytrace mode, shows the three "special" rays for manual construction.
x Dos shell, to temporarily go to the DOS prompt. Return by typing "EXIT" ![]() Input, bug reports and suggestions are may be sent to
me at the address shown to the right.
When commenting on a specific document, please reference it
by name or content.
Input, bug reports and suggestions are may be sent to
me at the address shown to the right.
When commenting on a specific document, please reference it
by name or content.
people have visited this page, hoping to see the light. Not one of them has offered
any support for program development.
Return to Donald Simanek's page.