Building a better macro adapter for the Fuji W1 3d camera, with flash!
All of the stereoscopic pairs on this page are presented for cross-viewing.In a previous document I described a prismatic macro attachment for the Fuji FinePix REAL 3D W1 camera. (See 3d gallery13.) Never satisfied, I rebuilt it with 1 inch prisms, a 52mm filter attachment ring (for close up lenses) and a double reflector to deflect the camera's flash up and forward. This turned out to be surprisingly successful, in that the camera's flash exposure system still works with all these unauthorized modifications.
The design if the prism frame is the same as the earlier prototypes. Note that front surface mirrors could be used instead of prisms. A 52mm threaded ring is attached just in front of the front prism faces, salvaged from an old filter. This is about the smallest size you could use without vignetting. This allows attachment of threaded diopter close up lenses. I have found that 1 or 2 diopters is ideal.
The Fuji's internal flash provides plenty of light for close up macro photography, but its location between the camera's two lenses puts it directly behind the front prisms, which block its light. The solution is to divert the flash light with two reflectors made from aluminum tops salvaged from peanut cans. One is shaped carefully to lie just between the rear prisms and deflect the flash upward. The second, used full size, is above that, reflecting the upward light forward toward the subject.
This camera, like most point and shoot digital cameras, uses a brief pre-flash to determine the flash exposure. This must follow the same path that the main flash will take from camera to subject. This flash deflector seems to satisfy the camera's computer, for in my initial tests the flash exposures are right on target.
Slave flash.
Caution: That pre-flash can confuse older slave flash triggers causing them to fire prematurely, so if you intend to use slave flash be certain you get one specifically designed "for digital cameras", and better yet, test it before buying. It must have a trigger that ignores the preflash and only fires the flash when the camera's main flash occurs. The preflash is sensed by the camera's autoexposure system, to determine the settings for proper exposure. This happens in all flash modes, and is not to be confused with the preflash used to prevent "red-eye" in pictures taken of people and animals.I just received from Amazon.com a Neewer SF-01 digital slave flash. They are selling it for $6.49, but some places sell it for as much as $40. Made in China, of course. Many web sites have it without giving the brand or model, but the photos match this one. See it here. It works fine with the Fuji 3d, even with the macro adapter described on this page. It can be used with most cameras. It has an infrared-sensor wireless mode and also a hot-shoes. A slide switch sets it to ignore 1, 2 or 3 pre-flashes. Setting to ignore 1 pre-flash works for the Fuji 3d.
It takes two AA cells, is very lightweight and has very fast recycling. The flags for proper insertion of the cells are only on the underside of the removable slide cap of the battery compartment. Easily missed. Also, the cells fit very snugly and don't slide out easily. You may have to use a tool to get hold of one to remove them.
The flash bracket is sturdy aluminum with a rubber pad to grip the camera. At $6.49 (plus about $5 shipping), it is a steal. I just hold the flash in one hand and the camera in the other hand, for I usually want remote flash, not "near-camera" flash. This flash unit does have a 1/4-20 threaded socket on the bottom of two screws on the bracket and these are removable, as is the flash shoe, so you could easily mount the flash on a tripod. These 1/4-20 screws are actually rather good quality with large knurled edges. I bought another flash unit for two-light illumination of tabletop 3d macros.
If you already have an older flash unit you might consider the Seagull model SYK-5 slave flash trigger unit, which is also inexpensive at about $11. I haven't found a US source for this, and haven't tested it.
Details of construction.

View from the front. Prisms are shown below, and some of the steel construction set parts (Meccano and Erector). The black semi-rigid 3x3 hole and 2x9 hole plates were custom cut from larger 1970s Erector construction set parts, using metal shears. Actually I ended up using two 3x4 hole plates on either side (blue). The 52mm threaded ring was from an old color filter, with the filter removed.

This view from the rear shows the carefully shaped aluminum reflector that just fits between the prisms.
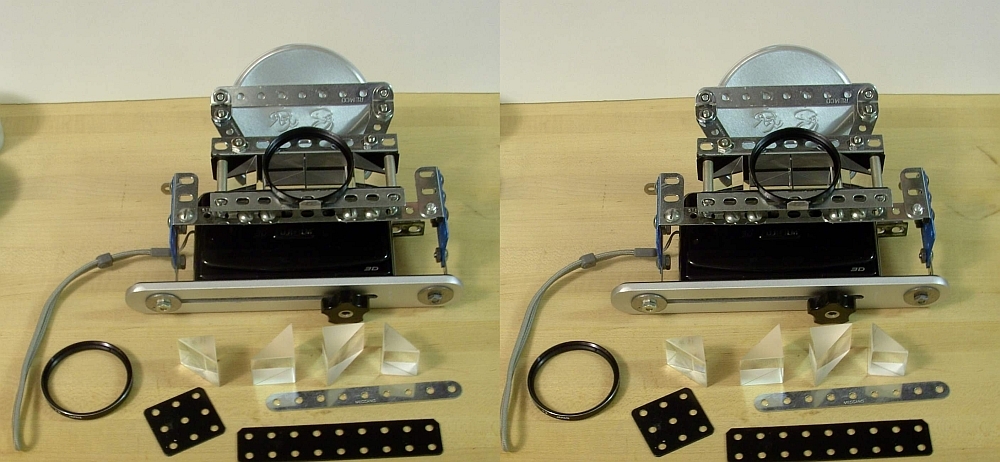
Here is the adapter with the Fuji 3d camera in place. On the table are four prisms from the previous prototype, one of the diopter lenses, and two black "special" parts cut from the plastic plates of a 1970s Erector set. These plastic plates were much despised by Erector collectors who insisted that steel construction sets should be all-metal or mostly so. This is good for us tinkerers, for the plastic plates can be had from parts dealers at low cost and can be easily cut to size with tin shears. Two 3x4 hole plastic plates are used at the sides of the adapter, and one 2x9 hole plastic plate forms the base of the prism holder (it is exactly 1 inch wide, and the prisms have 1x1 inch faces). Another 2x9 hole plastic plate is at the top of the prisms, but a section of it was cut out to accomodate the aluminum reflector. A plated steel 9 hole Meccano strip is shown for comparison.

Front view. Note that the images of the camera lenses are about 1 inch apart. This is a good way to check for alignment of the prisms and alignment of the camera with respect to the prisms.
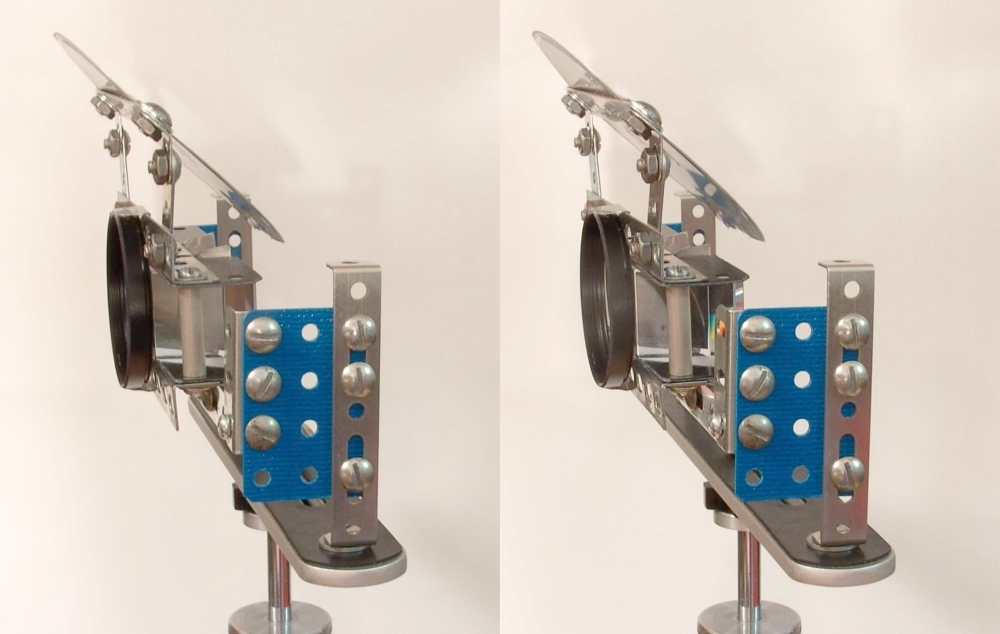
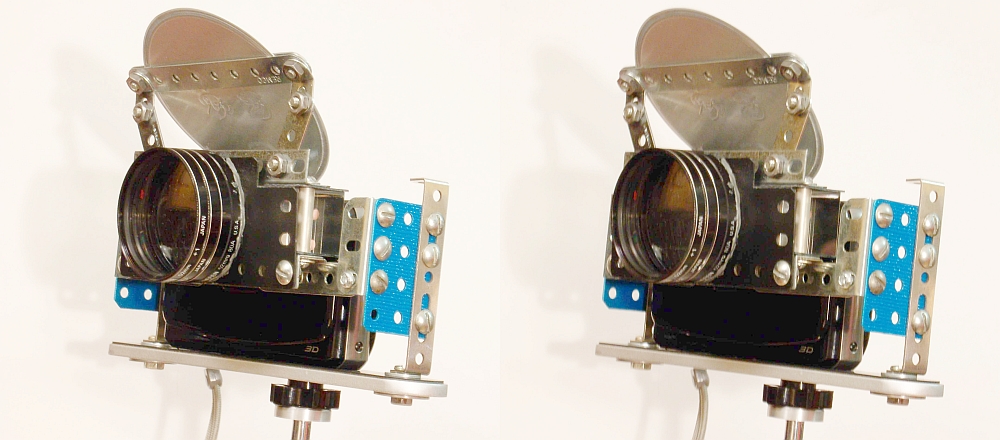
Front/side view of the adapter, showing construction and position of the large aluminum reflector.
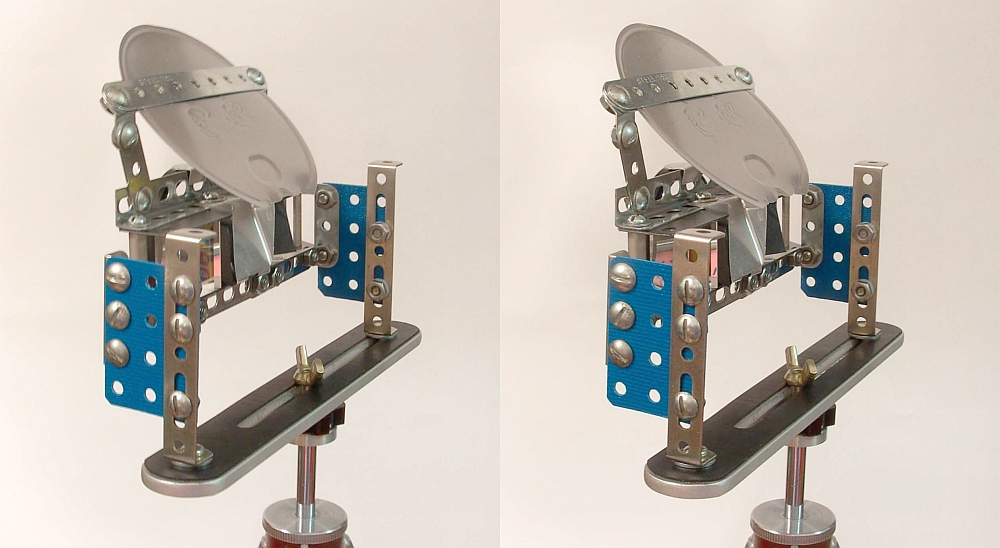
Rear/side view of the adapter, showing the shaped aluminum reflector between the prisms. The sharp edges should be trimmed so they don't scratch the plastic sliding door of the camera.
The above photos were taken with a slide bar and a small digital camera with 1 inch shift. If you sense some unsharpness in some of them, it is due to a slight wobble of the tripod during 2 second time exposures. I will soon replace these with better photos. However, they illustrate a useful fact about stereo. Slight unsharpness in just one picture of a stereo pair is generally ignored by the brain when it fuses them into stereo, and the apparent sharpness of the stereo seems as good as the sharpest of the pair.
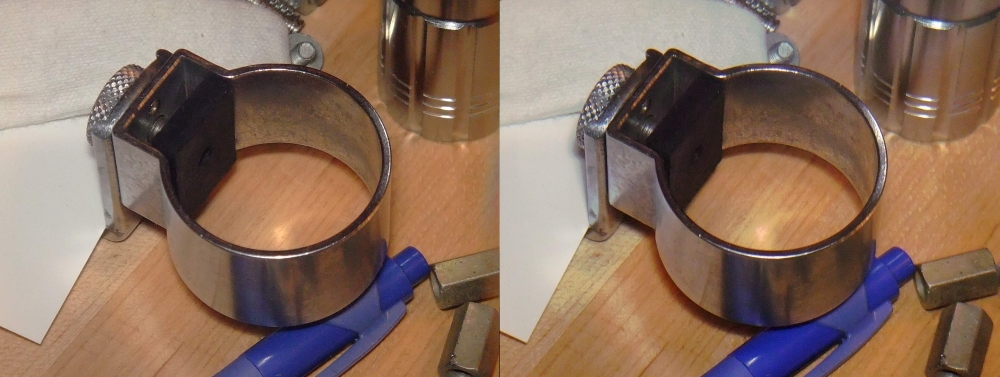
The first test photo, of an old flashgun bracket ring, shows that the exposure is good, and there's none of the dreaded stereo "shadows". This is a beneficial result of the flash being effectively well above the camera lenses, and the matte aluminum diffuses the flash somewhat.
Oudoors in sunlight the camera's flash serves its usual function as fill light to soften shadows.

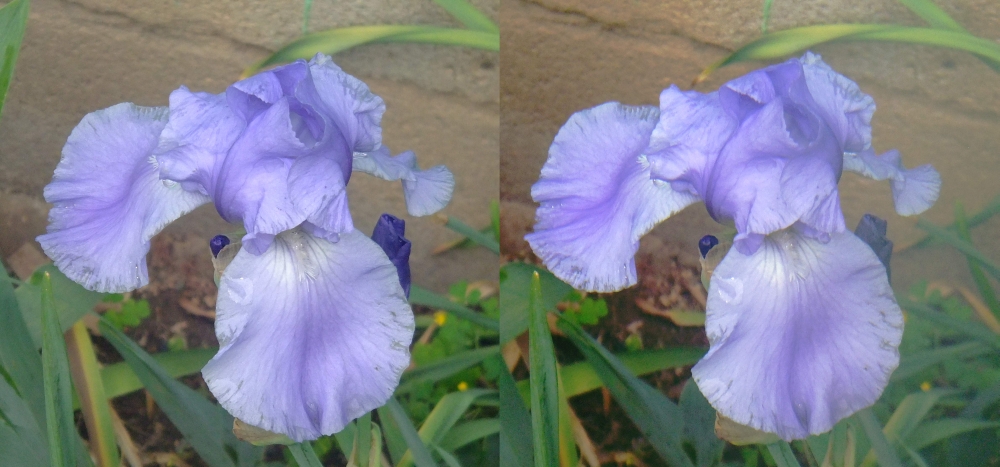
Outdoors in sunlight with slave flash. Fuji macro with +2 lens. P mode, ISO 100. Note how the foliage background close behind the subject makes the picture easier to view than if it were more distant. Its softer focus prevents its detail from distracting from the iris flower.
The final (?) problem.
Some readers may wonder why I haven't put this macro unit in a "proper" enclosure. The reason is simple. I expect I'll soon be taking it apart and modifying it in some better way. Besides, if it works without problems with all prisms exposed to the environment I can be pretty sure the alignment of the prisms is correct, without stray light intruding.Some new Fuji 3d users complain that the pictures they take show slight digital noise when greatly enlarged. Very likely that is when they use the A mode (automatic everything). In A mode the camera chooses shutter speed, aperture and ISO setting, and in dim lighting it chooses a high value for ISO, which has more noise and poorer resolution. This last picture used the P mode (preset), for which the camera's instruction manual provides no help at all. P mode allows you to lock the ISO sensitivity, and for outdoor work or flash photography I like to use the lowest setting, ISO 100, for the best quality pictures. Try it, and you may like it enough to use it most of the time, instead of the A mode. But there are times (sports and moving subjects) where low ISO may force the camera to choose shutter speeds too slow to stop the action.
The P mode is especially helpful for use with the macro unit and flash. In the A (automatic) mode you can't set the ISO sensitivity, and in dark situations the camera will choose large ISO numbers which give digital noise and poorer resolution. In the A mode with ISO 100 the camera must choose slower shutter speeds and/or larger apertures. The same situation exists when you use slave flash, for the camera has no way of knowing that you will provide that extra illumination. I assume that in that case the camera will sense the extra illumination when the picture is taken and shut off image capture when it gets enough. If any reader knows more, let me know.
Some of my test pictures, especially those taken indoors showed a hazy glare. This happened frequently when using flash. Clearly some light from the flash was getting into the prisms and then reflecting or scattering back into the camera lenses. So I stuffed some black foam plastic strips between the camera and the aluminum reflector, on both left and right sides of the flash. I also put light shields just above the lenses, to block light from the reflector from reaching the lenses directly. This eliminated the problem. Apparently the 1/4 inch gap between camera and the adapter was letting some light from the flash reach the back face of the outer prisms and the lenses. So now I have foam light shields all around the inner edge of the flash reflector. This requires that the sliding camera cover be open all of the time, because the foam gets in the way of the cover. But I already showed you in 3d gallery 13 a procedure for turning the camera on and off with the door open. One does need to dissamble the system to remove the memory card.
I suspect this unwanted light from the flash might not be a problem with an all-mirror system.
Fuji's camera design is definitely unfriendly to those of us who make modifications.
Here's the latest incarnation of the design. Black foam strips glued on the sides of the first aluminum flash reflector (not visible) block light from the flash from scattering to the camera lenses. A black plastic front plate holds the threaded filter ring (bonded to the plate with epoxy), and three close-up lenses are stacked on it. If you plan to use larger diamter lenses than 52mm, and/or or a lens shade, for very close work, it would be a good idea to raise the flash reflector about 1/2 inch higher so their shadow isn't in the picture and the flash autoexposure doesn't get confused.
The old rule for stacking lenses applies here. If two or more close-up lenses are stacked, the strongest one should be nearest the camera.

Find the critters. Shooting pictures of bees requires following their rapid and erratic path, and you often don't have time to carefully compose a shot. Sometimes you get lucky and the shot has more than you saw at the time. This one, taken in sunlight with fill flash and a +2 diopter lens at ISO 100 shows three insects. Just above the honeybee is a spider lurking deep in a flower, and to its right is a small, green Katydid. The flowers are commonly called yellow buttercups.

This bumblebee was liesurely going about his business, unconcerned that he was being photographed. This was taken with the internal flash and reflector, with 6 diopters of lenses.
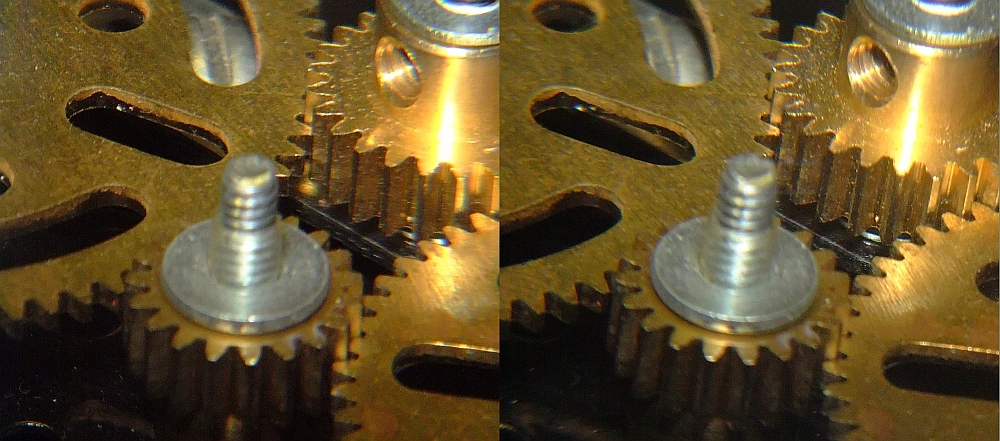
One of my favorite (and handy) subjects for testing focus are gears. The smallest gear here is 1/2 inch diameter. Taken with flash, and 6 diopters. The depth of focus wasn't sufficient to cover the stereo depth, so the near field is slightly unsharp, but I don't think it matters much. Six diopters is pushing the limits of this sort of system. For general use, 2 diopters is best.
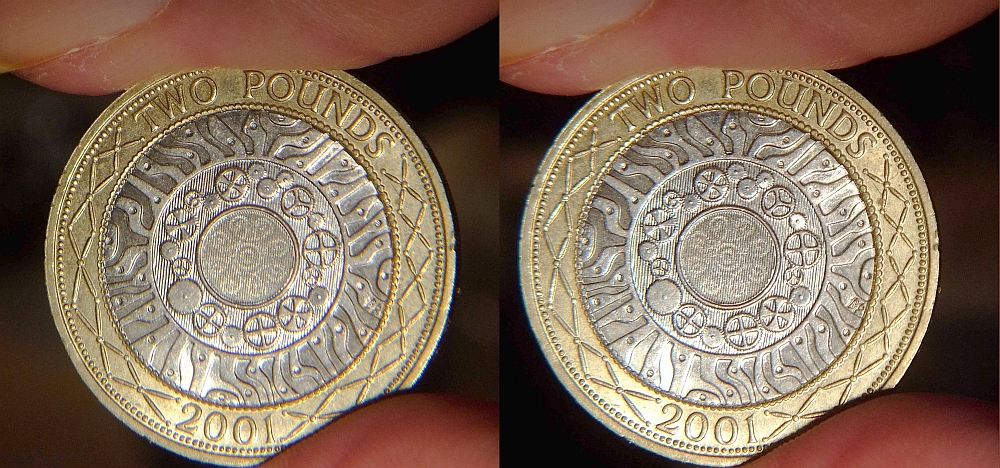
Finally, while photographing this British 2 poound coin for a magazine article, I said "Why not photograph it in stereo?" This was taken with the Fuji 3d adapter and 6 diopters worth of close-up lenses handheld with the camera's fill flash bounced from the reflector. The coin is interesting because the design has 19 gears in a closed loop, which, being an odd number, could not possibly turn. It was that design I wanted to show clearly. The tiny gears can be distinguished better in this photo than they could if you were holding the coin and looking at it with your naked eye (unless you used a magnifying glass). Violation of the 1/30 rule exaggerates the stereo relief. Carelessly, I held the coin upside down. No problem; I just rotated the resulting stereo 180°. This system is so simple to use for small objects that it may become my system of choice whether I want a 2d or 3d result.
Digital vs. film stereo
Classic 1950s stereo photography was dominated by the Stereo Realist and its imitators. Typically the film of choice was Kodachrome with ASA (ISO) 10 or ASA 25. Sometimes Ektachrome 32 or Kodachrome 64 were used when these became available later. The film chips were only 5 sprockets wide (compared to 8 for 2d 35mm cameras), and the smaller the film and the higher the film sensitivity, the more grainy the results. Photographers wanted the finest grain and highest resolution for stereo. The high end cameras generally offered aperture settings up to f:3.5 or f:2.8 for use when photographing darker scenes, and shutters from 1/1000 sec to 1/50 sec, and time exposres as long as you wanted. With larger apertures you could deliberately let a background have soft focus to emphasize a close subject. But for general photography in sunlinght most stereo photographs were taken with the smallest aperture you could get away with, for sharp rendering from nearby to infinity.Digital photography changed the equation. The Fuji 3d for example has just three aperture settings, f:8, 5 and 3.7. But the lenses have shorter focal length, which give greater depth of field than the Realist's 35mm lens. This makes it impossible to deliberately get a smaller depth of field with nearby subjects, to soften a background. The longest shutter speed is only 3 seconds, achievable only by using the "night scene with tripod" shooting mode.
In automatic mode digital cameras generally will increase the ISO film sensitivity as needed for a good exposure, since the camera has no f-stop option larger than 3.7. For indoor scenes with normal lighting, this gives a well-exposed picture, but at a high ISO the sensor resolution isn't as good, and digital noise may become noticable. Then you may wish to use slave flash, with its attendant complications.
If you choose the "preset" (P) mode, you can lock the ISO sensitivity, while retaining the other automatic functions. Perhaps you choose the smallest sensitivity, ISO 100. In daylight that's usually just fine. But indoors you probably will need more light. Or you can go back to "automatic" (A) mode.
There are things you just can't (easily) do with a point-and-shoot digital camera.
- You can't take double exposures. Maybe you can simulate this effect with software, but it probably wouldn't be easy.
- The Fuji W-1 3d doesn't allow you to use macro mode in 3d, only in 2d. There's probably a good reason for this, for the camera's stereo lens spacing is much too wide for such close work in 3d. If you want to photograph something small (like a flower) you do have the 3x telephoto with which you can more tightly compose at a greater distance. With my macro adapter, the effective lens spacing is only 1 inch, so it would be nice to be able to work at closer subject distances for greater stereo depth.
- We are "stuck" with composing the picture on the camera's LCD screen, which is near-impossible to do in bright sunlight (even with the LCD brigtness increased). There's no other viewfinder, and not even a place where an external viewfinder could be easily attached. (The ability to compose on a small 3d screen is a dubious benefit. How often would one take the extra time?)
- The Fuji 3d has no direct connector or communication device for external flash, and no hot shoe. I've described the use of slave flash units and external flash triggers, but these require you to turn on the camera's "fill flash".
- The Fuji has no convenent attachment points for accessories, and not even threaded rings for lens shades, filters, polarizers or supplementary lenses. It does have a tripod screw. (You can add these functions as accessories, but it would have been nice to have them integral to the camera.)
- I have not found a way to use bounce flash or flash diffusers on the camera's flash and still get predictable auto-exposures. I suspect the reason is that the Fuji determines the proper exposure with an infrared light, then sets the camera system on the assumption that the built-in flash fill is the only flash illuminating the scene. I'm still working on this problem.
- It's not easy to deliberately darken or lighten digital camera exposures. You can adjust exposure by plus or minus 2 stops using a menu, but this takes valuable time. (With film cameras it was simply a quick manual adjustment of aperture or shutter speed.) You can, of course, center-focus on something in the scene that is lighter or darker while holding the shutter release halfway down, and hold it there while recomposing. Then depress the shutter release all the way to take the picture.
- You don't have the drops, swings and tilts of a studio or press camera, for controlling perspective. A workaround is to use the keystone correction tools in Stereo Photo Maker (SPM). (Select adjust, easy adjust, then select V_persp and H_persp tabs.) To be fair, we never had these features on film stereo cameras, either. However, similar effects may be done after the picture is taken. See digital stereo photography tricks and effects.
- Autofocus, autoexposure, and auto color balance.
- 3x zoom in stereo.
- It is lightweight and compact.
- The integral lens cover is nice, too.
![]() Input and suggestions are welcome at the address shown to the right.
Input and suggestions are welcome at the address shown to the right.
All stereo pictures on this page © 2010 by Donald E. Simanek.
Latest revision May 18, 2010.
Stereo pictures for cross-eyed viewing 3d Gallery One.
More cross-eyed stereos in 3d Gallery Two.
Stereo view cards in 3d Gallery Three.
Building a digital stereo close-up photography system in 3d Gallery Four.
Review of the Loreo stereo attachment 3d Gallery Five.
Review of the Loreo macro adapter, 3d Gallery Five B
The Loreo macro stereo attachment—improved 3d Gallery Five C.
The Loreo LIAC attachment as a 3d macro device, 3d Gallery Five D.
Wildlife photography in your backyard, 3d Gallery Six.
A home-built digital stereo camera using mirrors 3d Gallery Seven.
Stereo close-up photography in your garden 3d Gallery Eight.
Stereo photography in your aquarium 3d Gallery Nine.
Stereo digital infrared photography 3d Gallery Ten.
Wider angle stereo with the Loreo LIAC 3d Gallery ll. A failed experiment.
Review of the Fuji FinePix Real 3D W1 camera. 3d Gallery 12.
Macro attachment for the Fuji FinePix REAL 3D W1 camera. 3d gallery 13.
Panoramic stereo photography. 3d Gallery 14.
Tips for stereo photography with the Fuji 3d camera. 3d Gallery 15.
Mirror methods for stereo photography. 3d gallery 16.
The Fuji 3d macro adapter with flash! 3d gallery 17.
Critters in stereo. 3d gallery 18
Wide angle stereo. 3d gallery 19.
Telephoto Stereo. 3d gallery 20.
2D to 3d Conversion. 3d gallery 21.
Stereos from outer space. 3d gallery 22.
Review of the Panasonic Lumix 3d digital camera. 3d gallery 23.
Reverberant flash for shadowless lighting.
Digital stereo photography tricks and effects.
Shifty methods for taking stereo pictures.
Guidelines for Stereo Composition.
![]()
Input and suggestions are welcome at the address shown to the right.
Return to the the 3d and illusions page.
Return to Donald Simanek's front page.