Simple methods for close-up stereo photography.
This page requires a monitor width of at least 1000 pixels in order to see both images for cross-eyed stereo viewing. Since the photos also have large vertical dimension, it helps to toggle the "full screen" view (F11 in Windows). However, if you haven't mastered that viewing method, these pictures may also be appreciated as 2d flat photos. All are © 2008 by Donald Simanek.
For instructions on free-viewing 3d by the cross eyed method, see the
How to View 3D page.
Telephoto 3d.
Fuji stereo cameras have a 3x optical zoom, a luxury we never had with stereo cameras of the 50s, not even the Stereo Realist. Most first time stereo users will likely take most pictures at the default setting (no zoom). If they use the zoom for a distant object they may be disappointed, for though it makes the subject seem larger, it does not produce greater depth, in fact the depth seems to be less.
The real value of the zoom facility lies elsewhere.
- Portraits. If you shoot a stereo portrait by moving closer to your subject, you may find the results are unflattering, showing exaggerated depth. Just as portrait photographers often used "portrait" lenses on their cameras, you should, too. The portrait lenses in 2d days had focal lengths 2 times as long as "standard" camera lenses, sometimes 3x. You can get similar results by photographing a person from a greater distance and using the stereo camera's zoom lens.
- Close ups of small animals, flowers, miniature models, toys, etc.

These two young racoons were still curious and fearless. (One is well hidden.) Taken with the Fuji W3 3d, 3x zoom.
This method for close-ups works best when nothing in the scene is more distant than about six feet from the camera, to avoid excessive disparity of distant objects.

This picture of mountain laurel in early June was taken the same way. The background was in deep shadow and does not distract. The few visible objects there were retouched out.
Stereo convergence.
I have described many methods for taking stereo pictures of small objects, by reducing the effective interocular spacing of the stereo camera's lenses. These avoid the excessive stereo parallax of such pictures and do a good job of preserving the geometry of the subject.
If you photograph a nearby subject (less than 3 feet away) with a stereo camera that has "normal" (2.5 inch) interocular spacing, your eyes are forced to converge uncomfortably when viewing the picture. You can shift the two pictures horizontally to make the subject appear farther away when viewed, but that makes everything in the picture appear farther away, and stretches the z-axis1 abnormally. It also presents the dilemma of where to place the stereo "window"—the boundary frame around the picture. If you crop the picture, you can make that frame as distant as the subject, and at the same time you lose much of the picture at the sides, resulting in a narrower picture. Of course, this portion of the picture had no 3d effect anyway, but the narrow format and narrower angle of view is often considered undesirable.
You could move back away from your subject, then crop the resulting pictures severely on all sides. Or achieve the same effect by moving even farther back and using the camera's telephoto function.
For example, take a picture at a distance S from the subject that composes and frames the picture the way you like. Then if you moved back twice as far away from your subject (2S), and used 2x telephoto, the subject would still fill the frame. The subject size would seem the same as with the normal lens setting, but the effective lens separation would be reduced by half. Stereo depth would also be reduced by half. But this usually makes such subjects easier to view, and the results are pleasing.
Much depends on the viewing method used. I find that cross-eyed viewing is more tolerant of stretched depth. This is because distant objects require less eye convergence than nearby ones. But each person's perceptions are different.
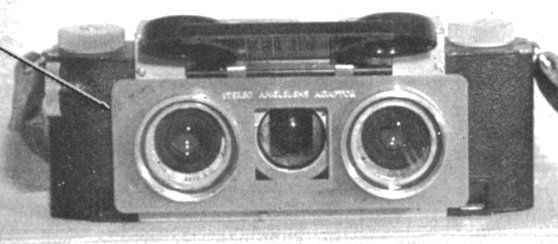
Stereo Angle Lens attachment for the Stereo Realist.
Back in the dark ages when everyone used film for photography, stereo photographers somemtimes used close-up lenses for photography of nearby objects. These were matched prismatic lenses that attached to the camera's filter rings. They had alignment marks that had to be accurately positioned to ensure the prism axes were correct. They not only allowed for closer focusing, but their prismatic effect caused the effective stereo axes to converge toward the subject.
One such device was the "Stereo Angle-Lens", a prismatic close-up lens manufactured by
Photo-Liz Inc. in Long Beach NY. These were available for the Stereo Realist camera, but I suspect not many were sold. This set had three different strengths. One was "neutral", which did not alter the focus. Its prisms had no lens action, they just converged the stereo axes.
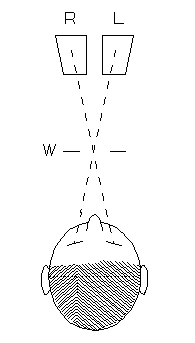
The same effect could have been achieved as shown in this figure. One lens, at least 4 inches in diameter, is mounted so that the camera lenses "look" not through its center but near its edges, achieving prismatic "bending" of the optic axes as shown below.
A one diopter lens converges the axes to about 1 meter, 2 diopters to 1/2 meter, 3 diopters to 1/3 meter, etc.
An alternative arrangement uses two matched lenses as shown to the left. If two lenses are used, you'll want each to have a diameter of about 52mm. This trick of using a lens off-center for axis convergence was used in the old viewers for stereo view cards in the Victorian era.
Where do you buy such lenses today? Typical close-up lens sets sold for 2d photographers included +1, +2 and +4 diopter lenses, threaded so they could be used in combination for anything from +1 to +7 diopters. You can still find them. Used close-up sets are often available at bargain basement prices at camera stores. Pharmacies sell inexpensive hand magnifiers. Be sure you get optical glass, not plastic.
Or, if you just want to try the method, consider a pair of those inexpensive reading glasses sold in drug stores. They have diopter ratings marked on the frames. Remove the lenses from the frame and remount them as you like.
The Fuji camera's autofocus functions properly with closeup lenses.
I always like to include examples of the results of my half-baked ideas. I found a large lens (from an old lantern slide projector). It was not optical quality, and showed annealing stress distortions, but it was handy. Also handy is my cluttered work table near my computer, which makes a good stereo subject.
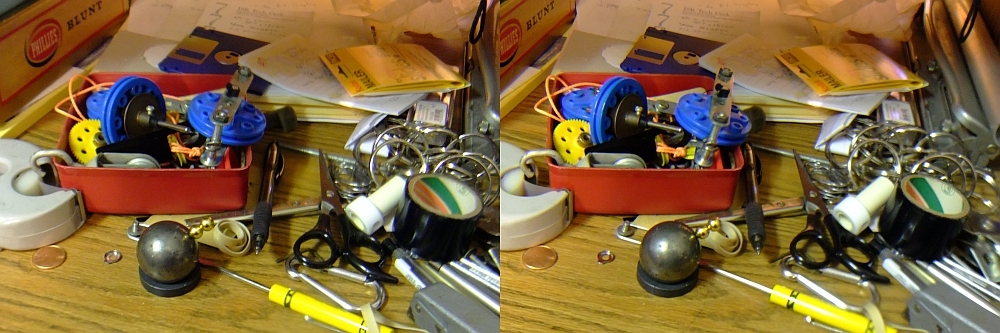
The axial convergence was just right. There was no 2d material at the sides, so no cropping was required. The convergence of the stereo axes increases the stereo depth (z axis), but still our brain judges these familiar objects to look "normal", at least with cross-eye viewing.

However, as this cropped portion of the same picture shows, a 2x enlargement has even more comfortable stereo, just as it would if I had used a 2x telephoto setting at the same subject distance. I attribute the slightly "soft" resolution to be due to the low optical quality of the large lens I used. I am surprised that it wasn't worse.
Since taking these pictures I stumbled across the lens I used to use with my Kodak stereo camera in the 1960s. It was 4 inches in diameter and a focal length of 22 inches. My notes say that I set the camera lenses at 3.5 ft, and placed the subject at 12.5". Depth of focus in sunlight was from 12" to 18". I did not use this with my Stereo Realist camera because the snap-up lens cover would get in the way.
Is it worth the trouble?
A friend, a long-time accomplished stereo photographer who specializes in macrophotography, recently acquired a Fuji W3 camera. He often uses rigs with two synchronized cameras, and complained that the Fuji camera provided no easy way to deliberately produce axis convergence. My advice was "Move farther away, use the telephoto setting and then crop the result to your liking." After trying the large close up lens alternative, I still think that was good advice. You'll have to crop the picture width, but the Fuji camera's pictures do not suffer much from even severe cropping, and it sure beats lugging around a heavy glass lens in your camera bag.
Still, there are situations were convergence of stereo lens axes might be desirable. Consider a subject that has very small stereo relief, like a bas-relief. Axis convergence can boost that relief considerably. These situations are most likely to be encountered in an indoor studio setting.
As with all stereo macro photography it is good to have a plain background just behind the subject. Some photographers carry large cardboard sheets in plain colors such as dark green, blue or black to hold behind flowers for close-up photography.
Footnotes.
1. In stereo jargon, the z axis is the depth dimension, a coordinate axis extending from the camera to infinity. The x and y axes are width and height, as seen from the camera position.
Stereo pictures for cross-eyed viewing 3d Gallery One.
More cross-eyed stereos in 3d Gallery Two.
Stereo view cards in 3d Gallery Three.
Building a digital stereo close-up photography system in 3d Gallery Four.
Review of the Loreo stereo attachment 3d Gallery Five.
Review of the Loreo macro adapter, 3d Gallery Five B
The Loreo macro stereo attachment—improved 3d Gallery Five C.
The Loreo LIAC attachment as a 3d macro device, 3d Gallery Five D.
Wildlife photography in your backyard, 3d Gallery Six.
A home-built digital stereo camera using mirrors 3d Gallery Seven.
Stereo close-up photography in your garden 3d Gallery Eight.
Stereo photography in your aquarium 3d Gallery Nine.
Stereo digital infrared photography 3d Gallery Ten.
Wider angle stereo with the Loreo LIAC 3d Gallery ll. A failed experiment.
Review of the Fuji FinePix Real 3D W1 camera. 3d Gallery 12.
Macro attachment for the Fuji FinePix REAL 3D W1 camera. 3d gallery 13.
Panoramic stereo photography. 3d Gallery 14.
Tips for stereo photography with the Fuji 3d camera. 3d Gallery 15.
Mirror methods for stereo photography. 3d gallery 16.
The Fuji 3d macro adapter with flash! 3d gallery 17.
Critters in stereo. 3d gallery 18
Wide angle stereo. 3d gallery 19.
2D to 3d Conversion. 3d gallery 21.
Stereos from outer space. 3d gallery 22.
Review of the Panasonic Lumix 3d digital camera. 3d gallery 23.
Reverberant flash for shadowless lighting.
Digital stereo photography tricks and effects.
Shifty methods for taking stereo pictures.
Guidelines for Stereo Composition.

Input and suggestions are welcome at the address shown to the right.
Input and suggestions are welcome at the address shown to the right.
Return to the the 3d and illusions page.
Return to Donald Simanek's front page.
More cross-eyed stereos in 3d Gallery Two.
Stereo view cards in 3d Gallery Three.
Building a digital stereo close-up photography system in 3d Gallery Four.
Review of the Loreo stereo attachment 3d Gallery Five.
Review of the Loreo macro adapter, 3d Gallery Five B
The Loreo macro stereo attachment—improved 3d Gallery Five C.
The Loreo LIAC attachment as a 3d macro device, 3d Gallery Five D.
Wildlife photography in your backyard, 3d Gallery Six.
A home-built digital stereo camera using mirrors 3d Gallery Seven.
Stereo close-up photography in your garden 3d Gallery Eight.
Stereo photography in your aquarium 3d Gallery Nine.
Stereo digital infrared photography 3d Gallery Ten.
Wider angle stereo with the Loreo LIAC 3d Gallery ll. A failed experiment.
Review of the Fuji FinePix Real 3D W1 camera. 3d Gallery 12.
Macro attachment for the Fuji FinePix REAL 3D W1 camera. 3d gallery 13.
Panoramic stereo photography. 3d Gallery 14.
Tips for stereo photography with the Fuji 3d camera. 3d Gallery 15.
Mirror methods for stereo photography. 3d gallery 16.
The Fuji 3d macro adapter with flash! 3d gallery 17.
Critters in stereo. 3d gallery 18
Wide angle stereo. 3d gallery 19.
2D to 3d Conversion. 3d gallery 21.
Stereos from outer space. 3d gallery 22.
Review of the Panasonic Lumix 3d digital camera. 3d gallery 23.
Digital stereo photography tricks and effects.
Shifty methods for taking stereo pictures.
Guidelines for Stereo Composition.
Return to Donald Simanek's front page.