Digital stereo photography tricks and effects.
by Donald E. Simanek
All of the stereo pairs on this page are presented for cross-viewing.Digital cameras are nice, but some of the tricks we used to do with film cameras aren't obviously easy with digital. Double exposres, for example, can't be done simply by re-exposing without winding the film. Some of the old tricks can be simulated with post-processing software.
Perspective control.
|
|
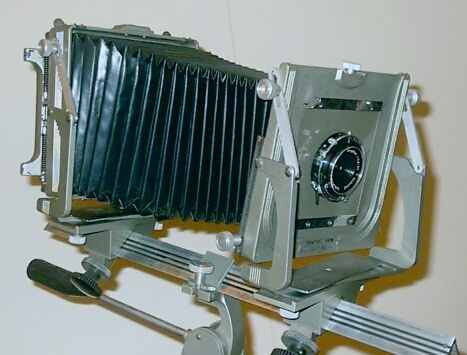
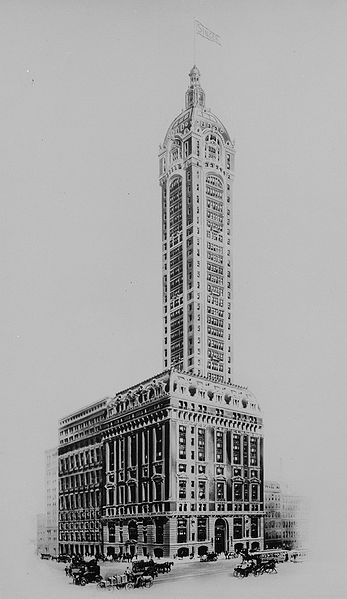
Digital cameras don't have the lens shifts, drops, swings and tilts of the large format studio or press cameras. These features were used for controlling perspective and even for enhancing depth of field. In the 1940s and 50s professional photographers often used such tricks. For example, to photograph a tall skyscraper from ground level on the street below, they would often use such cameras to warp the perspective so that instead of the building's sides converging to a perspective vanishing point, they were rendered parallel. This was called "single point perspective" or "two point perspective", or "architect's perspective". When artists discovered perspective in the Rennaissance such 1 or 2 vanishing point rendering was used for pictures of buildings and city scenes. It is still seen today in architectural drawings, used for its dramatic impact. See two point perspective. This 1908 picture of the Singer Building in New York City is in two point perspective.
Studio photographers often used similar tricks in product photography for advertising pages. See view cameras, tilt and shift photography, and keystone correction. These effects can be obtained with photo-manipultation software. But did you realize you can also do it in stereo, using only Stereo Photo Maker?
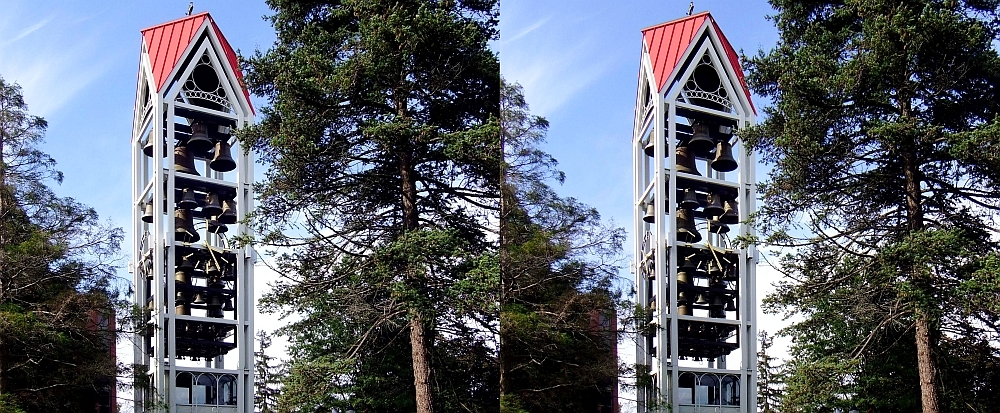
To illustrate that, consider this picture of our Lock Haven University campus bell tower. The tower sides (and the trees) converge with height. This is a necessary consequence of having to aim the camera upwards to get in the whole hight of the tower from a nearby camera position. Of course, if you could move farther away (assuming no trees or structures were in the way), you could render this tower with more nearly parallel sides. And you'd lose stereo depth, even if you used a telephoto lens.
A telephoto lens on a stereo camera (such as the Fuji 3d) gives you the same picture geometry and stereo relief as if you used a wider angle lens and just cropped a small section from it. The telephoto/wide control does not change the lens axis separation. You'd have to use the cha-cha method to take 2d pictures from widely separated vantage points to preserve stereo relief in a subject such as this.
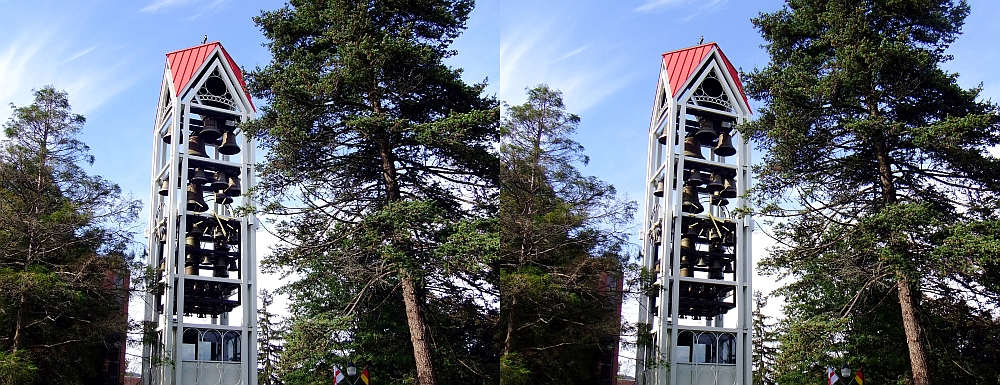
Now compare this version. Most of the convergence has been eliminated.
This was accomplished with the keystone correction tools in Stereo Photo Maker (SPM). (Select adjust, easy adjust, then select V_persp or H_persp tabs.) In this case the horizontal perspective control was used (which seems counter-intuitive). Important: Check the "link both rotations together" box, to ensure that the left and right pictures are adjusted identicaly. SPM uses the word "rotations" incorrectly to label this function. But it works.
Even film stereo cameras didn't have such perspective controls. But this software simulation can be done on stereos taken with any 2d camera by the cha-cha method. I wonder how many people have tried this in stereo? It is a bit surprising that it works so well. Which version you prefer is a matter of taste. I rather like this "retro-photography" look.
Another place this might be useful is to increase convergence of parallel lines.

After applying keystone correction or distortion it often a good idea to do another SPM auto-align and to reposition the stereo window with horizontal shift.

Same tower, taken with maximum zoom. After making the side by side stereo pair I used edge detection, and then boosted contrast in Irfan View. Paint programs have "paint," "solarize," and other effects.
Tilt
Tilt is a word stereo photographers have long feared. Every 3d film camera instruction manual cautioned "Never tilt the camera sidewise." Some even provided a spirit level visible in the viewfinder to prevent accidentally tilting the camera.
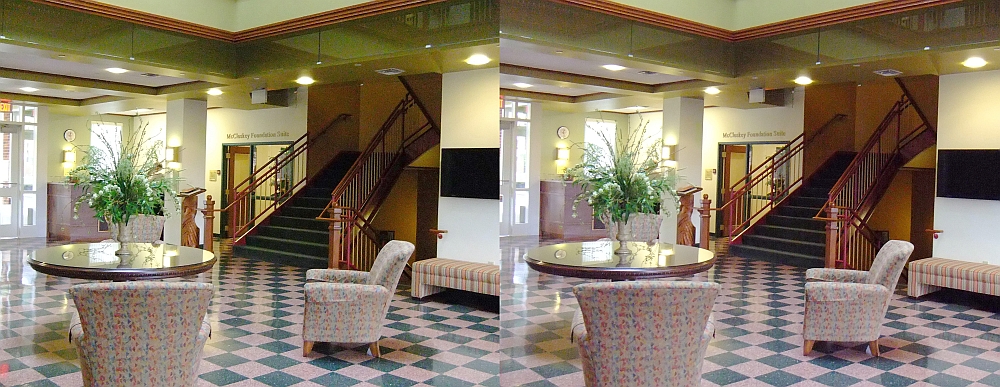
This interior picture is ok, but that slight tilt is mildly annoying because the scene contains so many vertical and nicely parallel lines, but the picture frame doesn't match them. Dare we correct that? Why not try?
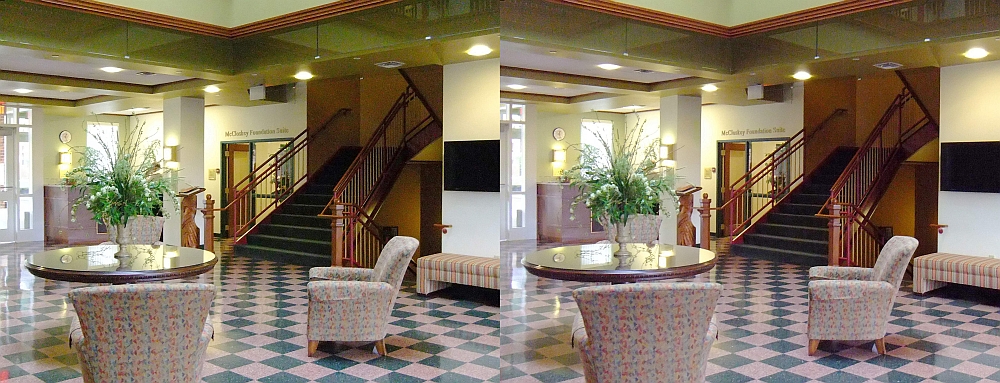
We have corrected the tilt with SPM by exactly 1.3° using SPM. Does this compromise the stereo effect? Not that I can see. Don't tell and few would notice. Don't be afraid to do another SPM autoalign after correcting tilt, for that won't undo your correction.
Perspective
Stitched stereo panoramics will often show considerable curvature of straight lines. This is cylindrical perspective.
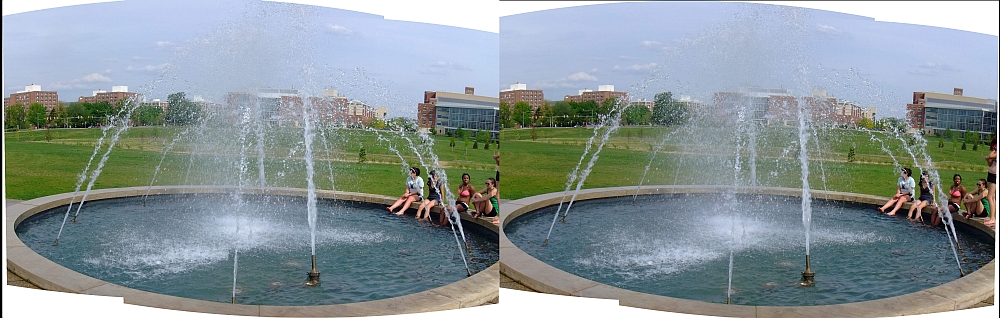
This is the raw output of a two-panel stereo panoramic taken with the Fuji 3d camera. Notice the buildings in the background. This is actually the way our brain would "see" the scene if we "panned" our eyes left and right. This is the way a single wide angle camera lens would record the scene if the lens design were not "corrected" (as most are) to render straight lines straight. Many people prefer this. The raw edges of this stitched picture show how the panoramic software (PanaVue) had to warp the pictures to achieve smooth "straight" lines across the overlap region of the two panels.
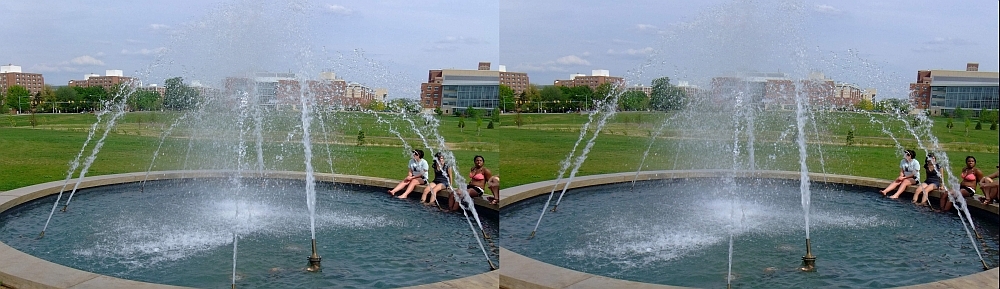
Stereo Photomaker has the capability to "correct" this, in its "barrel distortion" function. Select "adjust, quick adjust, barrel". Here's the result, not completely corrected, but much reduced, and, for most people, a "better" representation of the scene. Some tilt was also corrected and the pictue cropped top and bottom. The downside of this trickery is that you can straighten lines, but angles are altered. Right angles are no longer rendered as right angles, particularly near the edges of the picture. Look at the windows of the building at the extreme right. They look like trapezoids, not rectangles. Can we fix that?
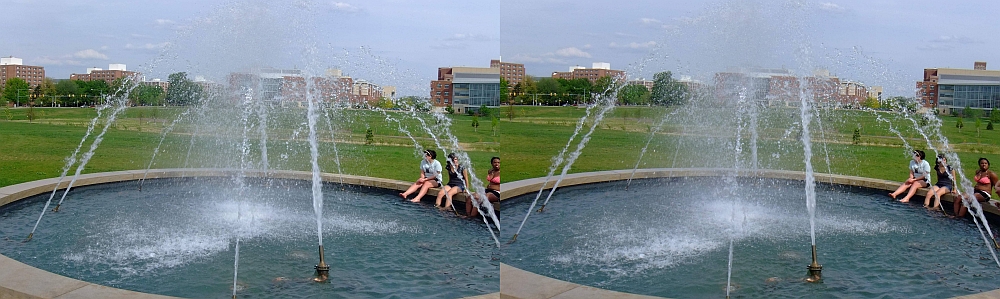
Application of the horizontal perspective correction in SPM has straightened that building considerably, as well as improving the geometry of all the buildings in the distance.
Stereo cloning.
Fuji 3d camera users must be continually aware that it's all too easy to get a finger in front of one of the camera's lenses, usually the left lens. But sometimes, in haste, one forgets. And this is the result.
Sometimes you are lucky and the image can be cropped in SPM. Most photomanipulation programs have a "clone" tool, which can be handy for removing specks and blemishes in photos, and even more extensive photo "repairs". But they are even useful in stereo.
Here the background from the right picture (on the left) has been cloned to replace the finger image on the right. This was remarkably easy to do, taking no skill at all. Just be sure to space the copy so that it produces an image at the right distance when viewed in stereo. No one I've ever showed this to realized that it had been manipulated.
Cropping
The stereographer who learned the craft with film cameras may have an aversion to (1) experimenting with telephoto stereo pictures, and (2) cropping any stereo picture. Film stereo cameras didn't have telephoto capability, and the small film chips were a standard size to fit standard mounts, so cropping was a tedious "last resort" to salvage an otherwise imperfect picture. All that is changed with digital stereo.Consider this example. Taken in daylight with the Fuji 3d fitted with my macro adapter, it was a situation in which I couldn't even see what I was shooting on the LCD screen. (I really must devise a viewfinder for that thing.) I just aimed and hoped the aiming might be correct. It wasn't. But the Fuji's autofocus worked fine. (Too bad it can't also autolocate the subject of interest and autoadjust the composition to artistic standards.) My macro adapter works at 3x telephoto setting. Dare we crop this further, to isolate the honeybee on the flower at the very bottom of the frame?


Why, of course we can, or I wouldn't have mentioned it. The original pictures were 2753 x 2606 pixels (each), reduced to 1000 pixel width for presentation here. The cropped version was 1222 x 1014 pixels, also reduced to 1000 pixel width. So the result is equivalent to a more than 6x telephoto picture. Yet sufficient stereo depth remains for it to be an interesting 3d picture. The detail is still sufficient for web use. The composition is nothing to brag about, however. The Fuji 3d camera has digital zoom but only in 2d. Cropping gives the same result in 3d. So give cropping a try in difficult situations.
Ghost-Busting
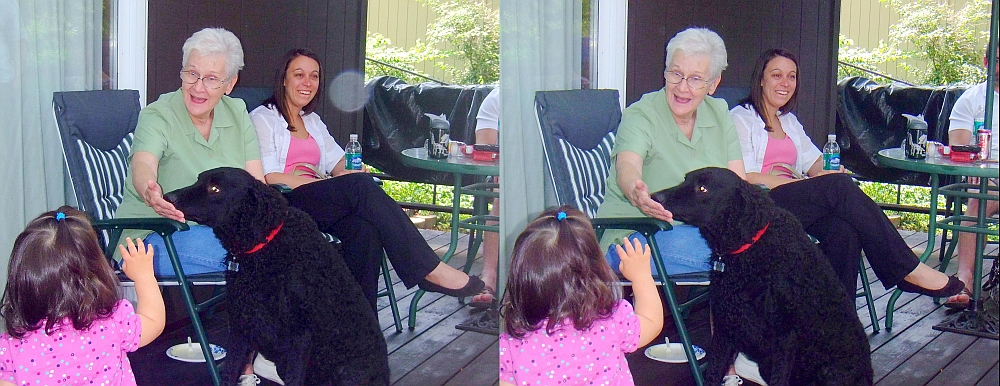
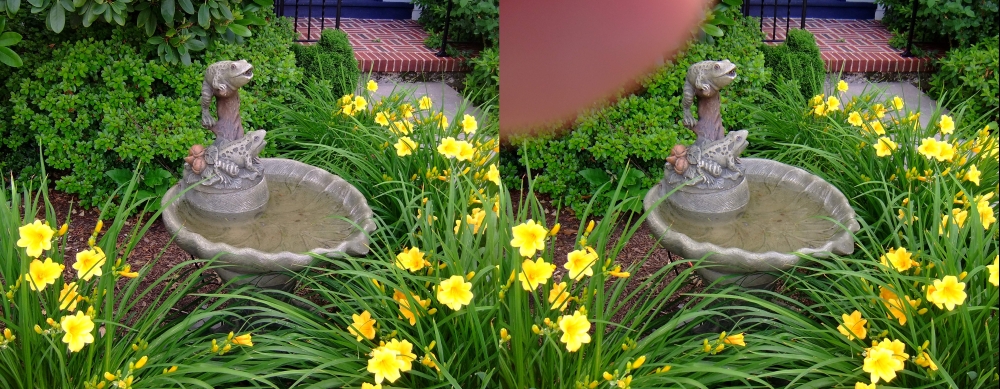
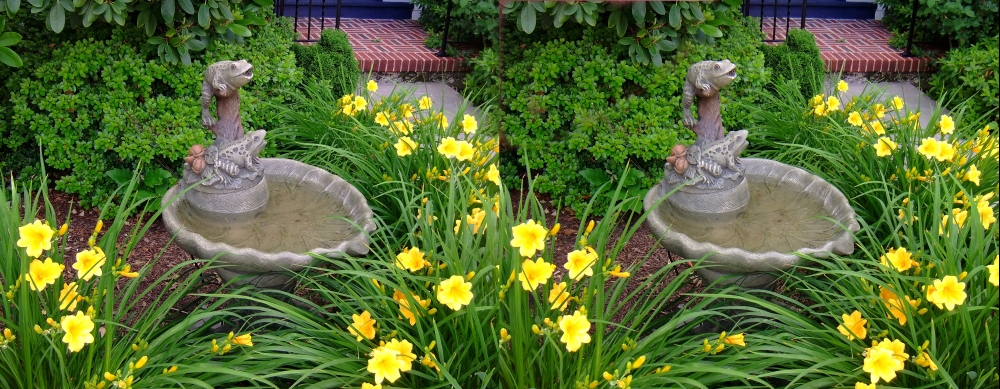
Here's a rather ordinary picture taken on a back porch during a family gathering. But what is that white floating circle just to the right of the lady's face? Why, it's an "orb" of course. How many times have you seen such artifacts in pictures on TV, websites, and books, along with the claim that they are some kind of "spirit manifestation". They can't be seen with the naked eye, so they must be something supernatural.
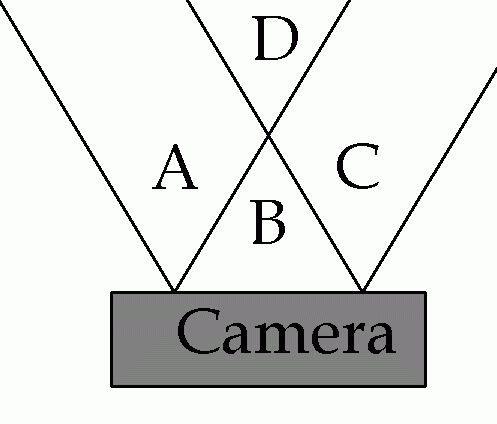 |
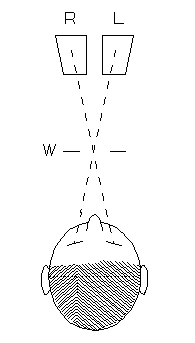
Don't believe it for a minute. They are caused by light (the camera's flash in this case) reflecting from dust particles, pollen, or droplets of fog very near the camera lens. But notice, the orb is only in one of the two pictures (the right eye picture) of the stereo pair. This is a dead give-away that this is no spook. Consider the diagram of the angles of view of the lenses. If a speck lies in region A or C it will be seen by only one lens. If it is in region B, niether lens will see it. If it is in region D it could be seen by both lenses, but would not be noticable for it would be subtend too small an angle.
The horizontal angle of view is about 45°, the orb diameter is about 6°.
In the days of film photography such artifacts were seen on flash photographs after they were developed, and gullible people interpreted them as ghosts, spirits, or even ectoplasm. I wonder at the modern "ghost hunters" who go into allegedly haunted places armed with high-tech equipment that they don't understand. Why don't they carry along a stereo camera, either still, or video? This could quickly rule out the artifacts that have a perfectly natural origin. But they probably don't want to do that, for it takes the mystery out of it. They don't want scientific facts; they want mysteries. If they were more knowledgable about physics and the use of instruments they'd be left with no mysteries at all.
Psychological trickery.
Close up photography in 2d or 3d suffers from limited depth of focus. Clever methods, such as image stacking, are sometimes used to artificially extend this depth, but they are tedious and exacting to do, though the results can be prize-winners. For the less dedicated, there are shortcuts.
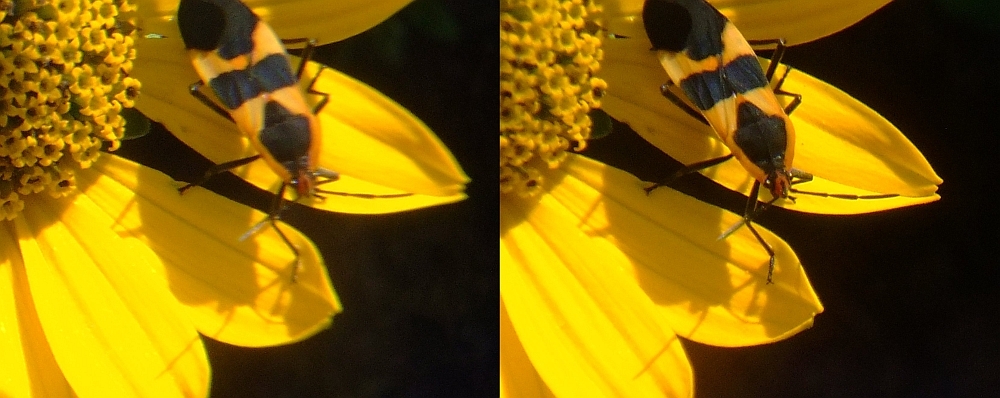
Here's a milkweed bug posing on a daisy. Note that in the left eye picture (on the right) the bug and petals are sharply focused, but the center of the daisy isn't. In the right eye picture (on the left) the center detail of the daisy is sharp, but the bug and petals aren't. When viewed in 3d, most people find everything sharp, with enhanced depth of focus. This psychological trick was used in the 50s in a fixed focus stereo camera (I can't remember the name of it). The two lenses were set fixed to focus at different distances, for greater apparent depth of focus. My picture was made the same way, with close-up lenses and my home-built prismatic adapter for 1 inch inter-ocular distance.
The brain fuses the left and right eye pictures, and if the two aren't equally sharp, the sharpest one dominates. This trick is also an option for people having cataract surgery. They can choose to have one eye implant lens for distant focus, and one for closer focus, giving a sensation of greater depth of focus. Implant lenses have no distance accomodation, so this can benefit some people. I have lens implants with that option.
![]() Input and suggestions are welcome at the address shown to the right.
Input and suggestions are welcome at the address shown to the right.
All stereo pictures on this page © 2010 by Donald E. Simanek.
Latest revision May 18, 2010.
Stereo pictures for cross-eyed viewing 3d Gallery One.
More cross-eyed stereos in 3d Gallery Two.
Stereo view cards in 3d Gallery Three.
Building a digital stereo close-up photography system in 3d Gallery Four.
Review of the Loreo stereo attachment 3d Gallery Five.
Review of the Loreo macro adapter, 3d Gallery Five B
The Loreo macro stereo attachment—improved 3d Gallery Five C.
The Loreo LIAC attachment as a 3d macro device, 3d Gallery Five D.
Wildlife photography in your backyard, 3d Gallery Six.
A home-built digital stereo camera using mirrors 3d Gallery Seven.
Stereo close-up photography in your garden 3d Gallery Eight.
Stereo photography in your aquarium 3d Gallery Nine.
Stereo digital infrared photography 3d Gallery Ten.
Wider angle stereo with the Loreo LIAC 3d Gallery ll. A failed experiment.
Review of the Fuji FinePix Real 3D W1 camera. 3d Gallery 12.
Macro attachment for the Fuji FinePix REAL 3D W1 camera. 3d gallery 13.
Panoramic stereo photography. 3d Gallery 14.
Tips for stereo photography with the Fuji 3d camera. 3d Gallery 15.
Mirror methods for stereo photography. 3d gallery 16.
The Fuji 3d macro adapter with flash! 3d gallery 17.
Wide angle stereo. 3d gallery 19.
Telephoto Stereo. 3d gallery 20.
2D to 3d Conversion. 3d gallery 21.
Stereos from outer space. 3d gallery 22.
Shifty methods for taking stereo pictures.
Guidelines for Stereo Composition.
Reverberant flash for shadowless lighting.
![]()
Input and suggestions are welcome at the address shown to the right.
Return to the the 3d and illusions page.
Return to Donald Simanek's front page.