Stereo digital infrared.
by Donald E. Simanek.
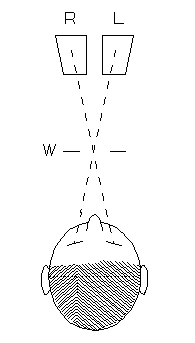
This page requires a monitor width of at least 1000 pixels in order to see both images for cross-eyed stereo viewing. Since the photos also have large vertical dimension, it helps to toggle the "full screen" view (F11 in Windows). However, if you haven't mastered that viewing method, these may also be appreciated as 2d flat photos. All are copyright by Donald Simanek.For instructions on free-viewing 3d by the cross eyed method, see the How to View 3D page.
Infrared Photography.
Our eyes see only a small portion of the spectrum of light. We do not perceive infrared or ultraviolet, but photographic films can, and so can digital camera sensors. Film photographers often used ultraviolet blocking filters to block UV that could record as blue on film. Infrared was not much of a problem for the films themselves weren't very sensitive to it. Special films were manufacturerd with enhanced infrared sensitivity for photographers who needed to record that portion of the spectrum. This was generally used in scientific and forensic applications. But pictorial photographers liked it for dramatic black and white pictures of scenery. Color infrared films were produced with the interesting feature that infrared was rendered as red, red as green, and green as blue. Blue was not recorded. These, too had both scientific and pictorial uses.
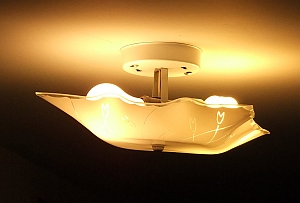
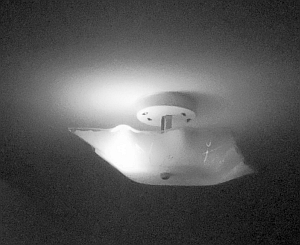
These two pictures illustrate the difference between visible (left) and infrared (right) recording of an overhead light fixture with two lamps, an incandescent lamp on the left and a compact fluorescent on the right. The illuminated spots on the ceiling show that the visible brightness of the two lamps is about the same. But in the b/w infrared photo the fluorescent shows only a faint glow. This shows that the fluorescent lamp is emitting very little energy in the infrared region of the spectrum. This is the reason they are much more efficient than incandescent bulbs.
The more expensive digital cameras generally have infrared-blocking filters (called "hot" mirrors) over their sensors. Some photographers who wish to photograph infrared will remove the filter (a job best left to a camera technician). But low-end, inexpensive cameras often omit the filter entirely, to keep costs down. This was especially the case a few years back, so if you have an old point and shoot inexpensive camera lying around, chances are good that it can photograph infrared.
You can find out by aiming the camera at the "invisible" infrared light from a television's remote control. If you see the flash of the light on the camera's LCD screen, the camera is at least somewhat infrared-sensitive. Choose a remote control that emits light that is really invisible to the naked eye. Some have an infrared light that emits red as well. If you can't see it flash with your naked eye, then it isn't emitting visible light.
But the camera sensor's sensitivity to visible light is so much greater than the IR sensitivity that you must block the visible light, or most of it. You can use the same filters that film photographers used for that purpose. Kodak Wratten 87, 87A, 87B or 87C filters are a good choice, but similar filters are made by other companies. Some photographers like the Hoya R72 (dark red) filter. It has a sharp cut-off at 720 nm wavelength, blocking frequencies below that. One can also used two linear polarizers with crossed axes as an IR filter. Some even have reported good results with a filter made from a frame of color photographic film that is unexposed and developed to opaque black. But none of these will produce good IR photos if the camera sensor is not "seeing" some of the near-infrared.
What can you expect from an infrared photo? Here's a comparison of a stereo scene in color, and the same scene with a very inexpensive digital camera and 87B filter, using the "Cha-Cha" shift method. This was hand held, and some unsharpness is evident. This camera will autoexpose using a very slow shutter speed, so it is better to use a tripod and slide-bar.
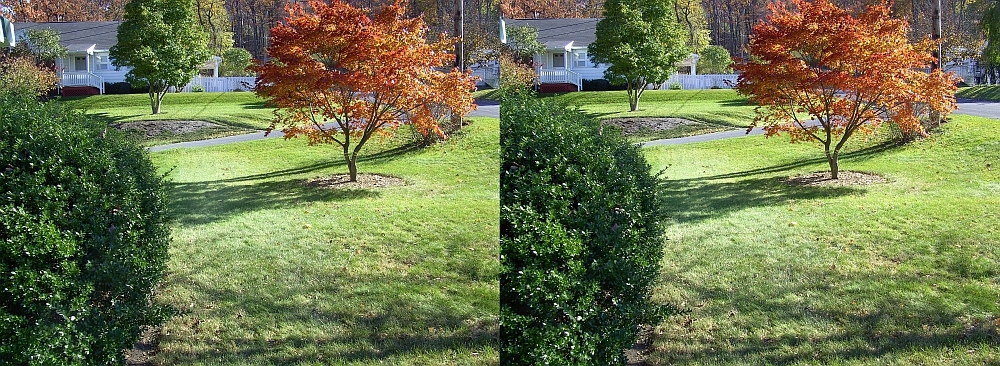
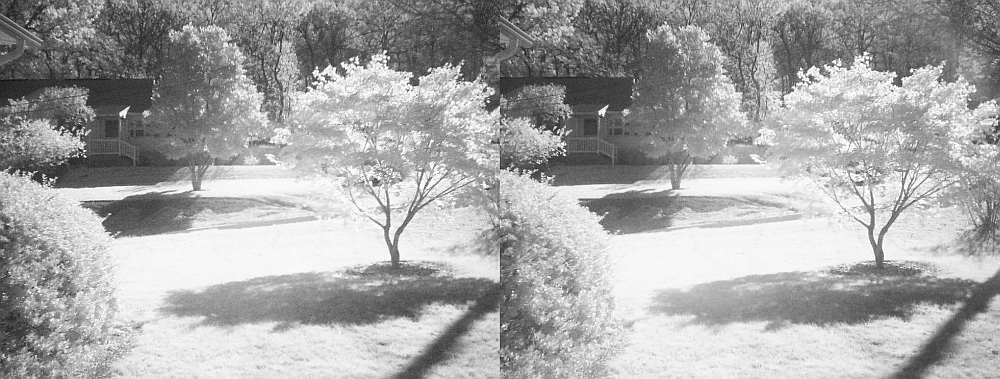
Green trees and grass generally emit strongly in the infrared. Even the bronze colored leaves of the ornamental Japanese maple do. Blue sky does not, and generally appears black in infrared, causing white clouds to stand out dramatically. Infrared films were generally contrasty. To achieve the same result with a digital camera, it helps to boost the contrast with your photo software. Photographs will often show some range of colors, which may be desirable pictorially, but for "classic" look, convert the picture to greyscale black/white.
The wavelength of infrared is longer than that of visible light, so it refracts differently by the camera lens. The picture may be slightly less sharply focused (depending on its method of autoexposure). Inexpensive digital cameras may not have manual focus adjustment, but they usually have small apertures with great depth of field, so the results may still be quite acceptable.
Since your eyes can't see infrared, you can't know how the picture looks in infrared until you see it on the camera preview screen, or on the computer screen. Expect to discard many pictures to get a few good ones.
The number of photographers who do infrared photography is small. The number of stereo photographers is also small. The number who do infrared stereo is still smaller.
Infrared is especially good for landscape photography. Not so good for portraits, unless you want garish results.
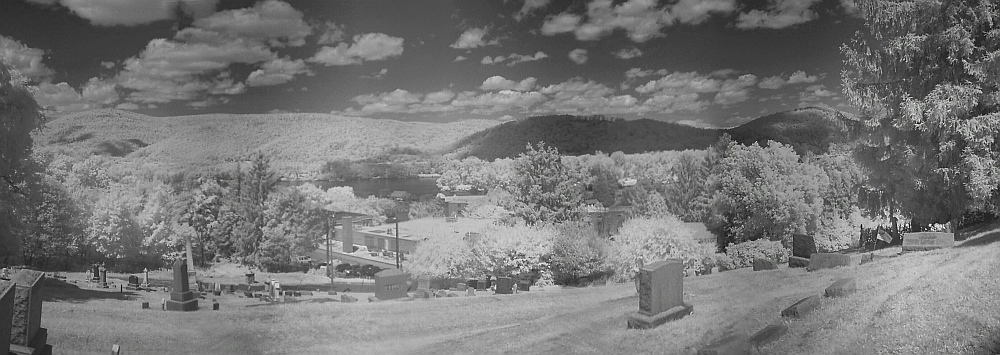
Wide angle panoramic infrared photography
Here's an example of infrared landscape photography. It is a panoramic stitched (with PanaVue software) from three separate photos overlooking Lock Haven, PA in August. The same inexpensive camera was used with 87B filter.
Infrared with the Fuji Finepix W-1 3d camera.
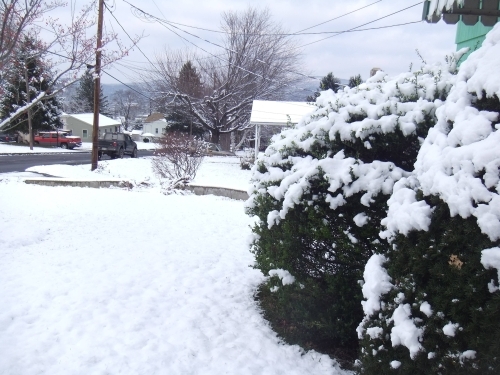 |
As we have seen, the most dramatic infrared pictures are those with green foliage, grass and trees, and blue skies with cumulous clouds. Unfortunately my Fuji 3d camera arrived in the fall season and I didn't get around to trying an infrared filter on it until the leaves had fallen and the snow had, too. Not ideal conditions for dramatic infrared pictures.
Here's a scene from our front yard, in color. Below is the same scene with 87b infrared filters (Wratten gelatin filters). I used the "night scene with tripod" setting of the Fuji 3d camera, which will take time exposures up to 3 seconds, and of course, I used a tripod.
The picture comes out with a mostly red tone. You can at this point convert it directly to grayscale, then boost gamma, contrast, and perhaps also brightness to simulate the old film infrared photos. Or you can remove the red entirely, and you will discover that the infrared light was also exposing the blue sensor pixels. Then convert to grayscale, etc.
Since there was no clear sky in this scene, we see no pictorial improvement there. The only green foliage was in the nearby yew and boxwood bushes at the right. They come out nearly as white as the snow, confirming that some infrared light is being picked up by the camera's sensors.
Some stray light is reflected in the filter at the left of the picture. The space between the filter and the lens must be light tight, and the filter rim should be black, not reflective.
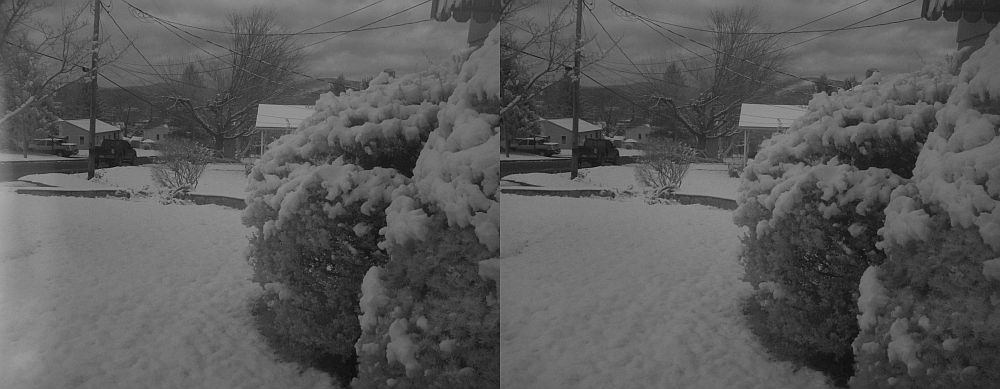
The results are not impressive. This experiment will have to wait for spring.
I finally ordered some decent IR filters, that block light below 720 nm wavelength. Here's the result.
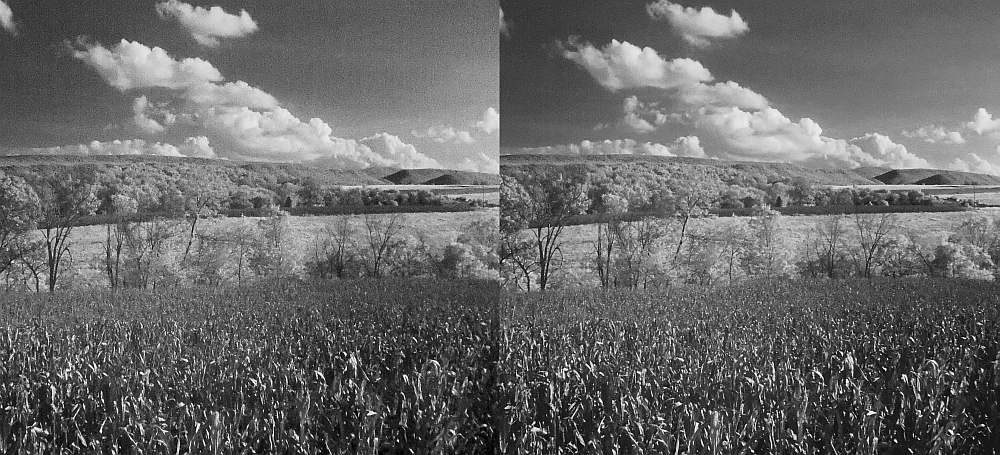
The original (color) stereo pair was color balanced, converted to black/white (with IrfanView), then color balanced again with SPM. Finally, using IrfanView, I boosted both gamma and contrast for a crisper look, reduced the size and sharpened the result for web page presentation.
An unmodified digital camera with IR filters in front will kick into a very slow shutter time (hence the need for tripod). It also kicks the camera into a high ISO setting, producing the most digital noise. This causes the "grainy" look in solid, featureless areas.
This graininess can be reduced in post processing using the "resample ON" toggle in StereoPhotoMaker, in the VIEW pulldown menu. It can make a dramatic improvement. It doesn't entirely remove the graininess, but makes it "finer" and more pleasing to the eye.
Similar graininess reduction occurs when you use the "sharpen" function in IrfanView, which is always a good idea after you have done a size reduction of the picture.
Portraits do not look good in infrared. Gardens and flowers can be a good subject.
The original (color) picture showed that the left picture was brighter than the right one. It could be that the Fuji camera's autoexposure system (which works through the left lens of the Fuji 3d) is the reason. Fortunately StereoPhotoMaker has an "adjust color balance" function which mostly corrects this imbalance. I used it on the original color pairs, and then again after converting to black/white (using IrfanView).
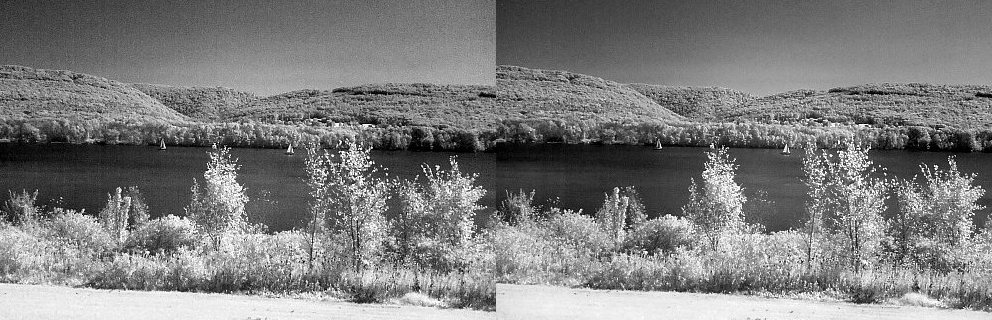
Sailboats at Bald Eagle State Park, Pennsylvania. In infrared green trees and grass are bright, sky and water are dark.
All pictures on this page © 2008 and 2011 by Donald E. Simanek.
More cross-eyed stereos in 3d Gallery One.
Still more, mostly taken with a digital camera in 3d Gallery Two.
Stereo view cards in 3d Gallery Three.
Home-built digital stereo macro camera attachment 3d Gallery Four.
Review of the Loreo stereo attachment 3d Gallery Five.
The Loreo stereo attachment—improved 3d Gallery Five C.
The Loreo LIAC attachment as a 3d macro device, 3d Gallery Five D.
Wildlife photography in your backyard 3d Gallery Six.
A home-built digital stereo camera using mirrors 3d Gallery Seven.
Stereo macro photography in your garden 3d Gallery Eight.
Stereo macro photography in your aquarium 3d Gallery Nine
Wider angle stereo with the Loreo LIAC 3d Gallery ll. A failed experiment.
Review of the Fuji FinePix Real 3D W1 camera 3d Gallery 12.
Macrophotography with the Fuji 3D camera. 3d Gallery13.
Panoramic stereo photography. 3d Gallery 14.
Tips for stereo photography with the Fuji 3d camera. 3d Gallery 15.
Mirror methods for stereo photography. 3d gallery 16.
The Fuji 3d macro adapter with flash! 3d gallery 17.
Critters in stereo. 3d gallery 18
Wide angle stereo. 3d gallery 19.
Telephoto Stereo. 3d gallery 20.
2D to 3d Conversion. 3d gallery 21.
Stereos from outer space. 3d gallery 22.
Review of the Panasonic Lumix 3d digital camera. 3d gallery 23.
Reverberant flash for shadowless lighting.
Digital stereo photography tricks and effects.
Shifty methods for taking stereo pictures.
Guidelines for Stereo Composition.
![]()
Input and suggestions are welcome at the address shown to the right.
Return to the the 3d and illusions page.
Return to Donald Simanek's front page.
—Donald E. Simanek