The Lumix 3D Stereo Camera.
This page requires a monitor width of at least 1000 pixels in order to see both images for cross-eyed stereo viewing. Since the photos also have large vertical dimension, it helps to toggle the "full screen" view (F11 in Windows). However, if you haven't mastered that viewing method, these pictures may also be appreciated as 2D flat photos. All stereos are © 2014 by Donald Simanek.For instructions on free-viewing 3d by the cross eyed method, see the How to View 3D page.
The Lumix 3D Digital Camera.
When the Panasonic Lumix DMC 3D-1 stereo camera hit the market a few years ago it struck me as something of a freak of photographic engineering. The most obvious feature that triggered skepticism was the fact that its stereo lenses were spaced only 30 mm apart—a bit over an inch. Yet it was being marketed as a general purpose 3D and 2D camera. Now it is not the only stereo camera to have small interlens spacing (compared to the human eyes). The Horseman camera comes to mind, as does the Realist macro stereo camera. But the latter was marketed as a macro camera, for close-up stereo of small subjects, and nothing more. It was marketed to scientists and teachers of science.At its initial price of something like $600 I was not curious enough about the Lumix stereo camera to acquire one. Now, as production has ceased and supplies are limited, the Japanese version of the camera began selling for a bit over $200. I was willing to take a chance that this might have some usefulness as a stereo macro camera. I didn't expect it would be good for much else in my arsenal of stereo cameras.
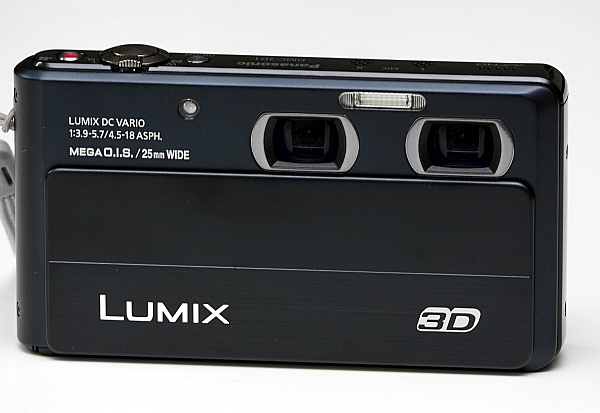 |
| The Lumix stereo camera. |
|---|
First impressions: The camera is smaller and lighter than the Fuji W1/W3, and solidly built. Its size is only 4 x 2¼ x 1 inch. The lenses are spaced 1 3/16 inch apart (30 mm). It has built-in flash, but located between and so close to the lenses that I judged it to be of little or no use to me, sure to produce the dreaded "stereo shadow".
The instruction manual is in Japanese. Some of the menu icons on the touch screen are also. An English instruction manual is available for $6 online. The most used touch screen icons are obvious in meaning, so those of us who don't read Japanese can use the camera without much difficulty.
The camera has optical telephoto, from normal (wide) to 4x (telephoto), its control conveniently located around the shutter button. The viewing screen is 2D only, but is large and bright. A plastic tripod screw is located offside, rather than below the lenses. The camera comes with a compact battery charger, requiring the removal of the battery from the camera during charging. As usual, a camera wrist strap is included.
Stereo images are recorded in MPO format (the same as the Fuji 3D cameras) and a JPG is also simultaneously recorded separately. There does not seem to be any option to turn off the redundant recording of the JPG, but those images can be ignored, or erased later.
I don't take stereo movies, but this camera has that capability. I'm told the recording format of these movies is a bit strange, but StereoMovieMaker can deal with it.
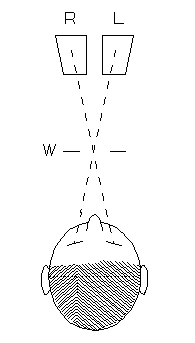
Just above the two stereo lenses are two stereo microphones, labeled L and R, just 0.4 inch apart! Whatever were the designers and engineers thinking? There's no way this small separation will give true stereo sound recording. More and more I'm convinced that camera designers just throw together off-the-shelf modular components into an attractive package, then turn it over to clueless marketers and hope some people will be gullible enough to buy it.
Versatility. The camera also takes 2d pictures, and in that mode it has the usual range of choices for manually altering focus, shutter, white balance, scene types, etc. None of those are available in 3D mode. In 3d mode the camera is strictly "automatic", making all decisions about focus, shutter, white balance, etc., with no manual over-ride. You do have the ability to focus on whatever object you want by holding the shutter halfway down before finally composing and taking the picture. I find the automatic choices have been "right on" in most cases, and slight deficiencies of exposure or color balance can be easily corrected later, with computer software.
The Lumix 3D as a close-up stereo camera.
The stereographer's rule is that the nearest object in the scene should be no closer than 30 times the lens separation. With a "normal" stereo camera with lenses 2.5 inches apart, that means that nothing closer than 75 inches (roughly 6 feet) should be in the scene. Objects beyond about 30 feet have paralax too small for stereo.The lumix lenses are separated by about 1 inch. So nothing closer than 30 inches (roughly 1 yard) should be included in the scene. Objects beyond about 10 feet show no stereo depth. So the good stereo range of the Lumix is roughly 2.5 to 10 feet. Good for portraits. small groups, children, flowers and small animals.
I've built many macro stereo adapters for cameras. The most useful ones have effective inter-lens spacing of about 1 inch or less. I've used commercial adapters such as the Loreo macro stereo adapter, which also has effective spacing of one inch. That's just what the Lumix 3D camera does with much less bother.
Comparison with the Loreo Macro lens. The Loreo is a beam splitter that records stereo on the sensor of an SLR camera, with images side by side. A fuzzy, unusable region separates the images. While the camera's auto-exposure works with this lens, the lens' aperture settings are limited and manual. Autofocus does not function, so focus is also manual (on the lens). The Lumix 3D has automatic exposure and focus that function reliably.
Comparison with my homebuilt devices. My image splitters for digital SLR cameras have the same limitations as the Loreo macro lens, with the additional limitation of the front tube and the aperture mask that is required. Also, they are necessarily bulky and the prismatic and mirror adapters add considerable weight.
The Lumix has a normal, rather wide, field of view. My devices all had field of view reduced by about 1/2 normal width.
My devices had no automatic focus. The Lumix does.
The bottom line is that my own macro stereo devices no longer travel with me. The Lumix 3D does nearly all I need for close up photography without the bulk. My own devices still have some uses in and near home. Of course, for medium distance and scenics I still use my Fuji 3D cameras.
 |
This picture of a honeybee is pushing the limit of the Lumix range. It was taken in available daylight, hand held, wide angle, with no supplementary lenses. The image has been cropped, and some gamma correction applied. The depth is extreme, but with cross-viewing you can get away with some of that. It might not be comfortable to view it with parallel viewing methods.
Use the Telephoto.
My other web pages often suggest that close-up stereo can benefit from using telephoto at 3x or 4x. This allows a subject to appear larger, as if the camera were closer, and it decreases the exaggerated depth in the subject due to convergence. It is far more convenient than use of a supplementary close-up lens (but can also be used with such lenses—see next section). The same is true for the Lumix 3D.
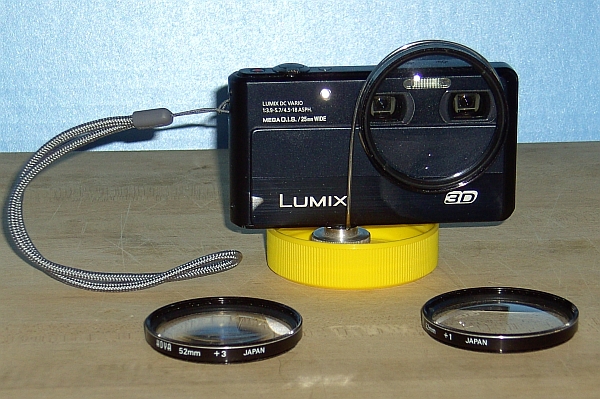 |
| Adapter for close-up lenses. |
|---|
Use of Close-Up Lenses.
I have described the use of a single positive close-up lens in front of both stereo lenses. It allows focusing at closer distances. One advantage/drawback is that it introduces effective axis convergence of the lenses. The Lumix lenses will autofocus with a close-up lens. But a warning "no 3D" icon appears. The camera will take the picture anyway.
 |
| One-lens macro. |
|---|
The instruction manual says that at its wide angle setting the camera focuses from 50 cm (1.64 ft) to infinity. At telephoto setting, from 1 meter (3.28 ft) to ifinity. I find these values conservative. My Lumix camera auto-focuses as close as 5 inches in its wide setting and 14 inches in telephoto.
Here's where the supplementary lens demonstrates its value, for it produces enough convergence to achieve stereo pictures at close distances with less cropping. Here's the results of crude testing:
|
The values in the table are approximate because they are difficult to measure with the camera's autofocus always "on".
The value of the telephoto setting is twofold. It gives a result that is more comfortable to view by compressing the stereo depth of the subject. It increases the overlap area of the two lens images. For a subject of size (width) S, you would, using 4x telephoto, move the camera 4 times as far from your subject to preserve the same size image on the picture.
However, the advantage of the supplementary lenses is not great. They allow you to achieve the same size image at closer distances, thereby increasing stereo depth. They preserve stereo image overlap at these closer distances at the expense of keystone distortion. With a +2 diopter lens the distortion is usually acceptable if you take care to avoid distracting detail near the edges of the picture frame. Also avoid excessive depth of the subject.
These small cameras do not provide convenient attachment points for accessories. I fashioned a 52 mm lens holder from some strong, stiff, steel wire and attached it at the tripod screw. Epoxy holds the filter ring to the wire. I removed the filter from a 52mm ring, and that provided the threads to attach supplementary lenses. 52mm is barely large enough to cover both lenses, but edge vignetting is slight and may be cropped off. It is not an issue with telephoto. I had the 52 mm lenses on hand, which dictated my choice.
Polarizers. The adapter ring attachemt is also useful for mounting a single polarizing filter. This can be useful when photographing subjects with very reflective surfaces.
Closer without accessories. I mentioned that the Lumix can focus at very small distances, and, while the camera's computer warns you that this is not desirable for 3D, the camera does function in 3D at those distances. The reason the camera "complains" is that the resulting picture has side regions where there's no overlap of the L/R images, hence no stereo. This is not necessarily "fatal" to the picture. When you take such pictures, frame them so your subject is in the right 2/3 of the screen, anticipating that you will crop off the left third. What you see on the LCD screen is only the left lens picture. The subject should then lie in the left 2/3 of the image from the right lens, and its right third will be cropped, for a square stereo picture result.
You will still need to compose to minimize picture elements that might show distracting keystoning due to convergence. It is still best, for subjects no closer than 17 inches, to use the telephoto setting to allow you to be farther from the subject, with smaller convergence and less cropping.
Flash.
The camera's built-in flash is too close to the lenses to be useful for direct illumination of a stereo subject. It can be used as a trigger for external slave flash units, but with the camera's good available light performance of the camera I have had little need for flash, even indoors.Outdoors, the camera's flash is useful when used as "fill flash", to lighten shadow areas.
However... There's a trick for using slave flash units while blocking the in-camera flash from illuminating the subject. Cover the flash window with a small filter that transmits infrared and visible light. The infrared is sufficient to trigger the slave flash, but will not be recorded by the camera. A chip of gelatin infrared filter used be used for this purpose. A small chip of unexposed and developed photograph film is a handy alternative. If you have none of these, two pieces of filter material cut from 3D movie glasses can be placed together, oriented to block visible light.
I have tested this with crossed polarizers, and it does work. However, the output of my small and inexpensive Neewer ™ slave flash overpowers the camera, overexposing the subject. I had to mask the face of the flash gun with a card with two 1/4 inch holes punched in it to reduce the light output. I aimed the flash away from the camera and the subject to give the effect of "open flash". Back in the days of film photography this method was used for "natural" appearing subject lighting. The flash bulb was fired without its reflector, filling the room with light scattered from ceiling and walls, illuminating the scene from all directions. This totally eliminates any possiblity of the annoying "stereo shadow". The speed of light is so great that the light scatters from everything in the room many times while the camera shutter is open.
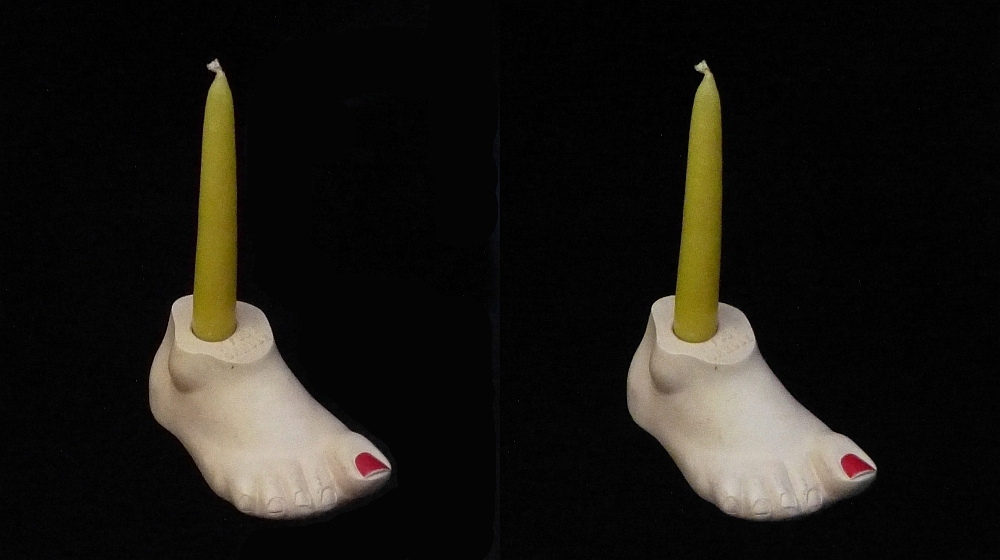
This picture illustrates the importance of backgrounds in stereo photography. The black plush cloth makes the subject appear to be floating in space. This is not necessarily desirable. (Now that metric units are standard in science and industry, these foot-candles are very rare.)
Reverberent flash.
A solution to the indoor flash problem is an old photography trick. Divert the camera's small flash upward, so it doesn't reach the subject directly, but scatters all around the room. This gives nearly shadowless lighting on subjects close to the camera, and useful shadow fill illumination for more distant subjects. The speed of light is so great that the light scatters from ceiling, walls and everything else in the room before reaching the subject, all within the interval of the shortest shutter speed.
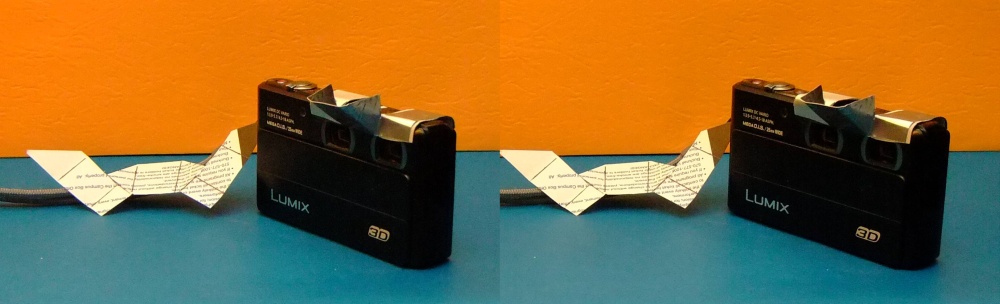
Here's the Lumix fitted with a thin aluminum reflector cut from a peanut can lid. The paper template on the left shows the shape of the reflector before bending. The two extensions of the aluminum wrap over and to the back of the camera to hold it in place. A plastic tape is applied to the inside of these to prevent scratching the camera body or the viewing screen.
This trick also eliminates the dreaded "stereo shadow" on nearby backgrounds that results from flash originating between or very near the stereo lenses.
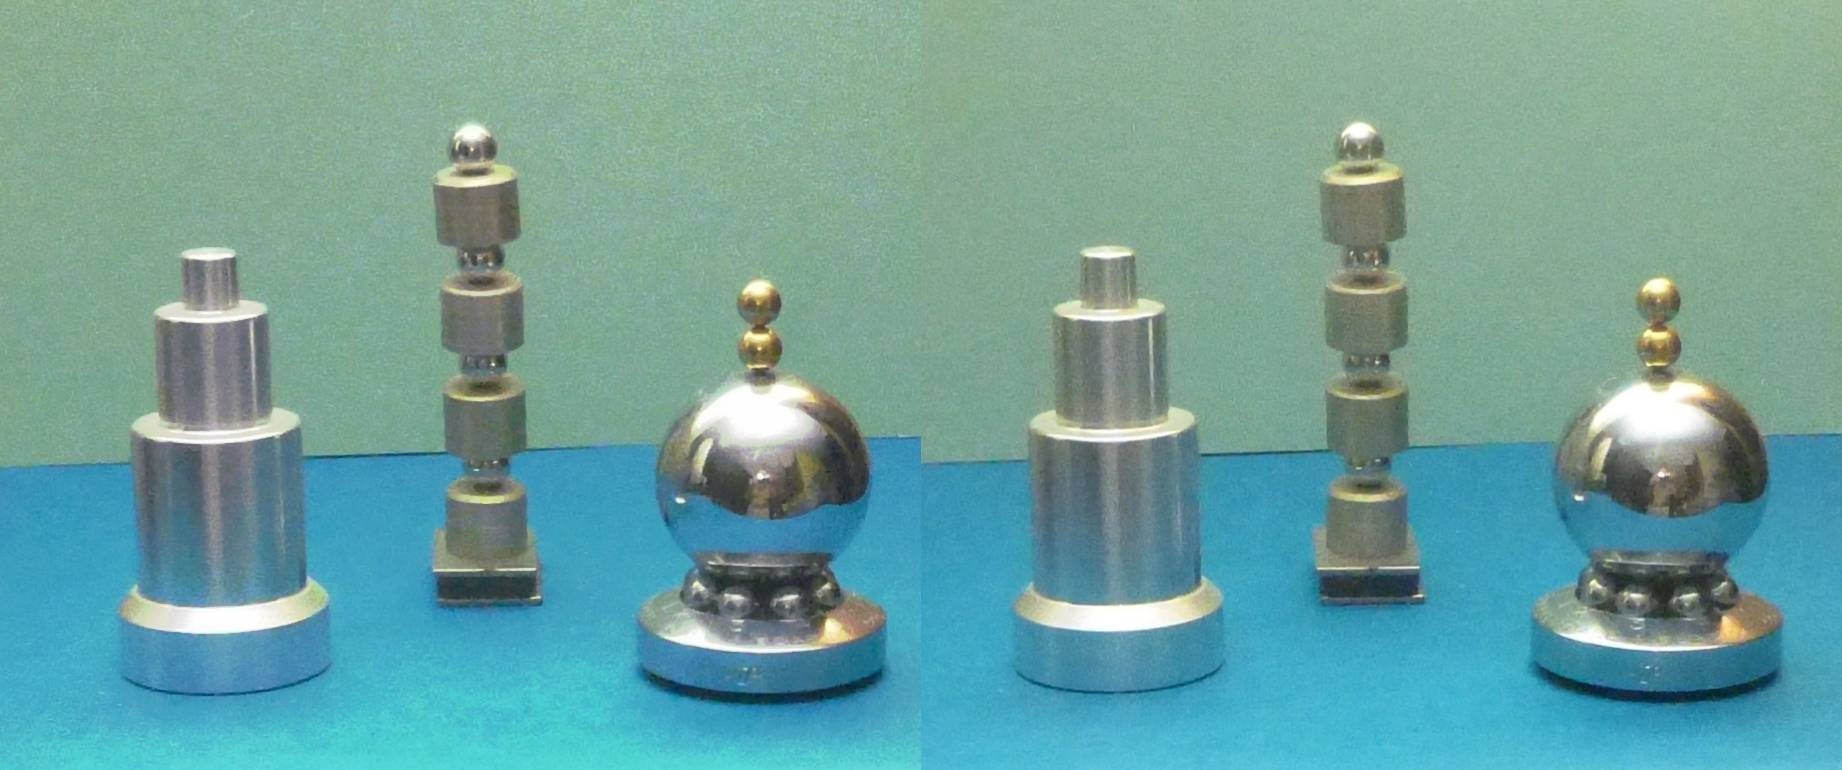
These metal objects were photographed using the Lumix camera's flash diverted upward with the aluminum reflector. The flash autoexposure function calculated the exposure perfectly. The illumination is nearly shadowless, and there are no annoying reflections from the shiny metal surfaces. The object at the left has cylinders of diameter 1, 2, and 3 cm. Telephoto setting 2X.
Result samples.

This parrot was photographed at a pet store with available light.

Photo taken at a garden shop greenhouse with available light. The gnomes are about 4 inches tall.

Even in February your local garden shop is a convenient place for taking pictures of flowers. Normal lens setting.

"What, me munching on your flowers?" This is the sort of subject ideally suited to the 1 inch lens separation of the Lumix 3d. No accessories or attachments were used, just the lightweight pocket sized Lumix stereo camera.

Gears of an old tower clock mechanism.

These "wire-nuts" were photographed with a +2 diopter close-up lens. The yellow ones are one inch long.
Advantages and Disadvantages.
Advantages:
- Small and lightweight. Solid construction.
- Good available light performance. Good colors and light balance. You may have no need for flash indoors.
- I'm impressed with the quality of the lenses.
- Nearly parallel lens axes ensure that background objects never have excessive parallax.
- Large and bright LCD viewing screen. It is not a 3D display; it sees only the left eye image.
- Sliding lens cover turns camera on/off. There's also an over-ride on/off button.
- Autofocus and auto-exposure work well.
- Wide view to optical telephoto 4x. Very handy.
- Autofocus functions at even closer distances than the instruction manual suggests.
- Stereo images are MPO format, easily processed with StereoPhotoMaker. (Same format as Fuji 3D cameras.)
- The camera will take 3D movies. (I have not tested this.)
- Can be used with close-up lenses for macro photography. Auto functions still function properly.
- Some screen menu captions are in Japanese. No English option. (English manual available for $6 online.) Not serious, IMOP.
- Interlens spacing is too small for robust stereo at mid and large distances.
- The LCD screen display is only 2D. But it is bright and sharp.
- Flash in camera of little use for 3D (too close to lenses, and between them). (However, with reflector diverted reverberant flash (see above) it is very useful.
- 3D features are more limited than 2D options. In 3D mode, focus, aperture and shutter are automatic only.
- When current supplies of the Japanese version are exhausted, no more are expected.
- Must be removed from tripod to access the battery and memory card. Typical of these small digital cameras.
- Warranty only valid in Japan.
All stereo photos on this page © 2014 by Donald E. Simanek.
More cross-eyed stereos in 3d Gallery One.
Still more cross-eyed stereos in 3d gallery Two.
Antique stereo view cards in 3d Gallery Three.
Building a digital stereo close-up photography system in 3d Gallery Four.
Review of the Loreo stereo attachment 3d Gallery Five.
Review of the Loreo macro adapter, 3d Gallery Five B
The Loreo stereo attachment—improved 3d Gallery Five C.
The Loreo LIAC attachment as a 3d macro device, 3d Gallery Five D.
Wildlife photography in your backyard, 3d Gallery Six.
A home-built digital stereo camera using mirrors 3d Gallery Seven.
Stereo close-up photography in your garden 3d Gallery Eight.
Stereo photography in your aquarium 3d Gallery Nine.
Stereo digital infrared photography 3d Gallery Ten.
Wider angle stereo with the Loreo LIAC 3d Gallery ll. A failed experiment.
Review of the Fuji FinePix Real 3D W1 camera 3d Gallery 12.
Macrophotography with the Fuji 3D camera. 3d Gallery13.
Panoramic stereo photography. 3d Gallery 14.
Tips for stereo photography with the Fuji 3d camera. 3d Gallery 15.
The Fuji 3d macro adapter with flash! 3d gallery 17.
Critters in stereo. 3d gallery 18
Wide angle stereo. 3d gallery 19.
Telephoto Stereo. 3d gallery 20.
2D to 3d Conversion. 3d gallery 21.
Stereos from outer space. 3d gallery 22.
Digital stereo photography tricks and effects.
Shifty methods for taking stereo pictures.
Reverberant flash for shadowless lighting.
Digital stereo photography tricks and effects.
Guidelines for Stereo Composition.
![]()
Input and suggestions are welcome at the address shown to the right.
Return to the the 3d and illusions page.
Return to Donald Simanek's front page.