Reverberant flash.
by Donald E. Simanek.
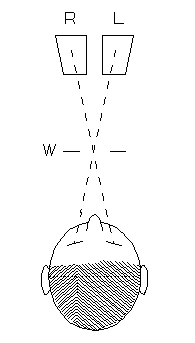
Some pictures on this page require a monitor width of at least 1000 pixels in order to see both images for cross-eyed stereo viewing. Since the photos also have large vertical dimension, it helps to toggle the "full screen" view (F11 in Windows). However, if you haven't mastered the cross-viewing method, these may also be appreciated as 2d flat photos. All are copyright by Donald Simanek.For instructions on free-viewing 3d by the cross eyed method, see the How to View 3D page.
Some history.
Some readers may not remember the days of film photography. Modern digital cameras are nice, but most do not have features we used to take for granted. Many more people take pictures today, but most are not photographers. They aim and click with no attention to composition, light and shadows.Every camera today has built-in flash, usually very close to the camera lens(es), with no control over its position.
Photographers used to use "flash guns", some of which had cords allowing them to be moved at arms length from the camera, controlling the location of shadows. Some used multiple flash units at different locations with control over their relative intensity.
Even more versatility was possible with reverberant flash:
- Ceiling flash. Aim the flash unit to the ceiling, so the subject receives scattered light from many directions overhead. The subject lighting is "soft", nearly shadowless.
- Bare bulb flash. Remove the flash reflector entirely, so the light from the flashbulb goes in all directions, reflecting and scattering from walls, ceiling, and anything else in the room many times before some of it reaches the camera lens.
But here's the problem. Those little flash units built into cameras are located very near the camera lens, producing "flat" lighting of the subject, and a dark shadow on one side of the subject on walls or other objects behind the subject. This is generally distracting and ugly. Stereo cameras have flash between the lenses, so the L and R pictures show the shadow on opposite sides of the subject. This is even more distracting, for the brain can't place those shadow's location in space. Each eye sees a different shadow.
There are wireless remote flash units, triggered by the camera's flash and overpowering it. But that is an extra piece of equipment to carry with you, and it requires batteries.
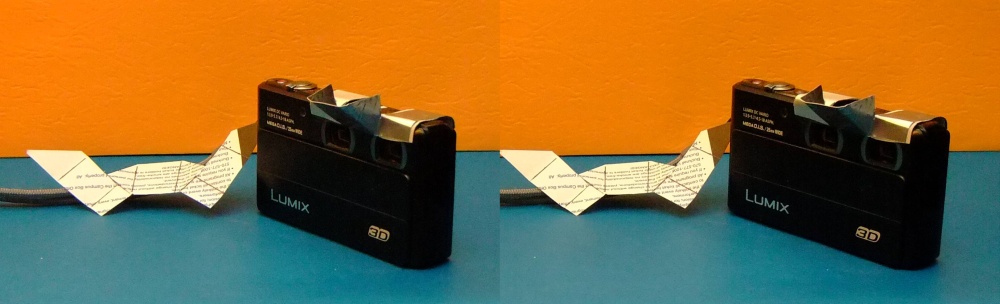
Could we redirect the camera's own flash so it doesn't fall directly on the subject? A simple, small, reflector in front of the flash window could direct flash light to the ceiling. Manufactures didn't make that easy for us. There's no provision for attaching anything in front of the flash window. Whatever you attach to the camera that closely might scatter light back into the lens(es).
I like simple and inexpensive solutions to such problems. My flash reflectors make use of very thin aluminum from peanut can lids. Not the thin paper ones, but the solid, stiff metal ones, easily cut with tin shears.
Every camera presents its own problems. I suggest experimenting with heavy white paper until you have a working template. Paper does fine as a reflector, but isn't sturdy enough for regular use.
The reflector should not let any flash light light reach the subject directly, and should not let any light reach the camera lens directly. Pay attention to the possibility of light leakage where the reflector edges contact the camera body.
This technique is especially useful for close-up stereo photography. The Lumix stereo camera has lenses spaced about 1 inch apart. With this camera and a flash redirector this work can be done in a small space indoors with no additional equipment. It gives uniformly pleasing results. The camera's auotomatic exposure system ensures correct exposures evey time.
If manufacturers wanted to they could engineer an internal flash unit with a movable internal mask that could direct the flash light forward, or upward at any chosen angle. Wouldn't that be handy? The extra cost would be insignificant.
The Fuji stereo cameras have sliding front covers. There's enough space between the open cover and the camera body to slide a thin card or thin metal behind the door to anchor the reflector. I advise facing the metal back side with soft plastic or cloth tape to avoid scratching the camera body.
The Lumix has internal mechanism under the sliding door that prevents this method of attachment. I designed my Lumix adapter with two arms folding over the top of the camera to hold it in place. Again, use plastic tape backing to protect the camera's finish.
These reflectors are unlikely to be used outdoors so they needn't be very securely mounted.